
Related Manuals for The Singing Machine FIESTA


Summary of Contents for The Singing Machine FIESTA
- Page 1 SDL9037 FIESTA INSTRUCTION MANUAL www.singingmachine.com The Singing Machine® is a registered trademark of The Singing Machine Co., Inc.
-
Page 2: Important Safety Instructions
Warnings WARNING: TO PREVENT FIRE OR SHOCK HAZARD, DO NOT EXPOSE CAUTION THIS UNIT TO RAIN OR MOISTURE. RISK OF ELECTRIC SHOCK FCC WARNING: This equipment may generate or use radio frequency DO NOT OPEN energy. Changes or modifications to this equipment may cause harmful interference unless the modifications are expressly approved in the CAUTION: TO REDUCE THE RISK OF ELECTRIC SHOCK, DO NOT instruction manual. - Page 3 Included Please make sure the following items are included. Wired Interactive Microphone Main Unit Wired Microphone AC Adapter HDMI Cable Manual Singing Machine Flash Drive — 2 —...
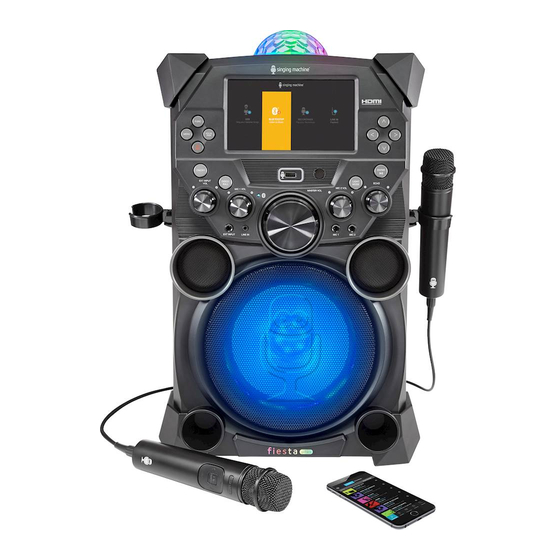
- Page 4 Location of Controls (Top/Front) 1. Disco Ball 17. USB Slot 2. MENU Button 18. Navigation LEFT Button 3. FUNCTION (Monitor ON/OFF) Button 19. Navigation UP 5 Button 4. VOCAL/PAIR Button 20. Navigation RIGHT Button 5. ON/OFF Button 21. ENTER/ Button 6.
-
Page 5: Location Of Controls (Rear)
Location of Controls (Rear) 1. Adjustable Handle 4. Handle Release 2. DC IN Jack 5. HDMI Jack 3. Wheels — 4 —... - Page 6 Location of Controls (Microphones) Interactive Microphone Standard Microphone 1. Mic ON/OFF Switch 4. ENTER/ Button 2. MENU Button 5. Remote Transmitter (Rear) 1. Right Tower Speaker Jack 4. HDMI Jack 3. Navigation Buttons 6. Battery Compartment (Rear) 2. Left Tower Speaker Jack 5.
- Page 7 Connection Connecting the Microphone(s) Microphones: Connect a microphone into Mic jack 1 u and the other microphone into Mic jack 2 v (if desired). Note: Do not drop or tap the Mic as damage to the Mic or speakers may occur. Do not twirl the microphone by cord as it will cause damage to the encased wiring.
- Page 8 Connection Connecting to AC Power Insert the AC power cord into a conveniently located AC outlet having 120V AC, 60Hz. Note: Make all connections before connecting to AC power. Changing the Interactive Microphone’s Battery When performance suffers, change the batteries as follows: Unscrew the Battery Compartment screw and remove the door.
-
Page 9: Rechargeable Battery
Rechargeable Battery This unit comes with a built-in rechargeable battey pack that will allow the unit to be used without being connected to AC power. The Battery indicator (top right of the display) will show the battery charge left indicated by the amount of bars. The rechargeable battery pack must NOT to be replaced by the user. -
Page 10: Singing Machine Usb Flash Drive
Flash Drive, which is used for storing Karaoke songs as well as recordings from this unit. There are two songs included on the Singing Machine USB Flash Drive, but you can access the Karaoke Store for many more songs. Just follow the Welcome... - Page 11 The Karaoke Store application can be installed on Microsoft Windows computers running Vista, Windows 7, and Windows 8 or higher. The Karaoke Store application requires connection to the Internet (a high-speed connection is recommended). Insert the Singing Machine USB Flash Drive into a powered USB slot on your computer.
- Page 12 The Karaoke Store application can be installed on Apple Macintosh computers running OS X 10.8 and higher. The Karaoke Store application requires connection to the Internet (a high- speed connection is recommended). Insert the Singing Machine USB Flash Drive into a powered USB slot on your computer.
- Page 13 Operation Microphone Remote Operation The Microphone is also a remote control that can be used to control the unit. See below for instructions on using the Microphone Remote. It is very important to point the remote’s sensor at the unit’s remote sensor (see illustration). This Microphone Remote’s buttons will operate the same way as the main unit’s ENTER, Navigation and MENU buttons.
- Page 14 Operation Light Mode There are four Light modes. Repeatedly press the LIGHT MODE button to select a mode as follows: Light Mode 1: The unit will light up with random colors and patterns. Light Modes 2 and 3: The unit will synchronize to the music being played or the live singing performance.
- Page 15 USB plug. Insert it into the USB slot on the unit so it faces upward. Note: The Singing Machine flash drive has an 8 GB capacity (the actual capacity may vary slightly). The USB mode will be selected by default;...
- Page 16 Operation Playing Songs from the USB (Continued) Use the Navigation 5 Up and Down buttons to navigate through the list of songs that you have previously downloaded on your USB. Press the ENTER button to start the playback. The HD karaoke video will play on the screen.
- Page 17 Operation Playing Songs from the USB (Continued) VOCAL: To sing with the lead singer on the recording, press the VOCAL/PAIR button; “ ” will appear at the top right of the monitor. To listen to music only, press the VOCAL/PAIR button again;...
- Page 18 Operation Playing Songs from the USB (Continued) RECORDING YOUR SINGING: To record your singing as well as the music, press the RECORD button; recording will begin and the record icon at the top right corner of the monitor will blink red. When done recording, press the RECORD button again;...
- Page 19 Operation Playing Songs from the USB (Continued) SEARCHING BY GENRE, ARTIST or TITLE: To filter by Genre, Artist or Title, select the Genre, Artist, or Title using the Navigation Left and Right buttons, then press the ENTER button. The alphabet will appear at the bottom of the screen;...
- Page 20 Operation Playing Songs from the USB (Continued) USING THE PLAYLIST: To play your previously created playlist, select Playlist using the Navigation Right and Left buttons, then press the ENTER button; the row under Playlist will be highlighted. Select the desired selection using the Navigation ...
-
Page 21: Operation
Operation Playing Songs from the USB (Continued) CREATING FAVORITES: To create a favorite playlist, select a song using the Navigation 5 Up and Down buttons, then scroll to the Favorite column using the Navigation Right or Left button. Press the ENTER button to confirm the operation;... - Page 22 Operation Using a Bluetooth Device Connect the unit as described previously. Press the ON/OFF button to turn the unit on. Press the Navigation Right or Left button to select the Bluetooth mode, then press the ENTER button. You can also repeatedly press the FUNCTION button to select the Bluetooth mode.
- Page 23 Note: You can view the lyrics on your mobile device/tablet and get more songs by downloading the “The Singing Machine Mobile Karaoke App”; refer to the Welcome Kit for full app download instructions and to get your free song downloads.
- Page 24 Operation Using a Bluetooth Device (Continued) RECORD YOUR VOCAL PERFORMANCE: To record your singing as well as the music, press the RECORD button. Recording will begin and the record icon at the bottom right corner of the monitor will blink red and blue.
- Page 25 Operation Playing Songs from the Recorded Files Connect the unit as described previously. Press the ON/OFF button to turn the unit on. Press the Navigation Right or Left button to select the Recordings mode and press the ENTER button to continue.
- Page 26 Operation Playing Songs from the Recorded Files (Continued) You can sing along with your previously recorded song. Simply connect the microphone(s) as shown on page 6. Slide the Mic’s ON/OFF switch to the ON position. Adjust the MIC VOLUME control as desired.
- Page 27 Operation Using the LINE IN Jack Connect an external unit to the LINE IN jack. Press the ON/OFF button to turn the unit on. Connect the external unit to the LINE IN Jack on the front of this unit. Connecting an external unit will allow the audio to be played through your Singing Machine.
- Page 28 Operation Using the LINE IN Jack (Continued) Adjust the MIC VOLUME 1 or 2 control as desired. Increasing this will increase the volume of the respective microphone. Rotate the ECHO control to add an echo effect to your voice. Rotate towards MAX to increase the echo effect.
- Page 29 Operation Using the EXTERNAL INPUT Jack Connect the unit as described previously. Press the ON/OFF button to turn the unit on. Connect the external unit to the EXTERNAL INPUT Jack on the front of this unit. Connecting an external unit will allow the audio and video to be played through your Singing Machine.
-
Page 30: Troubleshooting Guide
Troubleshooting Guide Should this unit exhibit a problem, check the following before seeking service: No Power • Power is not on; press the ON/OFF button to turn power on. • Make sure the unit is connected to AC power. • Confirm the AC adapter is connected securely to the back of the unit •... -
Page 31: Updating The Firmware
2. Download the latest software (e.g xxxxxx.img) from www.singingmachine.com/ softwareupdates and save it into this folder. 3. Plug the Singing Machine USB Flash Drive into the USB jack on the unit and turn the unit on. 4. The unit will update automatically. -
Page 32: Specifications
Specifications AUDIO Output Power (Tweeters) ..............5 Watts (RMS) 8 Ohms (2) Output Power (Full range) ................ 30 Watts (RMS) 4 Ohms BLUETOOTH Bluetooth Version ........................V2.1 + EDR Working Distance ...........Up to 30 feet/10 meters measured in open space RECORDED FILE MP3 Encoding ..........................128kbps USB AND SD Format ..............................FAT32... - Page 33 Visit Our Website: www.singingmachine.com The Singing Machine Company, Inc. 4060 E Jurupa Street, Unit B Ontario, CA 91761-1413 USA PRINTED IN CHINA 9037-1605-ENG01...
Need help?
Do you have a question about the FIESTA and is the answer not in the manual?
Questions and answers