
Related Manuals for Barrett BH8 Series

Summary of Contents for Barrett BH8 Series
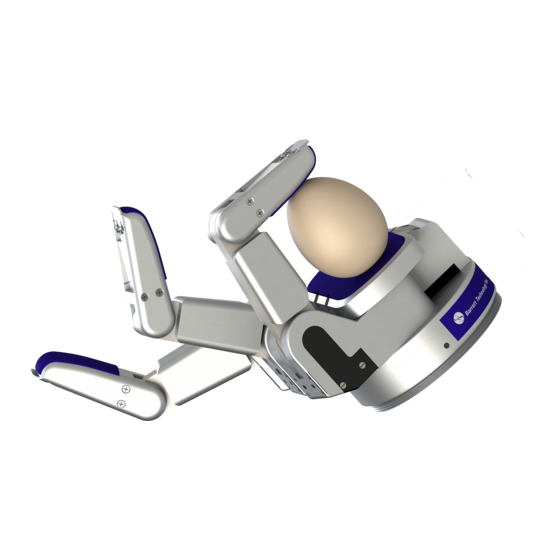
- Page 1 BarrettHand™ BH8-Series User Manual Firmware Version 4.3x Document: D3000 Version: AF.00...
-
Page 3: Table Of Contents
Movement Commands .................... 20 5.2.2 Motor parameter commands .................. 22 5.2.3 Global parameter commands ................. 23 5.2.4 Administrative commands ..................25 5.2.5 Advanced commands ....................26 ..................... 26 OTOR ARAMETERS © 2007 Barrett Technology®, Inc. Document: D3000, Version: AF.00 Page 1 of 82... - Page 4 ENSOR ........................67 INEMATICS ..................... 71 OINT OTION IMITS APPENDIX A TECHNICAL SPECIFICATIONS ............. 74 APPENDIX B FAQ........................ 76 APPENDIX C GLOSSARY ....................78 INDEX ............................80 © 2007 Barrett Technology®, Inc. Document: D3000, Version: AF.00 Page 2 of 82...
-
Page 5: List Of Figures
PREAD OINT MOTION LIMIT ANGE 33 - B ™ D .................. 75 IGURE ARRETT IMENSIONS 34 – T ™ A ..............77 IGURE ORQUE WITCH CTIVATION RAPH © 2007 Barrett Technology®, Inc. Document: D3000, Version: AF.00 Page 3 of 82... -
Page 6: List Of Tables
QUATION OTOR TO OINT NGLE RANSFORM BEFORE ORQUE WITCH CTIVATION 5 - M ™ A ..71 QUATION OTOR TO OINT NGLE RANSFORM AFTER ORQUE WITCH CTIVATION © 2007 Barrett Technology®, Inc. Document: D3000, Version: AF.00 Page 4 of 82... -
Page 7: System Description
While the bandwidth of serial communications may limit less intelligent equipment, the five (5) on-board microprocessors combined with Barrett’s open Grasper Control Language (GCL) endows the BarrettHand™ with millisecond response. -
Page 8: Barretthand
DC brushless servo motor. The joints of each finger are coupled through Barrett’s patented TorqueSwitch™, which automatically switches motor torque to the appropriate finger joint when closing on a target object. Using the fingers together allows the BarrettHand™... -
Page 9: Power Supply
Serial Cable supporting RS-232 communications from the host computer. Hand Cable which carries DC power and RS-232 to the BarrettHand™. Figure 2 - BarrettHand™ BH8-SERIES new 24-Volt Power Supply © 2007 Barrett Technology®, Inc. Document: D3000, Version: AF.00 Page 7 of 82... -
Page 10: Lab Bench Stand
Use the included set of adhesive guide clips for cable management. Since the control electronics reside inside the BarrettHand™ itself, no other electrical cabling is required. © 2007 Barrett Technology®, Inc. Document: D3000, Version: AF.00 Page 8 of 82... -
Page 11: Control Software And Firmware
EEPROM. See Sections 4 and 6 for more information on firmware commands and parameters. © 2007 Barrett Technology®, Inc. Document: D3000, Version: AF.00 Page 9 of 82... -
Page 12: Maintenance Kit
1.27-mm Hex wrench • 2.0-mm Hex wrench • Mobil 1® Lubricant in syringe • Lubricant applicators • Torque wrench • 2.0-mm Hex adapter for Torque wrench • Loctite 222 © 2007 Barrett Technology®, Inc. Document: D3000, Version: AF.00 Page 10 of 82... -
Page 13: System Options
1.2.1 Arm adapter Barrett Technology provides an arm adapter (Figure 5) matching the make and model of any robot specified by the customer. This lightweight arm adapter is made to work with the end-effector bolt pattern on your robot, allowing quick, easy mounting and wire management for a BH8- SERIES System. -
Page 14: Strain Gage Joint-Torque Sensors
Control Software/Firmware Upgrades Barrett Technology makes software and firmware upgrades periodically. Upgrades are available for purchase or free of charge for customers of Barrett's subscription service. Refer to Barrett's enclosed Warranty and Subscription Service Policy for more information. © 2007 Barrett Technology®, Inc. -
Page 15: Safety And Cautions
The spread, however, is backdrivable to aid in target- independent grasping (see Section 0) and requires constant motor current to actively hold position. Idling the spread motor, when possible, will help keep the temperature lower. © 2007 Barrett Technology®, Inc. Document: D3000, Version: AF.00 Page 13 of 82... -
Page 16: System Setup
To mount your BarrettHand™ on a robot, bolt the arm adapter onto the tool-plate bolt circle, located at the end tip of the robot arm. Next, insert the threaded base of the BarrettHand™ © 2007 Barrett Technology®, Inc. Document: D3000, Version: AF.00... -
Page 17: Installing The Hand Cable On A Robot Arm
Once verified, tighten the cable clips to secure the cable in place. © 2007 Barrett Technology®, Inc. Document: D3000, Version: AF.00... -
Page 18: Electrical Connections
PC (or robot controller). • With your PC off, attach the serial cable from your 9-pin COM Port to the Power Supply. Barrett Technology supplies a 3-meter standard straight-through serial cable, but you may purchase a longer cable if desired. •... -
Page 19: Download Firmware
RealTime mode enables users to close control loops in real time from their host PC or robot controller. This benefits users interested in real-time control via a data-glove, © 2007 Barrett Technology®, Inc. Document: D3000, Version: AF.00 Page 17 of 82... - Page 20 “Visual” control window to familiarize yourself with the BarrettHand™. The Visual window relies exclusively on RealTime control mode since it must follow your RealTime mouse-cursor movements. © 2007 Barrett Technology®, Inc. Document: D3000, Version: AF.00 Page 18 of 82...
-
Page 21: Supervisory Control Mode
"ERR <value>", where <value> is the sum of the status codes encountered. Note that the status codes are powers of 2 so that the sum may be decomposed into the individual status codes. © 2007 Barrett Technology®, Inc. Document: D3000, Version: AF.00 Page 19 of 82... -
Page 22: Command List
Target (CT) motor parameter as the destination. However, unlike the Move command, the C command will not return an ERR32 if it does not reach CT within the maximum position error (MPE) parameter. © 2007 Barrett Technology®, Inc. Document: D3000, Version: AF.00 Page 20 of 82... - Page 23 Moves the selected motor(s) to the given position. If no argument specified, then the motor(s) move(s) to the position given by parameter DP. Arguments: Position (0 to 20000) (optional) Example: 13M 1000 Notes: © 2007 Barrett Technology®, Inc. Document: D3000, Version: AF.00 Page 21 of 82...
-
Page 24: Motor Parameter Commands
Sets the given parameter(s) to the given value(s) for the selected motor(s) Arguments: <parameterName> <parameterValue> Example: SFSET DS 100 DP 1500 Notes: You can set more than one parameter by listing more than one parameterName/parameterValue pair. © 2007 Barrett Technology®, Inc. Document: D3000, Version: AF.00 Page 22 of 82... -
Page 25: Global Parameter Commands
Except for not taking a motor prefix they are identical to the set of motor parameter commands. See section 5.4 for a complete list of global parameters. © 2007 Barrett Technology®, Inc. Document: D3000, Version: AF.00 Page 23 of 82... - Page 26 Does not save the changed values to non-volatile storage. Command: PLIST Name: Parameter List Purpose: Lists all of the standard global parameters and their descriptions. Arguments: (none) Example: PLIST Notes: © 2007 Barrett Technology®, Inc. Document: D3000, Version: AF.00 Page 24 of 82...
-
Page 27: Administrative Commands
Arguments: <errorNum> Example: ERR 3 Notes: Command: VERS Name: Version Purpose: Prints the firmware version. Arguments: (none) Example: VERS Notes: © 2007 Barrett Technology®, Inc. Document: D3000, Version: AF.00 Page 25 of 82... -
Page 28: Advanced Commands
Arguments: (none) Example: PLISTAV Notes: 5.3 Motor Parameters Motor parameters change how a motor functions. 5.3.1 Movement Movement parameters affect how a given motor moves. © 2007 Barrett Technology®, Inc. Document: D3000, Version: AF.00 Page 26 of 82... - Page 29 LSG. Values: 0 to 256 Default: Notes: A value of 255 or 256 disables the strain gage checking during motion commands. © 2007 Barrett Technology®, Inc. Document: D3000, Version: AF.00 Page 27 of 82...
-
Page 30: Status
The total number of counts traveled by the selected motor, divided by 1000. Values: 0 to 4 billion Default: Notes: This value is never reset; it is maintained through power failures and firmware downloads. © 2007 Barrett Technology®, Inc. Document: D3000, Version: AF.00 Page 28 of 82... -
Page 31: Realtime
If non-zero, then a Proportional Gain byte will be sent in the control block for the motor. Values: 0, 1 Default: Notes: This controls the constant that is multiplied by the velocity error in order to produce the motor torque. © 2007 Barrett Technology®, Inc. Document: D3000, Version: AF.00 Page 29 of 82... - Page 32 The value sent to the host should be multiplied by LFDPC and then added to the last reported position © 2007 Barrett Technology®, Inc. Document: D3000, Version: AF.00...
-
Page 33: Advanced
FPG sets B in the HCTL-1100 controller, which is applied as specified in Equation 1 on page 23 of http://literature.agilent.com/litweb/pdf/5965- 5893E.pdf. Setting this parameter to a non-zero value increases susceptibility to random high-frequency noise. © 2007 Barrett Technology®, Inc. Document: D3000, Version: AF.00 Page 31 of 82... - Page 34 0 to 65,535 Default: Finger: 2 Spread: 0 Notes: Barrett recommends not setting IHIT to a value greater than 5. IHIT is used to get a consistent origin for the finger motors, and thus a consistent breakaway force. Parameter: IOFF...
- Page 35 15 to 255 Default: Notes: Written into the HCTL-1100 Sample Timer register according to See http://literature.agilent.com/litweb/pdf/5965-5893E.pdf. (The HCTL-1100 clock speed used in the BH8-series Hand is 2.00 MHz.) Barrett Technology does not recommend changing this parameter from default. Parameter: SGFLIP Name:...
-
Page 36: Global Parameters
Global status parameters are read-only and give information about the state of the hand. Parameter: TEMP Name: Temperature Purpose: The present temperature on the CPU board in tenths of a degree C. Values: -550 to 1250 Default: Notes: © 2007 Barrett Technology®, Inc. Document: D3000, Version: AF.00 Page 34 of 82... -
Page 37: Advanced
• If HOLD is false, the motor is then turned off; if HOLD is true, the motor is servoed to maintain this position. © 2007 Barrett Technology®, Inc. Document: D3000, Version: AF.00 Page 35 of 82... - Page 38 For each motor, if HOLD is false, that motor is then turned off; if HOLD is true, that motor is servoed to maintain the position at which the termination condition occurred. • The status code returned is 16384. © 2007 Barrett Technology®, Inc. Document: D3000, Version: AF.00 Page 36 of 82...
-
Page 39: Realtime Control
(Three other parameters, "LFVC", "LFDPC", and "LFDPD", modify specific data items.) © 2007 Barrett Technology®, Inc. Document: D3000, Version: AF.00 Page 37 of 82... -
Page 40: Control Blocks
LFV ("Loop Feedback Velocity"): 1 signed byte LFS ("Loop Feedback Strain"): 1 unsigned byte LFAP ("Loop Feedback Absolute Position"): Unsigned 2-byte word LFDP ("Loop Feedback Delta Potion"): 1 signed byte © 2007 Barrett Technology®, Inc. Document: D3000, Version: AF.00 Page 38 of 82... -
Page 41: Loop Feedback Delta Position
Most of the parameters are flags, specifying whether a specific datum is to be present in a control or feedback block. The four remaining parameters are coefficients or flags, which affect how the firmware interprets or generates a datum. © 2007 Barrett Technology®, Inc. Document: D3000, Version: AF.00 Page 39 of 82... - Page 42 Table 5 - RealTime Global Control Parameters Parameter Name Type Function Size in Block Loop Flag If True, RealTime 2 signed bytes Feedback feedback block will Temp. contain temperature © 2007 Barrett Technology®, Inc. Document: D3000, Version: AF.00 Page 40 of 82...
-
Page 43: Example
If you have purchased the joint-torque sensor option, the difference in tension between the tendon pair is used to determine the torque at the third joint. The fact that we © 2007 Barrett Technology®, Inc. Document: D3000, Version: AF.00... -
Page 44: Figure 8 - Hex Set Screw
You can easily readjust the pretension through Barrett Technology’s patented cable tensioning mechanism as follows: Loosen the hex set screw with the right angle hex wrench provided in the maintenance kit. -
Page 45: Figure 9 - Pretensioning Thet
It is advisable to completely remove the hex set screw to apply Loctite 222 to its threads before retightening it against the tensioner screw. This measure is especially important if the hand is under heavy use. Figure 9 - Pretensioning the Tendon Cable © 2007 Barrett Technology®, Inc. Document: D3000, Version: AF.00 Page 43 of 82... -
Page 46: Fastener Check
All screw fasteners in the BarrettHand™ have been installed with a thread locker, which should prevent loosening over the life of the product. However, after prolonged use, Barrett Technology recommends that you conduct a precautionary inspection to ensure all external fasteners are in place and tight. -
Page 47: Lubrication
5000 cycles Finger Spur Gears 5000 cycles Finger Motor Spur Gears 5000 cycles Palm Spur Gears 5000 cycles Motor Spur Gear Lube points Palm Spur Gear Lube points © 2007 Barrett Technology®, Inc. Document: D3000, Version: AF.00 Page 45 of 82... -
Page 48: Figure 11 - Lubricant Application
Shutdown the Power Supply and disconnect the BarrettHand™ Cable from the BarrettHand™. Locate and remove the finger attachment shoulder screw that holds the finger to its motor housing. The screw location is shown in Figure 12. © 2007 Barrett Technology®, Inc. Document: D3000, Version: AF.00 Page 46 of 82... -
Page 49: Figure 12 - Finger Attachment
Use a 2-mm hex wrench to manually rotate the Joint-3 drive 5 1/2 revolutions from the position where both links are inline and horizontal. © 2007 Barrett Technology®, Inc. Document: D3000, Version: AF.00 Page 47 of 82... -
Page 50: Figure 14 - Resetting Thef
Figure 15, again taking great care not to damage the gold-contacts when seating the alignment teeth. The teeth must be fully seated into the alignment slots to ensure proper operation of the BarrettHand™. © 2007 Barrett Technology®, Inc. Document: D3000, Version: AF.00 Page 48 of 82... -
Page 51: Strain Gages
Remove the Shroud Cover screws shown in Figure 16. Some models of the BarrettHand™ will have four Shroud Cover screws. Remove the Shroud from the finger link. © 2007 Barrett Technology®, Inc. Document: D3000, Version: AF.00 Page 49 of 82... -
Page 52: Figure 16 - Shroud Removal
Be careful not to touch the strain gage or damage any of the electrical wiring when replacing the shroud. © 2007 Barrett Technology®, Inc. Document: D3000, Version: AF.00 Page 50 of 82... -
Page 53: Troubleshooting
8 Troubleshooting Most of the symptoms repeated in this section were generated by Barrett’s own lab Hands which are assigned to destructive testing over millions of cycles. Symptom: The Hand behaves erratically. It disobeys some commands while obeying others. -
Page 54: Figure 18 - Cable And Idlerp
If so, loosen shoulder screw, shown in Figure 18, so the idler pulley will move with cable motion. If the problem persists, contact Barrett Technology. Symptom: Only the fingertip closes when the entire finger should close (Premature Breakaway). - Page 55 Finger moves in opposite direction of commanded motion. Possible Solution: Reload firmware. There is an encoder feedback problem. Reinitializing the finger should solve the immediate problem. If this recurs, contact Barrett Technology for servicing. © 2007 Barrett Technology®, Inc. Document: D3000, Version: AF.00 Page 53 of 82...
-
Page 56: Figure 19 - Manual Torques
Remove the 2-mm hex wrench and reinitialize the finger. If the problem persists, contact Barrett Technology. Figure 19 - Manual Torque Switch Activation ©... -
Page 57: Figure 20 - Manual Torques
Lubricating the high friction fingers will help reduce the friction and increase the velocity. See Section 7.3 for lubrication instructions. Alternatively, the commanded gains or commanded velocities from nominal allows you to compensate. If the problem persists, contact Barrett Technology. © 2007 Barrett Technology®, Inc. Document: D3000, Version: AF.00... - Page 58 The threaded locking ring does not fit on the threaded base of the BarrettHand™. Possible Solution: The threaded locking ring has been damaged or is warped. Contact Barrett Technology for a replacement part. The threads on the base of the BarrettHand™ have been damaged. Contact Barrett Technology for service.
- Page 59 Symptom: The spread fingers F1 and F2 are at different angles around the palm. Possible Solution: An internal spread gear is damaged and will need to be replaced. Contact Barrett Technology. © 2007 Barrett Technology®, Inc. Document: D3000, Version: AF.00...
-
Page 60: Theory Of Operation
Figure 21. User’s Host PC Hand CPU Board MC68HC11 Motion Controllers HCTL-1100s Encoder Phase Motor Decoder Power Power Boards Figure 21 – BarrettHand™ Controller Block Diagram © 2007 Barrett Technology®, Inc. Document: D3000, Version: AF.00 Page 58 of 82... -
Page 61: Low-Level Motor Control
The Velocity Control is used during torque-close and torque-open commands (TC and TO). These commands use proportional gain multiplied by the instantaneous velocity error to control the motors. For more information, see pages 31 and 32 of http://literature.agilent.com/litweb/pdf/5965-5893E.pdf. © 2007 Barrett Technology®, Inc. Document: D3000, Version: AF.00 Page 59 of 82... -
Page 62: Mechanisms
9.3.1 TorqueSwitch™ Barrett Technology’s patented TorqueSwitch™ mechanism affords the BarrettHand™ unparalleled weight reduction without sacrificing dexterity or functionality by serving as a “smart” coupling of two finger joints to one motor. The mechanism’s operation is similar to that of a simple screw fastener. - Page 63 Thus, when the clutch is disengaged, the inner finger link remains motionless while the fingertip continues to move allowing the fingers to form-fit around any shape. © 2007 Barrett Technology®, Inc. Document: D3000, Version: AF.00 Page 61 of 82...
-
Page 64: Figure 23 - Torque Switch ™ O
The force required to cause the TorqueSwitch™ to disengage can be set using the parameters, IVEL, IOFF, IHIT, and OT. Barrett Technology recommends that users should not change IVEL, IOFF, and IHIT from their default values. The following Breakaway force Curve can be repeated by using OT with the default values. -
Page 65: Figure 24 - Breakaway Force
TorqueOpen must be used. These commands use the Velocity Control Law with the parameters MCV and MOV. To determine the amount of desired force at the fingertip use Figure 25 to select proper velocities. © 2007 Barrett Technology®, Inc. Document: D3000, Version: AF.00 Page 63 of 82... -
Page 66: Spread Motion
For a given torque setting, larger forces can be achieved by curling F1 and/or F2 closed to the point where the contact point becomes closer to the spread axis. © 2007 Barrett Technology®, Inc. Document: D3000, Version: AF.00... -
Page 67: Optional Strain Gage Joint-Torque Sensor
Force B. The flexing in the beam creates a measurable voltage change in the Wheatstone Bridge. This difference in voltage is conditioned, amplified, converted and available to you in digital form. © 2007 Barrett Technology®, Inc. Document: D3000, Version: AF.00... -
Page 68: Figure 27 - Strain Gage Joint -T
J3 has no open stop, so its torque will measure only second order effects, such as residual friction, gravity, and dynamic inertia effects (on a moving robotic arm). © 2007 Barrett Technology®, Inc. Document: D3000, Version: AF.00 Page 66 of 82... -
Page 69: Kinematics
= distance from z to z measured along x α = angle between z to z measured about x = distance from x to x measured along z © 2007 Barrett Technology®, Inc. Document: D3000, Version: AF.00 Page 67 of 82... -
Page 70: Figure 29 - Barrett Hand ™ In
All of the kinematics for the BarrettHand™ are derived from the zero position. The zero position of the BarrettHand™ is shown in Figure 29 Figure 29 - BarrettHand™ in Zero Position © 2007 Barrett Technology®, Inc. Document: D3000, Version: AF.00 Page 68 of 82... - Page 71 The transforms from each axis to its previous axis can be determined using the homogeneous transform in Equation 1 and the link parameters for fingers in Table 9. Using Equation 2, the forward kinematics were determined to be: © 2007 Barrett Technology®, Inc. Document: D3000, Version: AF.00 Page 69 of 82...
- Page 72 After the TorqueSwitch™ has been activated, the joint angle can be determined using Equation 5. See Appendix B for information on how to detect TorqueSwitch™ activation. © 2007 Barrett Technology®, Inc. Document: D3000, Version: AF.00 Page 70 of 82...
-
Page 73: Joint Motion Limits
Figure 31. When the spread is in any position other than full open or close, the fingers may not have the full range of motion due to interference with other fingers. © 2007 Barrett Technology®, Inc. Document: D3000, Version: AF.00... -
Page 74: Figure 31 - Finger Joint Motion Limit
BH8-Series – User’s Manual support@barrett.com www.barrett.com 48° 0° 140° 0° Figure 31 - Finger Joint motion limit Range © 2007 Barrett Technology®, Inc. Document: D3000, Version: AF.00 Page 72 of 82... -
Page 75: Figure 32 - Spread Joint Motion Limit
Θ may not close completely due to finger interference. See Figure 32. 0° 180° 180° 0° Figure 32 - Spread Joint motion limit Range © 2007 Barrett Technology®, Inc. Document: D3000, Version: AF.00 Page 73 of 82... -
Page 76: Appendix Atechnical Specifications
298 x 149 x 42 mm (11.74 x 5.65 x 1.54 in) Weight: 1224 gm (2.70 lb) Cables 3-meter continuous-flex cable, 8-mm diameter (BarrettHand™ Cable) 3-meter serial cable AC line cord © 2007 Barrett Technology®, Inc. Document: D3000, Version: AF.00 Page 74 of 82... -
Page 77: Figure 33 - Barrett Hand ™ D
Strain gage Fingertip Torque Sensors for all three fingers B0111 C-Function Library B01C3 Subscription Service US Patents (patents established and pending in other countries) 5,501,498 5,388,480 4,957,320 © 2007 Barrett Technology®, Inc. Document: D3000, Version: AF.00 Page 75 of 82... -
Page 78: Appendix Bfaq
It is possible to determine the approximate time when the TorqueSwitch™ achieves breakaway by monitoring the breakaway flag, BD. When BD=1, breakaway has occurred at BP encoder counts. Setting BS=1 stops the motor at the instant of breakaway. © 2007 Barrett Technology®, Inc. Document: D3000, Version: AF.00 Page 76 of 82... -
Page 79: Figure 34 - Torque Switch ™ A
Acceleration is set with parameter BDAT. Time (ms) Figure 34 – TorqueSwitch™ Activation Graph For more questions, please contact Barrett Technology Customer Service. © 2007 Barrett Technology®, Inc. Document: D3000, Version: AF.00 Page 77 of 82... -
Page 80: Appendix Cglossary
BarrettHand™ – The 1.2 kilogram dexterous robotic Grasper™ as described in Section 1.1.2. BarrettHand™ System - The entire system received from Barrett Technology, Inc. Includes all components as listed in Section 1.1, plus any additional options as described in Section 1.1.2. - Page 81 The output gear is driven by the worm gear. The worm has a helical tooth similar to a screw thread. The profile of the worm gear looks similar to a conventional gear with the tooth skewed to the worm pitch angle. © 2007 Barrett Technology®, Inc. Document: D3000, Version: AF.00 Page 79 of 82...
-
Page 82: Index
UPSECS.......... 25, 36 Control software ........10 Grasp......... 7, 65, 77, 79 Installation ..........17 Graspcenter ........... 6, 79 CPU board ..........59 Guide clips ........9, 15, 16 © 2007 Barrett Technology®, Inc. Document: D3000, Version: AF.00 Page 80 of 82... - Page 83 LCVC ........30, 39, 41, 42 Maximum velocity ........60 LFAP ......31, 38, 39, 41, 42 Peak torque..........60 LFDP .......31, 38, 39, 40, 41, 42 Phases............60 LFDPC......31, 38, 40, 41, 42 © 2007 Barrett Technology®, Inc. Document: D3000, Version: AF.00 Page 81 of 82...
- Page 84 Warranty ........... 13 Supervisory control ........80 Weight ..........6, 75 Supervisory Mode .......18, 20 Worm gear .......... 46, 80 Synchronous ..........12 Zero position..........69 Threaded base..........7 © 2007 Barrett Technology®, Inc. Document: D3000, Version: AF.00 Page 82 of 82...
Need help?
Do you have a question about the BH8 Series and is the answer not in the manual?
Questions and answers