Advertisement
Quick Links
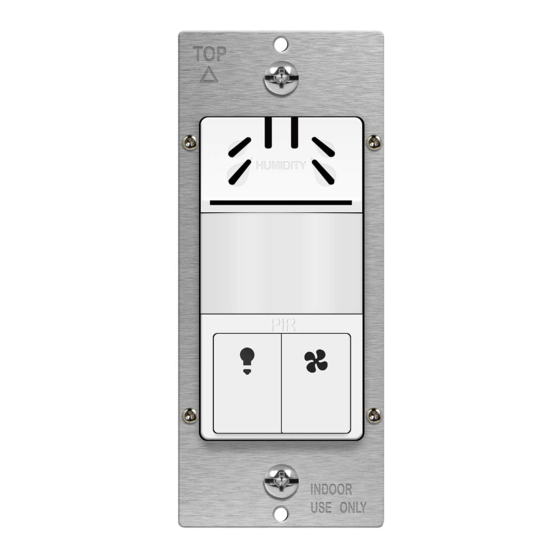
INSTALLATION INSTRUCTIONS
Model: TDHOS5
Dual Technology
Humidity/PIR Motion Sensor
with Interchangeable Face Cover
SPECIFICATIONS
Power.............................................................................................120VAC, 60Hz
Resistive................................................................................................360 Watts
Tungsten................................................................................................500 Watts
Electronic Ballast/ LED ............................................................400VA/ 400 Watts
Light and Fan Time Delay....................................15s, 10 mins, 20 mins, 30 mins
Motor...........................................................................................................1/4 HP
Humidity range.................................................................................45%-80% RH
PIR coverage............................................................................................600sq.ft
COVERAGE
As illustrated in the figure below, the TDHOS5 has a 180° detection range with
a maximum distance of 24' detection in front of the sensor and 12' on the sides.
For maximum results, the sensor must be properly installed between the height
of 4' to 5' and away from obstructions such as walls, furniture and transparent
barriers like Low-E glass.
Max. 12'
on the sides
WARNING
Turn the power off at the circuit breaker before installing the Sensor.
Read and understand these instructions before installing. This device is intended for
installation in accordance with the National Electric Code and local regulations. It is
recommended that a qualified electrician performs this installation. Make sure to turn
off the circuit breaker or fuse(s) and make sure power is off before wiring the device.
Use copper wire only.
WIRING DIRECTIONS:
1. Remove the wall plate.
2. Remove existing switch from wall box and prior to disconnecting wires,
identify the wires and label as needed.
3. Remove wires from existing switch.
4. Follow the diagram below to reconnect the TDHOS5 humidity sensor.
WARNING: The white wire you see in the wall box is not always the
neutral wire. Verify whether the power enters the wall or
ceiling box first.
Max. 24'
in the front
How to change the color cover/ push button.
Start by removing the wallplate if attached.
REMOVAL
Push down on the cover/ push button
to release, then pull away from main body.
PROGRAMMING
During programming, ONLY the Light Button will be used
•
Pay close attention to the Green LED lights as it will flash to indicate successful
•
programming steps and each time the button is pressed while making selections.
Once the program is saved, the load (lights on your ceiling/ wall) will turn OFF.
•
After each step, there are only 20 seconds to make the next programming
•
selection. If a selection has not been made, time will expire and the LED light will
flash 3 times and exit programming mode.
There are 2 Programmable Functions
Function 1: Time Delay for the light and fan
• Setting 1 (Default): 15 seconds/ 10 minutes. When selected, the time delay
• Setting 2: 20 minutes
• Setting 3: 30 minutes
Function 2: Humidity level (Humidity Range 45% - 80%)
• Setting 1: Low humidity sensitivity 45% (requires little
• Setting 2 (Default): Medium humidity sensitivity 65%
• Setting 3: High humidity sensitivity 80% (requires high
Power
To progam the humidity sensor, you must first enter programming mode, then choose
function 1 or function 2, then select 1 of 3 settings within each function
STEP 1: Enter Programming Mode
Press and hold the light button for eight seconds until the solid green
LED lights up (the LED will stay on).
STEP 2: Choose the Function
• Press the light button the same number of times as the Function Number you would
Neutral
Light
Fan
STEP 3: Choose the Setting
• Press the light button the same number of times as the Setting
REATTACH
STEP 4: Save the Settings
Align the latch pins to the unit, push the cover/
button against the main body, then slide up until
• Press and Hold the light button for eight seconds. The LED light will
its locked into place
flash 3 times indicating that the settings are saved then the load will
turn OFF.
will be 15 secs. After 5 minutes, the time delay defaults to 10 minutes
humidity to trigger)
humidity to trigger)
like to program (1x for Function 1 and 2x for Function 2)
After you select the function, the LED indicator will indicate the current
setting by blinking 1x for Setting 1, 2x for Setting 2, and 3x for Setting 3
If no selection has been made, the device will exit programming mode.
Number for that function (For example in Function 1: Press the button
2 times to select 20 minutes).
After the last button is pressed the sensor will flash back the
current setting for that function 10 times at two-second
intervals. If no selection has been made, the device will exit
programming mode.
Advertisement

Related Manuals for Topgreener TDHOS5


Summary of Contents for Topgreener TDHOS5
- Page 1 COVERAGE LED lights up (the LED will stay on). As illustrated in the figure below, the TDHOS5 has a 180° detection range with STEP 2: Choose the Function a maximum distance of 24’ detection in front of the sensor and 12' on the sides.
- Page 2 This device is warranted to be free of material and workmanship defects for 1 year from the date of purchase. Original receipt or proof of purchase from an authorized retailer must be presented upon warranty claim. ALL claims must be verified and approved by Top Greener, Inc. Warranties from other TOPGREENER products may vary. This warranty is nontransferable and does not cover normal wear and tear or any malfunction, failure, or defect resulting from misuse, abuse, neglect, alteration, modification, or improper installation.
Need help?
Do you have a question about the TDHOS5 and is the answer not in the manual?
Questions and answers