Table of Contents
Advertisement
Quick Links
Advertisement
Table of Contents

Related Manuals for TESTING Vicat


Summary of Contents for TESTING Vicat
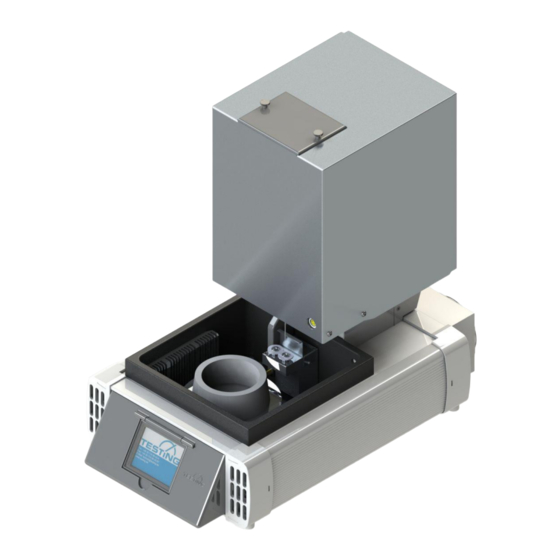
- Page 1 TESTING Bluhm & Feuerherdt GmbH Manufacture and Distribution of Testing Equipment for Construction Materials Motzener Str. 26b DE-12277 Berlin Tel. +49(0)30/710 96 45-0 Fax +49(0)30/710 96 45-98 www.testing.de Operating Manual Single Station Vicat Needle Testing Apparatus...
-
Page 2: Table Of Contents
3.7.2 Adjusting the zero voltage of the humidity sensor ..................... 23 3.7.3 Adjusting the offset of the humidity sensor ....................... 24 Settings for the Vicat device ............................. 25 3.8.1 Choosing cleaner device ............................25 3.8.2 Setting the cleaner device position ........................... 26 3.8.3... - Page 3 Figure 17: Adjusting the zero voltage of the humidity sensor ..............23 Figure 18: Adjusting the offset of the humidity sensor ................. 24 Figure 19: Settings for the Vicat device ......................25 Figure 20: Choosing cleaner device ......................25 Figure 21: Hint for cleaner device position ....................26 Figure 22: Cleaner device position .......................
-
Page 4: Basic Instructions
1.0360 Basic instructions Designation Designation of the device: Please see the nameplate on the Vicat Apparatus, which shows the complete characteristic data and the electric properties of the sys- tem. Purpose for which this system was designed This Operating Manual contains the information required for operation of the products described here, for the purpose for which they have been designed. - Page 5 Single Station Vicat Test Apparatus 1.0360 The operator must make sure not to endanger other persons. Only trained operators may use the device unsupervised. If any faults or damage to the apparatus impairs its operational safety, put it out of operation immediately and use it again after you eliminate all hazards.
-
Page 6: Guarantee
Single Station Vicat Test Apparatus 1.0360 Guarantee Apply our General Terms of Sales and Delivery in all cases. The Manufacturer guarantees that this Operating Manual has been prepared in conformity with the technical and functional parameters of the equipment as delivered. The Manufacturer reserves the right to add sup- plementary information to this Operating Manual as required. -
Page 7: Commissioning
Single Station Vicat Test Apparatus 1.0360 1.5.3 Commissioning Place the equipment on an even and vibration-free base with a suitable load-bearing capacity. This equip- ment is intended for operation in dry rooms. The ambient conditions that must be observed are as follows: + 5 …... -
Page 8: Connection To The Power Supply
Single Station Vicat Test Apparatus 1.0360 Connection to the power supply In accordance with the pertinent standards, connect the socket to the earthing-sys- Danger tem. Check the device rating plate to make sure that the ratings of the building power supply conform to the requirements for voltage, wattage, amperage, and frequency of the equipment. -
Page 9: Apparatus Properties
Single Station Vicat Test Apparatus 1.0360 Apparatus properties The apparatus is classified among those that generally do not reach an acoustic emission of 90 dB(A) (measured according to DIN 45 635). The noise caused by the apparatus depends on various factors, such as installation site. -
Page 10: Operation
Commissioning 3.1.1 Connections and switching on Plug the testing apparatus into the (110/230V 50/60Hz) mains using the supplied cord. Switch ON the main switch on the rear of the device (Figure 1). After switching ON the main switch, the control software runs through a standard initialization procedure that concludes by determining the reference points (zero points) for each axis. - Page 11 Single Station Vicat Test Apparatus 1.0360 * Installation of the USB-RS232-Adapter: You will find the driver for the USB-RS232-adapter on the attached installation CD, if not automatically in- stalled. Windows: To install the driver, you can use either: a) the „CDM v2.10.00 WHQL Certified.exe“, that you will find on the CD in the folder according to your op- erating system.
-
Page 12: Modes Of Operation
1.0360 Modes of operation In the settings mode, various parameters can be set for the display as well as for the Vicat device. The monitoring mode allows the observation of the course of the measurement, as well as the ON/OFF switching of the temperature control of the water bath. -
Page 13: Setting Options
Setting options Parameters can be set which affect the function of the touch display, the built-in sensors as well as the function of the Vicat device itself. These settings remain retained after switching off the unit. Parameters for the touch-display: ... -
Page 14: Choice Of A Language
Single Station Vicat Test Apparatus 1.0360 3.3.1 Choice of a language As soon as you press a radio button assigned to the respective language, the display switches to the acti- vated country language. This line shows the Settings >Language path in the selected language. -
Page 15: Setting The Parameters For Water Temperature Control
Single Station Vicat Test Apparatus 1.0360 Setting the parameters for water temperature control settings> water heating/cooling Setpoint Correction factor heating sensor T1 Hysteresis heating Setpoint cooling Hysteresis cooling Figure 8: parameters for water temperature control Parameters for the temperature control of the water bath: ... -
Page 16: Setting The Hysteresis For The Heating
Single Station Vicat Test Apparatus 1.0360 3.4.2 Setting the Hysteresis for the heating Settings> water heating/cooling> hysteresis heating 0.5 °C Figure 10: setting hysteresis heating One-time short press of the button increases the hysteresis by 0.1 °C. Pressing and hold down this button increases the hysteresis continuously by 0.1 °C. -
Page 17: Setting The Correction Factor For Sensor T1
Single Station Vicat Test Apparatus 1.0360 3.4.5 Setting the correction factor for sensor T1 We use a TSIC306 temperature sensor for water temperature control. The TSIC306 has a measuring range from -50 °C to 150 °C with a resolution of 0.1K. -
Page 18: Explanation Of The Process Of Water Temperature Control
Single Station Vicat Test Apparatus 1.0360 Explanation of the process of water temperature control The cooling process starts as soon as the water temperature reaches the value (set point cooling + hyste- resis cooling) or rises above this value. The cooling process stops only when the water temperature has declined to the value (set point cooling) or if it has fallen below this value. -
Page 19: Setting The Parameters For The Airflow Control
Single Station Vicat Test Apparatus 1.0360 Setting the parameters for the airflow control When the water bath is cooling, heat areises on the rear of the Peltier elements. This heat must be dissipate. For this purpose, the device is equipped with two heat sinks, which absorb the heat from the Peltier ele- ments. -
Page 20: Setting The Upper Temperature Of Heat Sinks
Single Station Vicat Test Apparatus 1.0360 3.6.1 Setting the upper temperature of heat sinks Settings> > Airflow flow control Upper temperature of the heat sinks 60.0 °C Figure 14: Upper temperature of the heat sinks One-time short press of the button increases the value by 0.1 °C. -
Page 21: Stop Running Fans
Single Station Vicat Test Apparatus 1.0360 3.6.5 Stop running fans In order to remove the excess heat the fans may continue to run until the heat sinks reaches the run-on temperature even after switching off the temperature-controller. Monitoring 21.3 °C 376 sec 34.3 mm... -
Page 22: Settings For The Humidity Sensor
Single Station Vicat Test Apparatus 1.0360 Settings for the humidity sensor Devices that comply with the "ASTM C191" standard are equipped with a sensor for measuring rel- ative humidity. Each sensor has its own parameter settings, which we configure on delivery. Our service or the user must set and save the new parameters only if it should be necessary to change the sensor. -
Page 23: Adjusting The Slope Of The Humidity Sensor
Single Station Vicat Test Apparatus 1.0360 3.7.1 Adjusting the slope of the humidity sensor Settings> Humidity sensor>Slope mV/%rH 30.08885 Figure 16: Adjusting the slope of the humidity sensor Use the key pad to insert the desired value Decimal delimiter Delete digit To get the set value also after switching off the device press the button. -
Page 24: Adjusting The Offset Of The Humidity Sensor
Single Station Vicat Test Apparatus 1.0360 3.7.3 Adjusting the offset of the humidity sensor The offset of the humidity sensor adjusts the value of relative humidity of the sensor to a more accurate referencing instrument. = rH offset Sens Settings>... -
Page 25: Settings For The Vicat Device
Sample’s zero level Factory settings Figure 19: Settings for the Vicat device Parameters of the Vicat device: coose cleaner device (for needle or for cone) cleaner device position ( set Y-coordinate and Z-coordinate (penetration deepnes of the needle)) ... -
Page 26: Setting The Cleaner Device Position
On this page you can also readjust the immersion depth of the needle or cone. Cleaner device On the page “settings>Vicat device”, press the button. position If sample is under test, the display shows a message to interrupt the measurements (Figure 21), otherwise the page for setting the cleaner device position (Figure 22) will appear and the needle will move to the last position set. -
Page 27: Setting The Samples Center Y-Coordinate
3.8.3 Setting the samples center Y-coordinate The center of the sample (Y-coordinate) must be set accurately enough to meet the standard criterion for the distance of the puncture points from the edge of the Vicat ring. Sample’s center On the page “settings>Vicat device“, press the button. -
Page 28: Figure 24: Setting The Y-Coordinate Of Samples Center
Single Station Vicat Test Apparatus 1.0360 Settings> Vicat device>Sample’s center Y: 84.6 mm Figure 24: Setting the Y-coordinate of samples center One-time short press of the button increases the Y-value by about 0.1 mm. The needle moves toward display. If you keep this button pressed, the value continuously increases by the relevant proportion until either you have released the button or you reach the maximum permissible value. -
Page 29: Setting The Samples Zero Level
Attention, if the rubber buffer is set so that the needle does not reach the glass plate, the zero level is determined incorrectly! Sample’s zero level On the page “Settings>Vicat device” press the button. If sample is under test, the display shows a message to interrupt the measurements (Figure 25), otherwise the page for setting the samples zero level appears (Figure 26). -
Page 30: Figure 26: Determine Zero Level
Single Station Vicat Test Apparatus 1.0360 Settings>Vicat device> Sample’s zero level Determine zero level of the sample? Figure 26: Determine zero level To start the determination of the zero level press button. The view changes as folow: Settings>Vicat device> Sample’s zero level... -
Page 31: Setting The Penetration Time
1.0360 3.8.5 Setting the Penetration time You can set the penetration time of the needle or cone to a value between 0 and 10 seconds. To do so, press on the page “setting>Vicat device” the button. Penetration time You will get to the next page: settings >Vicat device >Penetration time... -
Page 32: The Monitoring Page
Single Station Vicat Test Apparatus 1.0360 The monitoring page On this page, you can observe the course of a test. Path line Monitoring 21.3 °C 376 sec 34.3 mm 3:45 95.3 % rH Status line Wait state Figure 30: monitoring page This symbol shows the recorded number of measurements on sample one. - Page 33 Single Station Vicat Test Apparatus 1.0360 Danger! Turn on the temperature control only if the basin is filled with water! Without water, the heat exchanger heat sinks get too hot or too cold and can be dammaged. There is risk of burns on contact or risk of fire! Capacity if the basin is approx.
- Page 34 Single Station Vicat Test Apparatus 1.0360 Error messages are also displayed in the status line if errors occur. • X-Limit switch is open • Y-Limit switch is open • Z-Limit switch is open • X-Reference switch is open • Y- Reference switch is open •...
-
Page 35: Operation
Single Station Vicat Test Apparatus 1.0360 Operation Software Install and configure the software on the PC. See the “Software Operating Manual” for this. Figure 31: VicatMPM application software Note The VicatMPM software let you determine norm stiffness, initial time of seting and fi- ... -
Page 36: Insert A Sample
1.0360 Insert a sample Feel the sample material into the Vicat ring, use the supplied glass plate (120x5 mm) as the base. Place the sample on the measuring station and fix it with the fixing ring (note the driving pin). -
Page 37: Starting A Measurement On En Device
When performing tests in a water bath (EN196-3), close the ball valve on the back of the device and add water until the brushes are covered. Start the Vicat test via the PC software. After each penetration, the needle is cleaned with the cleaning device. -
Page 38: Starting A Measurement On Astm-Device
First, insert the cup with water under the cleaning device, and then insert the ASTM frame and ASTM cover over the sample. Start the Vicat test via the PC software. After each penetration, the needle is cleaned with the cleaning device. -
Page 39: Maintanace
Single Station Vicat Test Apparatus 1.0360 Maintanace 5.1 Adjustment of the rubber buffer To protect the needle, the rubber buffer can be adjusted such way that the needle will no longer strike the glass plate but the rubber buffer just in front of the glass plate instead. -
Page 40: Replacing The Brushes
Single Station Vicat Test Apparatus 1.0360 Replacing the brushes Depending on the option, the device is equipped with a cleaning device for needle or cone. When the brushes worns up, so that the needle can no longer be cleaned, they must be replaced. -
Page 41: Replacing The Needle
Single Station Vicat Test Apparatus 1.0360 Replacing the needle 1. Loosen the knurled screws to open the flap. 2. Remove the drop rode. 3. Loosen the screw and re- place the needle. 4. Reinsert the drop rod and lock the flap. -
Page 42: Replacing The Seal Ring
Single Station Vicat Test Apparatus 1.0360 Replacing the seal ring Depending on the degree of soiling, it may be necessary after approx. 2 years to replace the sealing ring situated under the plate for the sample. To do this, the plate for the sample must be unscrewed and re- moved. -
Page 43: After-Sales Service
Single Station Vicat Test Apparatus 1.0360 After-sales service Great care was made to assure that this Operating Manual was properly prepared. However, we cannot guarantee that it has no mistakes or that all data are complete and correct in means of technical modifica- tions.
Need help?
Do you have a question about the Vicat and is the answer not in the manual?
Questions and answers