
Related Manuals for ICSPI nGauge

Summary of Contents for ICSPI nGauge
- Page 1 Atomic Force Microscope User Manual Version 2.0 For Software and Firmware versions 1.0.0.0...
-
Page 2: Table Of Contents
Calibration........................40 Troubleshooting .........................42 7.1. Set-up Troubleshooting ....................42 7.2. Sweep Troubleshooting ....................44 7.3. Approach Troubleshooting ..................48 7.4. Scan Troubleshooting ....................52 Advanced Controls ......................55 8.1. Sweep Advanced Controls ..................55 8.2. Approach Advanced Controls..................57 © ICSPI Corp. 2007-2021 nGauge AFM User Manual 2.0... - Page 3 8.3. Menu Button Advanced Controls .................58 Appendix ..........................61 9.1. Gwyddion Supplement ....................61 © ICSPI Corp. 2007-2021 nGauge AFM User Manual 2.0...
-
Page 4: Introduction
1. Introduction Congratulations on purchasing an nGauge Atomic Force Microscope! The nGauge AFM achieves magnification that far surpasses that of an optical microscope so you can explore the world with nanometer-scale resolution. The most up-to-date user manual can be downloaded from the ICSPI website at https://www.icspicorp.com/resources... - Page 5 The AFM chip can be picked up by hand as long as you don't touch the tip. This is a zoomed-in photo of the AFM chip. The chip is extremely fragile. © ICSPI Corp. 2007-2021 nGauge AFM User Manual 2.0...
- Page 6 1. Click on Disengage. RETRACT 2. Wait for the button to indicate Retract. 3. Click and hold on Retract until the tip is at least 5 mm away from the sample (about 10 seconds). © ICSPI Corp. 2007-2021 nGauge AFM User Manual 2.0...
-
Page 7: Overview
MEMS AFM or AFM-on-a-chip operates almost exactly like a conventional AFM except that all of the essential components are integrated onto a single chip. The nGauge AFM chip is a micro -electro-mechanical systems (MEMS) device that uses the most advanced manufacturing process in the world to produce tiny, ultra-precise scanners and sensors on a 1 mm x 1 mm silicon chip. -
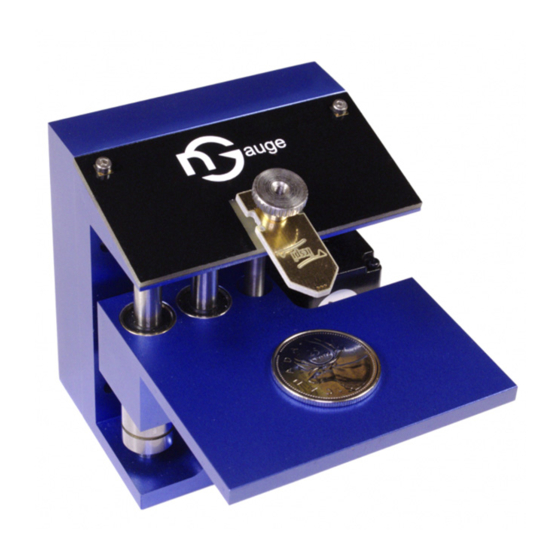
Page 8: Ngauge Afm Components
AFM models 1.1 and 1.2 feature a detachable sample platform. These screws are removable, and the stage can be customized. 3.3.2. Hole in base plate The base plate features a hole for mounting the nGauge AFM onto an optical table. 3.4. nGauge AFM Capabilities 3.4.1. - Page 9 3.4.3. Scan Size The nGauge AFM can scan areas of up to 20 µm x 20 µm in X and Y, up to 60 µm in X and vertical distances up to 10 µm in Z (peak-to-valley) with <1 nm RMS noise in the vertical direction.
-
Page 10: Setup
4. Setup 4.1. Location The nGauge AFM is small, simple, and portable, and can be set up virtually anywhere. For best results, it is recommended that you follow these guidelines: Normal The nGauge system should be set up in areas with normal room temperature temperature and pressure. -
Page 11: Basic Set-Up
4.2. Basic Set-up Follow these steps to set up your nGauge AFM system: 1. Remove the components from the carrying case. Set the stage upright on a flat surface. 2. Plug the power supply into a wall outlet and into the power connector in the stage. -
Page 12: Software Installation
3. Connect the USB cable to a computer and to the USB connector in the stage. 4.3. Software Installation The software required to operate the nGauge AFM can be found on the USB key provided or downloaded from https://www.icspicorp.com/resources To install the software, run the executable installer “nGauge_setup_x.x.x.x_windows.exe”. -
Page 13: Basic Operation
Launch the software by double-clicking on the nGauge program on your desktop or searching for nGauge in the start menu. If the AFM is powered up and connected to the computer with the USB cable, the welcome screen should display the message "AFM Ready". If not, refer to Section 7.1 Set-up Troubleshooting. -
Page 14: Chip Installation And Sample Placement
Once the AFM has been set up and the software installed, you are ready to install a chip. 1. Completely unscrew and remove the thumb nut from the stage. 2. Open the AFM chip box and pick up an AFM chip using the tweezers. © ICSPI Corp. 2007-2021 nGauge AFM User Manual 2.0... - Page 15 Approach page in the software and click and hold on the Retract button until the sample platform is separated by 15 mm or more from the chip installation area. 4. Replace the thumb nut and firmly tighten it. © ICSPI Corp. 2007-2021 nGauge AFM User Manual 2.0...
- Page 16 Ensure the sample is stable on the sample platform, and that it will not move while scanning. If you have a lightweight sample, ensure that it is firmly affixed to a rigid substrate such as a glass slide or AFM sample disc. © ICSPI Corp. 2007-2021 nGauge AFM User Manual 2.0...
-
Page 17: Software Overview
5.3. Software Overview The nGauge AFM software is divided into three pages: (1) Sweep, (2) Approach, and (3) Scan. To navigate between the three pages, click on the desired tab at the top of the page. There is a dropdown menu called ‘Show Advanced Controls’ on each page that displays advanced controls specific to that page. - Page 18 Sweep again. If you continue to encounter the error, refer to 7.2.1 Broken device or device not found error for more information. 5.4.3. Advanced Controls Refer to Section 8.1 Sweep Advanced Controls for more information on advanced controls for the Sweep page. © ICSPI Corp. 2007-2021 nGauge AFM User Manual 2.0...
-
Page 19: Approach
The Approach page also has an indicator for the Motor status and the Approach status. Ensure that the target area of your sample is below the nGauge AFM tip. Click the Approach button to initiate the automatic approach of the sample to the probe tip. The sample platform will rise quickly and then slow down for a final approach once the sample gets very close. - Page 20 Important: Always disengage the tip and retract the sample away from the tip when the nGauge is not in use. Important: If the tip is engaged with the sample and the tip is not on the target area, you must click on Disengage and then click and hold on Retract to move the sample platform away from the tip before re-positioning the sample.
- Page 21 Try disengaging and re-approaching and look for a snap-in. If you continue to observe false engages, refer to Section 7.3.3 False Engage. Proper approach. Steep snap-in to the False engage. Gradual decrease to the setpoint on the amplitude graph. setpoint on the amplitude graph. © ICSPI Corp. 2007-2021 nGauge AFM User Manual 2.0...
- Page 22 PGA. Refer to 7.3.5 Fine Z Drift and Fine Z Not Centered for more information. 5.5.5. Advanced Controls Refer to Section 8.2 Approach Advanced Controls for details on advanced controls on the approach page. © ICSPI Corp. 2007-2021 nGauge AFM User Manual 2.0...
-
Page 23: Scan
At any time, you can click Pause and Resume to temporarily stop and then resume the current scan, or you can Pause and then Reset to clear the current scan. © ICSPI Corp. 2007-2021 nGauge AFM User Manual 2.0... - Page 24 The topography scan displays data in nanometer (nm) or micrometer (µm), directly from the oscillation amplitude (V). The topography data is provided in nm or µm as courtesy values to the © ICSPI Corp. 2007-2021 nGauge AFM User Manual 2.0...
- Page 25 Refer to Section 5.8.3 Proportional and Integral Control for more information. The colors displayed in the Line Profile change and the change in color does not represent anything. © ICSPI Corp. 2007-2021 nGauge AFM User Manual 2.0...
- Page 26 Default is 500 µs. Can be safely changed during a scan. A standard 256 x 256-pixel scan with 500 µs dwell time will take approximately 80 seconds to complete. © ICSPI Corp. 2007-2021 nGauge AFM User Manual 2.0...
- Page 27 The data will be saved in the folder specified by Path. Changing the save folder is recommended, which can be achieved by clicking on the path. The default save location is the nGauge software folder (usually C:\Program Files (x86)\ICSPI\nGauge). However, depending on your computer’s configuration, Windows can occasionally store the data in the AppData folder: C:\Users\<username>\AppData\Local\VirtualStore\Program Files (x86)\ICSPI\nGauge...
- Page 28 The proportional coefficient of the PI controller. Increasing this value increases the response time of the controller but increasing it too much can cause Proportional instability in the Z actuator. Can be safely changed during scanning. © ICSPI Corp. 2007-2021 nGauge AFM User Manual 2.0...
-
Page 29: Scanning Recommendations
The height of the tip is represented by the Fine Z on the Approach page. The range is from 0 to 3.3 V. When the Approach button is clicked, Fine Z gets set to just below the middle of its range (approximately 1.5 V): © ICSPI Corp. 2007-2021 nGauge AFM User Manual 2.0... - Page 30 Approach page to make sure that the Fine Z is within the middle of the range and not approaching one of the extremes. Example of Fine Z reaching 0 V: the tip is no longer in contact with the sample. The amplitude is above the setpoint: © ICSPI Corp. 2007-2021 nGauge AFM User Manual 2.0...
- Page 31 Ideally, the tip is perpendicular to the sample. There are a few reasons why the tip may not be perpendicular to the sample: 1) nGauge AFM chips are installed at a 15º angle relative to the sample to ensure that the tip comes into contact with the sample;...
- Page 32 Leveling set to 5 (Forward). The tip follows sample topography. The scans in nGauge software are lightly processed, which removes the tilt in the Y direction. Open the scan using Gwyddion to verify that the Leveling setting is set correctly. These scans show the difference in the tilt when the leveling direction and leveling magnitude are changed.
-
Page 33: Improving Performance
As you decrease this value, the scan speed will increase and the controller will have less time to track the sample topography, possibly leading to poor image results. The default © ICSPI Corp. 2007-2021 nGauge AFM User Manual 2.0... - Page 34 If the P and I coefficients are too high, the controller may oscillate, and the image will be noisy. The default values are 5 for P and 5000 for I. © ICSPI Corp. 2007-2021 nGauge AFM User Manual 2.0...
- Page 35 However, inspecting the phase and error images shows that these settings induced oscillations and the image is noisy. Although the topography image does not appear noisy, there will be some noise in the topography image due to the controller feedback. © ICSPI Corp. 2007-2021 nGauge AFM User Manual 2.0...
-
Page 36: Advanced Scan Features
When the scan is completed, the line under your cursor would be displayed on the line profile plot. You can widen or narrow the line profile by using the scroll wheel. © ICSPI Corp. 2007-2021 nGauge AFM User Manual 2.0... - Page 37 Click the Scan button again after the selection has been made to scan the region of interest. To reset to the original scan area, click Reset Zoom. If Reset Zoom button is disabled, the AFM will scan the default area. © ICSPI Corp. 2007-2021 nGauge AFM User Manual 2.0...
-
Page 38: Post-Processing
These measurements are best acquired using Gwyddion, a powerful, free and open-source AFM post-processing program. Gwyddion can be downloaded here: http://gwyddion.net/download.php The nGauge user interface can save images in a Gwyddion-supported format (gsf) which can then be dragged and dropped into Gwyddion to open them. © ICSPI Corp. 2007-2021... -
Page 39: Gwyddion
Display a 3D view of the image. You can rotate or scale this 3D View > 3D View image, change the colors, and save it. © ICSPI Corp. 2007-2021 nGauge AFM User Manual 2.0... -
Page 40: Calibration
6.2. Calibration For the highest accuracy, nGauge AFM scans should be calibrated in Gwyddion. Calibration can be performed in both the vertical (Z) and lateral (XY) directions. To perform calibration, AFM calibration gratings with known step heights (for Z calibration) and/or pitches (for X/Y calibration) are required. - Page 41 For example, for calibrating scan areas such as 5, 10, 20 microns, a standard feature pitch of 3 micron would work well. For calibrating small scan areas (<1 micron), a feature pitch of 100 – 300 nm would be required. © ICSPI Corp. 2007-2021 nGauge AFM User Manual 2.0...
-
Page 42: Troubleshooting
7.1. Set-up Troubleshooting 7.1.1. Waiting for Serial Connection Message If the nGauge is not recognized by your computer, the message “Waiting for serial connection…” will be displayed instead of “AFM Ready” and the Firmware version will be “x.x.x.x”. Follow these steps to resolve the issue: 1) Unplug and then plug in the USB and/or power. - Page 43 If there is a COM port by one of these names: go to Step 5. 5) Close the nGauge AFM software and navigate to: C:\Program Files (x86)\ICSPI\nGauge\firmware\ISP If the firmware folder does not exist, download it from the ICSPI website: https://www.icspicorp.com/downloads Double-click on “flash-usb-win” or “flash-usb-win.bat”. A terminal window will open and should display the following: Opening serial port ‘COM#’...
-
Page 44: Sweep Troubleshooting
After installing this driver, try unplugging and plugging in the USB cable, and restarting the software again. If the AFM unit is plugged in to the computer and plugged in to power but is not recognized in Device Manager by your computer, contact ICSPI for support. 7.2. Sweep Troubleshooting 7.2.1. - Page 45 If any of them are above 250 ohm, proceed to 4a. • If they are between 100 and 250 ohm, proceed to 5a. • If any are below 100 ohm, proceed to 6. © ICSPI Corp. 2007-2021 nGauge AFM User Manual 2.0...
- Page 46 5c Uncheck the “Check Resistances” box. 5d You can click on Sweep and the error message should no longer be displayed. 6. If any resistance of X1, X2, Y1 or Y2 is consistently below 100 ohm, contact ICSPI for support.
- Page 47 Look for a large “waffle” structure at the end of the chip. If there is a waffle structure, then the chip should work. If the waffle structure is missing, the chip is broken and can be discarded. © ICSPI Corp. 2007-2021 nGauge AFM User Manual 2.0...
-
Page 48: Approach Troubleshooting
Override controls exist in the Menu button on the top right of the screen. After clicking the Menu button, the Motor Controls can be used to approach without a functional AFM chip. If the stage still will not move, contact ICSPI for support. © ICSPI Corp. 2007-2021 nGauge AFM User Manual 2.0... - Page 49 Go to the Sweep page, click on Show Advanced Controls and increase the Cantilever Drive Amplitude, then re-Sweep until the peak of the amplitude graph is between 2 and 3.3 V. © ICSPI Corp. 2007-2021 nGauge AFM User Manual 2.0...
- Page 50 The most effective way to discharge the sample is to place the sample on top of a piece of metal (“substrate”) and to make an electrical connection from the thumb nut of the nGauge system to the substrate. This electrical connection will ground the sample and prevent surface charging.
- Page 51 Disengage. Then select Show Advanced Controls and increase the Z Coarse value to 0.2 V. Click on Approach. If the setpoint is still not tracked, it is possible that the sample is electrically charged. © ICSPI Corp. 2007-2021 nGauge AFM User Manual 2.0...
-
Page 52: Scan Troubleshooting
Noisy Scan (Periodic Noise) If the image results are excessively noisy, this may be caused by nearby vibrations or air drafts. The nGauge is generally resistant to normal building vibrations, but nearby sources of mechanical or electrical noise can affect image quality. - Page 53 The Z scanner has a certain scan range. If the Z scanner reaches the minimum or maximum of the range, data can no longer be collected, and the image may be “clipped”, also known as a data plateau. In this scan, the data cuts out near the bottom. © ICSPI Corp. 2007-2021 nGauge AFM User Manual 2.0...
- Page 54 If there is no data in the scan at all, such as in the scan below, go to the Approach tab, click on Disengage then Approach. Ensure that the Fine Z is in the middle of its range. © ICSPI Corp. 2007-2021 nGauge AFM User Manual 2.0...
-
Page 55: Advanced Controls
Sweep Advanced Controls In the Sweep tab, click on Show Advanced Controls. These additional controls are for running a manual frequency sweep and controlling the driving frequency and tip oscillation amplitude. © ICSPI Corp. 2007-2021 nGauge AFM User Manual 2.0... - Page 56 Different chips may require different cantilever drive amplitudes. 8.1.3. Manual Sweep Controls The manual sweep controls are not required for normal operation of the nGauge. They are mainly provided for performing AFM research only and should only be changed by advanced users.
-
Page 57: Approach Advanced Controls
Increasing this value can be thought of as applying less force between Setpoint the tip and sample. Decreasing this value can be thought of as applying more force between the tip and sample. Enable/Disable Manually turns the controller on or off. © ICSPI Corp. 2007-2021 nGauge AFM User Manual 2.0... - Page 58 8.3. Menu Button Advanced Controls The Advanced Controls are not required for normal operation of the nGauge unit and should be used by advanced users only. To access the Advanced Controls, click on the button with three horizontal lines in the top right of the screen.
- Page 59 If an internet connection is available, this section shows if the software Updates and firmware used are up to date. If updates are available, please go www.icspicorp.com/resources to find the newest versions of © ICSPI Corp. 2007-2021 nGauge AFM User Manual 2.0...
- Page 60 Contact info@icspicorp.com for any questions regarding firmware updates. Update Firmware: currently Windows only. Reprograms the nGauge unit with the version of the firmware binary selected (see “Choose Firmware” button). Caution: ensure the connection to the unit is stable, and do not repeatedly click this button.
- Page 61 9.1.1.1. Change the Color Changing the color is optional, but the default for AFM is gold, like how the nGauge AFM scans are produced. The default is grayscale, but we can change it easily to the standard gold by right-clicking on the legend. (If gold is not an option, click on Edit > Color Gradients… and select gold from the list.)
- Page 62 To correct for tilt, click on Data Process > Level > Plane Level, or select the plane-level shortcut Note: In nGauge software, you can correct for tilt (in Y) by changing the Levelling setting. This will physically change the angle at which the tip scans across the sample. To simply correct for the tilt in a scan, you can also click on the “Level Image”...
- Page 63 2. Click on three areas that should have the same height in the scan. Place these points far apart from each other. 3. Increase the averaging radius to 10 px (or more). 4. Select “Set plane to zero.” 5. Click Apply. © ICSPI Corp. 2007-2021 nGauge AFM User Manual 2.0...
- Page 64 Three Point Level tool Three points selected in the troughs of the grating. © ICSPI Corp. 2007-2021 nGauge AFM User Manual 2.0...
- Page 65 Then click and drag a line where desired on the scan. This will cause the profile to show up in the blank graph. © ICSPI Corp. 2007-2021 nGauge AFM User Manual 2.0...
- Page 66 When the thickness of the line is desirable, click apply, and a new graph will pop up. Here it is possible to get an estimate of the calibration factor and otherwise gather data. © ICSPI Corp. 2007-2021 nGauge AFM User Manual 2.0...
- Page 67 Once the tool is open, select ‘Step Height (Positive/Negative)’ from a dropdown on the right-hand side. Negative is for lines with two plateau and one valley. Positive is for lines with two valleys and one plateau. Critical Dimension tool location © ICSPI Corp. 2007-2021 nGauge AFM User Manual 2.0...
- Page 68 Once this is selected, hit ‘Fit’. The parameters will fill out with values. Looking below, the step height of this grating is 135.5 nm with an error of < 1 nm. Step height © ICSPI Corp. 2007-2021 nGauge AFM User Manual 2.0...
- Page 69 Select as many points in the graph as you like. As you select them, information about the points will show up in the popup window. To know the height of the profiles, look at the Y[nm] column Measure distances button © ICSPI Corp. 2007-2021 nGauge AFM User Manual 2.0...
- Page 70 Select the peaks and subtract the valley height from the plateau height to find the measured height of the grating. In our example, the peaks are located at -1.6 nm and 139.8 nm. Subtracting these gives 141.4 nm as the measured height. © ICSPI Corp. 2007-2021 nGauge AFM User Manual 2.0...
- Page 71 1D Statistical Functions button Measure distances button © ICSPI Corp. 2007-2021 nGauge AFM User Manual 2.0...
- Page 72 With the calibration factor calculated, the Dimensions and Units tool is found under Data Process > Basic Operations > Dimensions and Units. In the ‘Z Calibration Factor’ input area, enter the calibration factor calculated earlier. © ICSPI Corp. 2007-2021 nGauge AFM User Manual 2.0...
- Page 73 If there is a scan for which height is to be recorded is not exactly like a calibration grating, or if the goal of a scan is to achieve accurate calibration for a range of heights, then multi-point calibration should be used. © ICSPI Corp. 2007-2021 nGauge AFM User Manual 2.0...
- Page 74 (x) and the known step height is the dependent variable (y). An example of a linear fit to the data above in Excel: © ICSPI Corp. 2007-2021 nGauge AFM User Manual 2.0...
- Page 75 ‘d1’. Once applied, this will create a new calibrated image. Check that the data is scaled appropriately using either method for calculating a calibration factor. Arithmetic location © ICSPI Corp. 2007-2021 nGauge AFM User Manual 2.0...
- Page 76 Often the same grating can be used for vertical and lateral calibration. For example, to calibrate in the X direction, a lines and spaces grating can be used. Use the Line Profile tool to measure the pitch between features. © ICSPI Corp. 2007-2021 nGauge AFM User Manual 2.0...
- Page 77 Use the ‘Measure distances in graph’ tool in the bottom left: Then select a point at the beginning of each of the line structures: © ICSPI Corp. 2007-2021 nGauge AFM User Manual 2.0...
- Page 78 Process > Basic Operations > Dimensions and Units. In the ‘X Calibration Factor’ input area, enter the calibration factor. These steps are outlined in Section 9.1.3.1 Apply calibration factor using Dimensions and Units Tool. © ICSPI Corp. 2007-2021 nGauge AFM User Manual 2.0...
- Page 79 ICSPI Corp. Integrated Circuit Scanning Probe Instruments Corp. The AFM-on-a-chip Company 248 Corrie Cres Waterloo Ontario N2L 6E1 Canada Telephone: +1 (289) 236-0204 Email: info@icspicorp.com Web: https://www.icspicorp.com © ICSPI Corp. 2007-2021 nGauge AFM User Manual 2.0...
Need help?
Do you have a question about the nGauge and is the answer not in the manual?
Questions and answers