
Subscribe to Our Youtube Channel
Related Manuals for autoXS EA-2138


Summary of Contents for autoXS EA-2138
- Page 1 User Manual Manual del usuario CAR BATTERY CHARGER CARGADOR DE BATERÍA DE AUTOMÓVIL English ..05 Español ..25 ID: #07177...
-
Page 2: Table Of Contents
Contents Overview ................3 Use ..................4 Package contents/device parts ..........5 General information ............6 Reading and storing the user manual ......... 6 Explanation of symbols ............6 Safety ................... 7 Proper use ..................7 Safety instructions ..............8 First use ................12 Checking the charger and package contents ....12 Operation ................ -
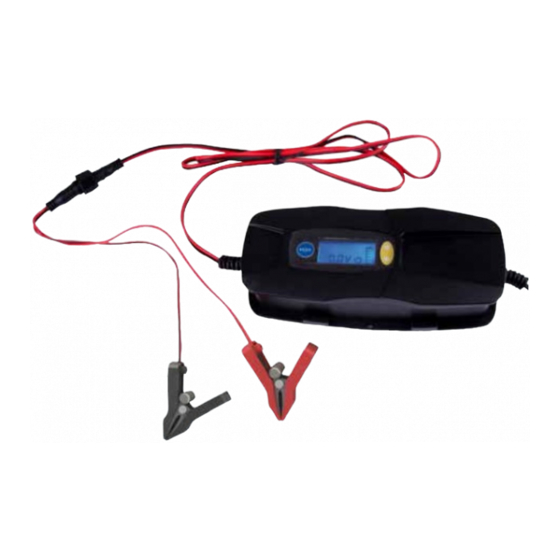
Page 5: Package Contents/Device Parts
Package contents/device parts Package contents/device parts Display (control panel) Power cable Battery connector cord Black battery terminal clamp, negative pole (–) Red battery terminal clamp, positive pole (+) Mode button Motorcycle charging program Car charging program Cold charging program 6 V charging program Battery charge level Power indicator Error indicator... -
Page 6: General Information
General information General information Reading and storing the user manual This user manual accompanies this car battery charger (referred to below only as the “charger”). It contains important information about start-up and handling. Before using the charger, read the user manual carefully. This par- ticularly applies to the safety instructions. -
Page 7: Safety
Safety The charger complies with protection class II. The charging current is direct current. Plus, positive polarity – Minus, negative polarity Products marked with this symbol may only be operated in in- door areas. The charger has been tested and found to comply with the limits for a Class B digital device, pursuant to part 15 of the FCC rules. -
Page 8: Safety Instructions
Safety Safety instructions WARNING! Risk of electric shock! A faulty electrical installation or excessive line voltage may result in an electric shock. − Only connect the charger if the line voltage of the outlet corresponds to the rating plate specification. −... - Page 9 Safety − Never use the power cable as a carrying handle. − Keep the charger, power plug and power cable away from open flames and hot surfaces. − Lay the power cable so that it does not pose a tripping hazard.
- Page 10 Safety risks associated with operating it. Children must not play with the charger. Cleaning and user maintenance must not be performed by unsupervised children. − Keep children under eight years of age away from the charger and connector cable. − Do not leave the charger unattended while in operation. −...
- Page 11 Safety − Once charging is complete, first disconnect the device from the power grid and then remove the battery terminal clamps from the battery or vehicle chassis. − Observe the instructions in this user manual when con- necting and disconnecting the charger to prevent the formation of sparks.
-
Page 12: First Use
First use − In the event of direct contact, seek immediate medical advice. − Use a dry, absorbent cloth to remove leaky battery fluid and avoid contact with your skin by wearing e.g. acid- proof protective gloves. NOTICE! Risk of damage! Improper handling of the charger may result in damage to the charger and the battery. -
Page 13: Operation
Operation Operation Functionality of the charger The charger automatically recognizes the connected battery type, 6 V or 12 V battery. If the battery terminal clamps and/or are incorrectly connected (re- will illuminate in red (see Fig. B). If the verse polarity), the error indicator charger overheats or short circuits during operation, the error indicator will (see Fig. C). -
Page 14: Charging Programs
Operation The charger is connected to the power The power indicator flash- grid. The battery terminal clamps es in green, the display are not connected or are not correctly blinking. connected. The charger is connected to the power grid. The power indicator is per- The battery terminal clamps manently illuminated in green. -
Page 15: Special Functions
Operation Depending on the battery’s charge level, the charger will adjust the charging currents. The specified maximum charging current will only be used to charge the battery during the main charging phase. Just before the maximum charge is reached, the charger operates with lower charging current. -
Page 16: Connecting The Charger
Operation Connecting the charger WARNING! Danger of explosion! An electrical short-circuit may occur if connected incorrectly. Sparks may form that could trigger an explosion. − Always start by connecting the battery to the charger. Then insert the power plug of the charger in the outlet. This is the only way to prevent the formation of sparks. - Page 17 Operation Charging the battery in the vehicle WARNING! Risk of injury! If the vehicle is in a faulty state when handling the charger and battery, this may result in severe injury. − If the battery is firmly mounted in the vehicle, make sure that the vehicle is not running and is in a secured stand- still.
-
Page 18: Starting The Charging Process
Operation As soon as the charger is connected to the power grid, the following will ap- pear on the display • the standby mode indicator • the empty battery symbol for the battery charge level indicator • the current voltage measured for the battery (see Fig. D). -
Page 19: Charging Process
Operation Reactivation via pulse charging is the same for all 12 V charging programs. For this reason, you can still switch to the car or cold charging programs (depending on the connected battery or the ambient temperatures) even if the battery voltage is still below 10.5 V. -
Page 20: Cleaning And Maintenance
Cleaning and maintenance The order of steps for disconnection corresponds to the reverse order of steps for connecting the charger: 1. Pull the power plug out of the outlet. 2. If you charged the battery outside of the vehicle, disconnect the •... -
Page 21: Storage
Storage utensils such as knives, hard scrapers and similar items. They could damage the surfaces. 1. Before cleaning, pull the power plug out of the outlet. 2. Disconnect the battery terminal clamps from the battery or the chassis of the vehicle (see chapter “Disconnecting the charger”). 3. -
Page 22: Technical Data
You can obtain our service address from our warranty card. This user manual is also available for down- load at www.wachsmuth-krogmann.com. Technical data Model: EA-2138 Article number: 95402 Protection class: Mains connection Input voltage: 220–240 V~/50 Hz... -
Page 23: Disposal
Disposal Suitable batteries Battery type: Lead batteries containing an electrolyte solution, lead batteries containing an electrolyte gel Rated capacity: 1.2 Ah~14 Ah for 6 V batteries, 1.2 Ah~120 Ah for 12 V batteries Charging programs 6 V: approx. 7.3 V / 0.8 A for 6 V / 1.2~14 Ah batteries Motorcycle: approx. - Page 25 Contenido Contenido Conjunto ....................3 Uso ......................4 Volumen de suministro/piezas del equipo ........26 General information ................27 Leer y guardar este manual del usuario ........... 27 Descripción de símbolos ..............27 Seguridad ....................28 Uso apropiado ..................28 Indicaciones de seguridad ..............29 Primera puesta en servicio ..............
-
Page 26: Volumen De Suministro/Piezas Del Equipo
Volumen de suministro/piezas del equipo Volumen de suministro/piezas del equipo Pantalla (panel de control) Cable de conexión de red Cable de conexión de batería Borne de batería negro, polo negativo (–) Borne de batería rojo, polo positivo (+) Botón de modo Programa de carga de motocicleta Programa de carga de coche Programa de carga de frío... -
Page 27: General Information
General information General information Leer y guardar este manual del usuario Este manual del usuario se incluye con este cargador de batería de automóvil (denominado en lo sucesivo abreviadamente: “carga- dor”). Contiene información importante relacionada con la puesta en marcha y el manejo. Lea detenidamente el manual del usuario antes de utilizar el cargador, en especial el apartado correspondiente a las indicaciones de seguridad. -
Page 28: Seguridad
Seguridad Longitud del cable: 5.91 pies (1.80 m) (longitud del cable con pro- 70“ / 1.9M tección contra dobleces y conector: 6.23 pies (1.90 m)). long cable longitud del cable El cargador presenta un grado de protección II. La corriente de carga es continua. Más, polaridad positiva –... -
Page 29: Indicaciones De Seguridad
Seguridad Indicaciones de seguridad ¡CUIDADO! ¡Peligro de descarga eléctrica! Una instalación eléctrica defectuosa o una tensión demasiado alta pueden producir una descarga eléctrica. − Conecte el cargador solo cuando el voltaje de la toma de corriente coincida con los datos proporcionados en la pla- ca de tipos. - Page 30 Seguridad − Nunca tire del cable del enchufe de red para desconectarlo de la toma de corriente; agarre siempre el enchufe de red. − Nunca use el cable de red como asa de transporte. − Mantenga el cargador, el enchufe de red y el cable de red alejados del fuego abierto y de superficies calientes.
- Page 31 Seguridad riesgos derivados de ello. Los niños no pueden jugar con el cargador. La limpieza y el mantenimiento de usuario no deben ser realizados por niños sin supervisión. − Mantenga alejados a niños menores de ocho años del car- gador y del cable de conexión. −...
- Page 32 Seguridad − Tras la carga, desconecte el equipo de la red eléctrica y luego los bornes de batería de la batería o de la carrocería. − Tenga en cuenta las instrucciones de este manual del usuario al conectar y retirar el cargador para así evitar la formación de chispas.
-
Page 33: Primera Puesta En Servicio
Primera puesta en servicio − En caso de contacto directo, busque consejo médico de inmediato. − Elimine el líquido derramado de la batería con un paño absorbente seco y evite el contacto con la piel usando, p. ej., guantes protectores a prueba de ácidos. ¡AVISO! ¡Riesgo de daños! El manejo indebido del cargador puede dañar el cargador y la... -
Page 34: Manejo
Manejo 3. Compruebe si el cargador o las piezas individuales presentan daños. Si está dañado, no utilice el cargador. Contacte con el fabricante a través de la dirección de servicio técnico indicada en la tarjeta de garantía. Manejo Funcionamiento del cargador El cargador detecta automáticamente si la batería conectada es de 6 V o 12 V. -
Page 35: Programas De Carga
Manejo Las barras del estado de carga La batería está totalmente cargada. de la batería están llenas y el marco se muestra de forma permanente. El cargador está conectado a la red eléctri- El indicador de red parpa- ca. Los bornes de la batería dea en verde, la pantalla están conectados o están mal conectados. -
Page 36: Funciones Especiales
Manejo • Programa de carga de 6 V : Se trata de un programa especial para cargar baterías de 6 V con una capacidad asignada de 1.2 Ah a 14 Ah. La corriente de carga adaptada es de 0.8 A. En función del estado de carga de la batería, el cargador adapta las corrientes de carga. -
Page 37: Conexión Del Cargador
Manejo Conexión del cargador ¡CUIDADO! ¡Riesgo de explosión! Con una mala conexión, se puede producir un cortocircuito eléc- trico. Se pueden formar chispas que provoquen una explosión. − Primero conecte siempre la batería al cargador. Conecte después el enchufe de red del cargador a la toma de co- rriente. - Page 38 Manejo Carga de la batería en el vehículo ¡CUIDADO! ¡Riesgo de lesiones! Un mal estado del vehículo durante el uso del cargador y la batería puede conllevar lesiones graves. − En caso de una batería fija en el vehículo, asegúrese de que el vehículo esté...
-
Page 39: Inicio Del Proceso De Carga
Manejo En cuanto el cargador esté conectado a la red eléctrica, aparece en la pantalla • el indicador del modo de standby • el símbolo de batería vacía del indicador del estado de carga de la batería • la tensión medida en ese momento de la batería (véase la fig. -
Page 40: Proceso De Carga
Manejo Cuando la batería alcanza una tensión de 10.5 V, el cargador pasa a la carga permanente normal. La corriente de carga corresponde ahora a la del progra- ma de carga de 12 V seleccionado. La tensión se muestra de forma permanente. La reactivación a través de la carga de impulsos es igual para todos los programas de carga de 12 V. -
Page 41: Limpieza Y Mantenimiento
Limpieza y mantenimiento − Tenga en cuenta la secuencia correcta al desconectar los bornes de batería (+/-) de la batería o carrocería. La secuencia de desconexión de los bornes corresponde al orden inverso de la conexión: 1. Extraiga el enchufe de red de la toma de corriente. 2. -
Page 42: Almacenamiento
Almacenamiento ¡AVISO! ¡Riesgo de daños! El manejo inadecuado del cargador puede dañar el cargador. − No utilice productos de limpieza agresivos, cepillos con cerdas de metal o nylon y objetos de limpieza afilados o metálicos, como cuchillos, espátulas duras y similares, pues podrían provocar daños en las superficies. -
Page 43: Datos Técnicos
Nuestros asesores de atención al cliente le ayudarán. En la tarjeta de garantía encontrará la dirección del servicio técnico. Este manual del usuario se puede descargar también en www.wachsmuth-krogmann.com. Datos técnicos Modelo: EA-2138 Número de artículo: 95402 Grado de protección: Conexión de red Tensión de entrada:... -
Page 44: Eliminación
Eliminación Baterías compatibles Tipo de batería: baterías de plomo con solución de elec- trolito, baterías de plomo con gel de electrolito Capacidad asignada: 1.2 Ah~14 Ah para baterías de 6 V, 1.2 Ah~120 Ah para baterías de 12 V Programas de carga 6 V: aprox. 7.3 V / 0.8 A para baterías de 6 V/1.2~14 Ah Motocicleta: aprox. - Page 45 DISTRIBUTED BY • DISTRIBUIDO POR: ALDI INC., BATAVIA, IL 60510 WWW.ALDI.US AFTER SALES SUPPORT • SERVICIO POSVENTA 95402 1-888-367-7373 help@myproduct.care YEAR WARRANTY MODEL/NO DEL MODELO: AÑOS DE GARANTÍA EA-2138 11/2017...
- Page 46 AFTER SALES SUPPORT Return your completed 95402 warranty card together with 1-888-367-7373 the faulty product to: help@myproduct.care Wachsmuth & Krogmann Inc. MODEL: EA-2138 11/2017 1015 Hawthorn Drive Itasca Hotline: IL 60143 Call charges from your regular landline operator. UNITED STATES...
- Page 47 ALDI INC. FULL WARRANTY CONDITIONS Dear Customer: The ALDI warranty is a full warranty offering you the following benefits: Warranty period: 3 year from date of purchase. 6 months for movable parts and consumables under normal and proper conditions of use (e.g. rechargeable batteries).
- Page 48 Envíe la tarjeta de garantía 95402 rellenada junto con el 1-888-367-7373 producto defectuoso a: help@myproduct.care Wachsmuth & Krogmann Inc. NO DEL MODELO: EA-2138 11/2017 1015 Hawthorn Drive Itasca Línea directa: IL 60143 Para la tarifa de red fija regular de su proveedor de telefonía.
- Page 49 CONDICIONES DE LA GARANTÍA COMPLETA DE ALDI INC. Estimado cliente: La Garantía ALDI es una garantía completa que le ofrece los siguientes beneficios: Período de garantía: 3 años a partir de la fecha de compra. 6 meses para las piezas de recambio y consumibles en condiciones normales y adecuadas de uso (por ejemplo, baterías recargables)
Need help?
Do you have a question about the EA-2138 and is the answer not in the manual?
Questions and answers
Can I leave the ea 2138 battery charger on whilst away for weeks
No, you should not leave the autoXS EA-2138 battery charger on while away for weeks. Improper handling may damage the charger or battery, and the manual does not mention support for long-term unattended use.
This answer is automatically generated
Why is charger flashing when first connected
The autoXS EA-2138 charger flashes green when first connected because it is powered on but the battery terminal clamps are either not connected or not correctly connected.
This answer is automatically generated
Do you have or carry just the battery cord for model ea 2138 charger?