
Subscribe to Our Youtube Channel
Related Manuals for Smith-Root eDNA Sampler

Summary of Contents for Smith-Root eDNA Sampler
- Page 1 INSTRUCTION MANUAL For eDNA Sampler videos and tutorials, visit: www.smith-root.com/support/tutorials 11569.01 eDNA Backpack Sampler Instruction Manual...
-
Page 2: Table Of Contents
Items manufactured by companies other than Smith-Root carry the original manufacturer’s warranty. Please contact product manufacturer for return instructions. All Smith-Root, Inc. manufactured products are covered by a one year warranty. Credit & Refund Policy: Customers returning equipment, in new condition, will be given credit five days from the date of the return. -
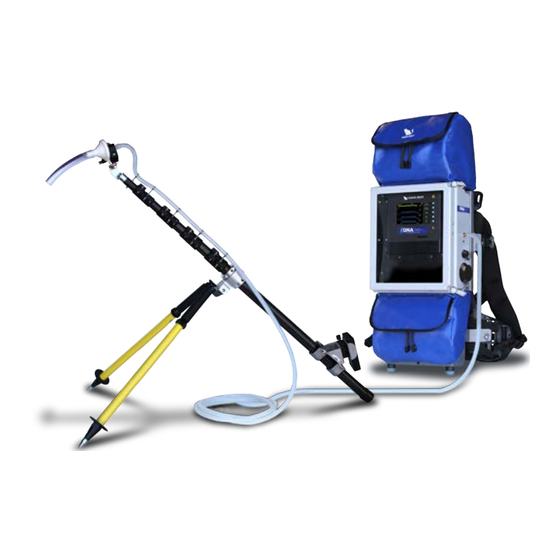
Page 3: Edna Sampler Unit
8. Rechargeable batteries and charger for remote control 9. Small Phillips head screwdriver for changing remote control batteries (not in- cluded) 10. AC charger for eDNA Sampler battery 11. Rechargeable 12v DC battery for eDNA Sampler unit 12. eDNA Backpack Sampler unit (shown) www.smith-root.com... -
Page 4: Warnings
INSTRUCTION MANUAL Stand-alone sampler A. Control/display panel I. Input power cable B. USB connector J. Battery (standalone sampler) C. Speaker/Volume K. Harness* D. Power Switch L. Upper dry bag* E. Water inlet M. Lower dry bag* Backpack sampler F. Water outlet N. -
Page 5: Battery Installation
SAMPLER BATTERY INSTALLATION 1. Empty the lower storage dry bag and fold it up to reveal the battery tray (backpack unit) 2. Place the battery in the rubber footer and align dual lock to snap in place 3. Connect the battery to eDNA Sam- pler power cable 4. -
Page 6: Edna Sampler Interface
INSTRUCTION MANUAL eDNA SAMPLER INTERFACE S A M P L E R 1. Menu button 2. Item select buttons 010055 3. Back button 4. Target Volume – The target sample volume in liters (L) 5. Target Flow – The flow rate set point in liters per minute (L/min) 6. -
Page 7: Auto Mode
SAMPLER AUTO MODE When the system is in auto mode, the user will be alerted by 2 beeps indicating that the filter should be inverted to achieve the target sam- ple volume. The system will continue to meter the water contained in hose and filter housing even after the nozzle is removed from water. -
Page 8: Menu Screen
INSTRUCTION MANUAL MENU SCREEN 1. Maximum Pressure – The maximum pressure in negative Pounds per Square Inch (PSI) 2. Minimum Flow – Flow rate at which the Low Flow Alarm will sound (5 rapid beeps) 3. Volume Offset – Value deducted from target volume to alarm user when to invert filter 4. -
Page 9: Volume Offset
SAMPLER VOLUME OFFSET This value needs to be changed when- ever the tubing length or filter arrange- ment is altered (for example, switching from 1 filter housing to 3 on the transect pole). To calculate the volume offset for the current setup, use the following procedure with an assistant: 1. -
Page 10: Point Sampling Procedure With Telescoping Pole
INSTRUCTION MANUAL POINT SAMPLING PROCEDURE WITH TELESCOPING POLE 1. Program your eDNA Sampler for your desired Target Volume, Target Flow, and Maximum Pressure. We suggest 1.0 L/min and 10 -PSI as a starting point. For Target Volume, please see “Determining a realistic sample vol- ume”... - Page 11 SAMPLER 9. Place the filter housing with attached tube into the clamp of the telescop- ing pole. Lightly tighten the clamp around the filter housing. Note: Over-tightening will deform the filter housing can cause air leakage. 10. Extend the telescoping pole to the needed length to reach your sampling location.
-
Page 12: Determining A Realistic Sample Volume
INSTRUCTION MANUAL 1. System beeps twice 2. Rotate quickly to invert 3. Elevate filter housing 4. Retract pole to remove filter DETERMINING A REALISTIC SAMPLE VOLUME If you are working in a new environment and the filterable water volume is not known, the low flow alarm can be used as an objective measure of filter clog- ging. - Page 13 SAMPLER 1. Set the Minimum Flow value to 0.3 L/min flow rate in the interface menu. 2. Program the Target Flow to 1.0 L/ min. 3. Set the pump to Manual Mode. 4. Press the Reset button on the inter- face to start a new data record.
-
Page 14: Sample Preservation
3. Label the sample with an ID and place the preserved sample in a storage box. Samples can then be stored in the dry bags of the eDNA Sampler unit. 4. Record the Log ID from the interface associated with the sample ID. -
Page 15: Transect Sampling Procedure
SAMPLER TRANSECT SAMPLING PROCEDURE The eDNA Sampler is optimized for mobile sampling, in which the user can filter water while wearing the backpack and walking along a transect. The system uses GPS to plot the eDNA filtration transect, while also giving the user a constant output of ml/meter –... -
Page 16: Estimate Your Transect Duration
2. If the environment will require you stop and start the pump repeatedly to avoid obstructions or shallow areas, program the eDNA Sampler to Man- ual mode. In Auto mode the data record will be reset each time you press Start. -
Page 17: Obstructions
SAMPLER OBSTRUCTIONS If you encounter an obstruction that requires you to break prime (remove the filter extension tubes from the water), it can be done several times within a tran- sect if the appropriate technique is fol- lowed. 1. When an obstruction is encountered,... -
Page 18: Completing The Transect
STERILIZATION By design the eDNA Sampler system does not need to be sterilized between each sample. However, when moving between watersheds, it may be advisable to ster- ilize the system to avoid transferring bacteria or pathogens between sensitive systems. -
Page 19: Storage Procedure
1. Always replace the orange “IN” and “OUT” port caps when the system is not in use. 2. When you return from sampling, or If the EDNA Sampler unit will not be in use for > 24 hours, please use the following procedure: a. -
Page 20: Data Access And Management
INSTRUCTION MANUAL DATA ACCESS AND MANAGEMENT 1. Plug an empty USB thumb drive formatted to FAT 32 into the eDNA Sampler USB port. 2. The unit will automatically transfer the data logs to the USB drive. 3. When prompted, remove the USB drive from unit. -
Page 21: Troubleshooting
• Do not twist the bipod legs (use the button on top to extend or retract). For video tutorials and updates, please visit: www.smith-root.com/support/tutorials For additional assistance with your eDNA Sampler system, please contact Smith- Root at 360-573-0202 or visit www.smith-root.com. www.smith-root.com... -
Page 22: Instructions For Self-Preserving Filters
INSTRUCTIONS FOR SELF-PRESERVING FILTERS Note: Self-preserving filter housings are currently rated to 10 PSI max pressure (20 in.-Hg; 508 mm-Hg). Please program your eDNA Sampler for a 10 PSI pres- sure threshold. 1. Open a sample packet containing a 47mm self-preserving filter housing and at- tach the extension tube to the housing. - Page 23 STATEMENT OF BIODEGRADATION Smith-Root self-preserving filter housings contain a material that is recognized as one of very few synthetic polymers which are water soluble and “inherently” bio- degradable in water.
-
Page 24: Specifications
GPS position accuracy: 2.5 meter Communications USB: 2.0 Log File Format: .csv Pump specs Ports: 1/4 inch ID tubing Priming vacuum: ~ 5 psi Maximum wetted vacuum: 14 psi (96.5 kilo-pascals) *Specifications subject to change without notice. © 2019, Smith-Root, Inc. 2019... - Page 25 (360) 573-0202 Vancouver, WA USA www.smith-root.com...
Need help?
Do you have a question about the eDNA Sampler and is the answer not in the manual?
Questions and answers