Table of Contents
Advertisement
Quick Links
Advertisement
Table of Contents

Related Manuals for Asus F5GL


Summary of Contents for Asus F5GL
- Page 1 Notebook PC Hardware User’s Manual E2915 / Oct 2006...
-
Page 2: Table Of Contents
Table of Contents Table of Contents 1. Introducing the Notebook PC About This User’s Manual ������������������������������������������������������������������������������������������ 6 Notes For This Manual ������������������������������������������������������������������������������������������� 6 Preparing your Notebook PC�������������������������������������������������������������������������������������� 9 2. Knowing the Parts Top Side�������������������������������������������������������������������������������������������������������������������� 12 Bottom Side �������������������������������������������������������������������������������������������������������������� 14 Left Side ������������������������������������������������������������������������������������������������������������������� 16 Right Side �����������������������������������������������������������������������������������������������������������������... - Page 3 4. Using the Notebook PC Operating System ����������������������������������������������������������������������������������������������������� 36 Support Software ������������������������������������������������������������������������������������������������� 36 Automatic Touchpad Disabling (on selected models) ����������������������������������������� 36 Pointing Device��������������������������������������������������������������������������������������������������������� 37 Using the Touchpad ��������������������������������������������������������������������������������������������� 37 Touchpad Usage Illustrations ������������������������������������������������������������������������������� 38 Caring for the Touchpad ��������������������������������������������������������������������������������������� 39 Storage Devices �������������������������������������������������������������������������������������������������������...
- Page 4 Contents...
-
Page 5: Introducing The Notebook Pc
1. Introducing the Notebook PC About This User’s Manual Notes For This Manual Safety Precautions Preparing your Notebook PC... -
Page 6: About This User's Manual
Introducing the Notebook PC About This User’s Manual You are reading the Notebook PC User’s Manual. This User’s Manual provides informa- tion on the various components in the Notebook PC and how to use them. The following are major sections of this User’s Manuals: 1. Introducing the Notebook PC Introduces you to the Notebook PC and this User’s Manual. -
Page 7: Safety Precautions
Safety Precautions The following safety precautions will increase the life of the Notebook PC. Follow all precautions and instructions. Except as described in this manual, refer all servicing to qualified personnel. Do not use damaged power cords, accessories, or other peripherals. Do not use strong solvents such as thinners, benzene, or other chemicals on or near the surface. -
Page 8: Transportation Precautions
Introducing the Notebook PC Transportation Precautions To prepare the Notebook PC for transport, you should turn it OFF and disconnect all external peripher- als to prevent damage to the connectors. The hard disk drive’s head retracts when the power is turned OFF to prevent scratching of the hard disk surface during transport. Therefore, you should not transport the Notebook PC while the power is still ON. -
Page 9: Preparing Your Notebook Pc
Notebook PC. 1. Install the battery pack 3. Open the Display Panel ASUS F5 ENTERTAINMENT SYSTEM IMPORTANT! When opening, do not force the display panel down to the table or else the hinges may break! Never lift the Note-... - Page 10 Introducing the Notebook PC...
-
Page 11: Knowing The Parts
2. Knowing the Parts Basic sides of the Notebook PC NOTE: Photos and icons in this manual are used for artistic purposes only and do not show what is actually used in the product itself. -
Page 12: Top Side
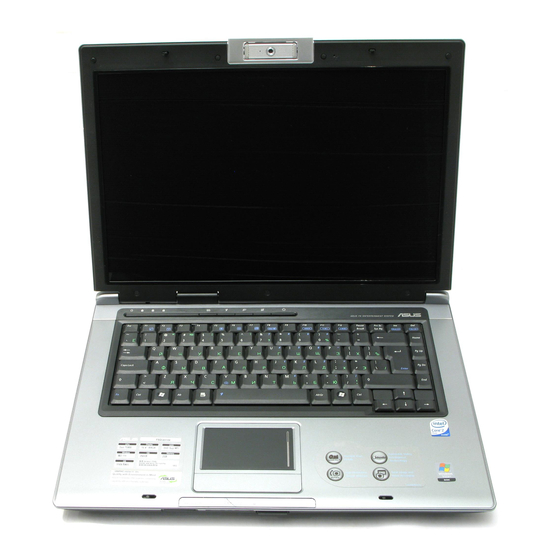
Knowing the Parts Top Side Refer to the diagram below to identify the components on this side of the Notebook PC. NOTE: The keyboard will be different for each territory. (continued on next page) -
Page 13: Display Panel
Camera Indicator The camera indicator shows when the built-in camera is in use. The camera may be auto-activated by supported software. Multi-Position Camera (on selected models) The built-in camera allows picture taking or video recording. Can be used with video confer- encing and other interactive applications. -
Page 14: Bottom Side
Knowing the Parts Bottom Side Refer to the diagram below to identify the components on this side of the Notebook PC. NOTE: The bottom side may vary in appearance depending on model. WARNING! The bottom of the Notebook PC can get very hot. Be careful when handling the Notebook PC while it is in operation or recently been in operation. -
Page 15: Battery Pack
Name Card Holder The Notebook PC has a name card holder glued to the bottom of the Notebook PC to hold identification information on the user in case the Notebook PC is found by others. Memory (RAM) Compartment The memory compartment provides expansion capabilities for additional memory. Addi- tional memory will increase application performance by decreasing hard disk access. -
Page 16: Left Side
Knowing the Parts Left Side Refer to the diagram below to identify the components on this side of the Notebook PC. LAN Port The RJ-45 LAN port with eight pins is larger than the RJ-11 modem port and supports a standard Ethernet cable for connection to a local network. -
Page 17: Expresscard Slot
ExpressCard Slot One 26pin Express card slot is available to support one ExpressCard/34mm or one ExpressCard/54mm expansion card. This new interface is faster by using a serial bus supporting USB 2.0 and PCI Express instead of the slower parallel bus used in the PC card slot. -
Page 18: Right Side
Knowing the Parts Right Side Refer to the diagram below to identify the components on this side of the Notebook PC. Optical Drive The Notebook PC comes in various models with different optical drives. The Notebook PC’s optical drive may support compact discs (CD) and/or digital video discs (DVD) and may have recordable (R) or re-writable (RW) capabilities. -
Page 19: Rear Side
Rear Side Refer to the diagram below to identify the components on this side of the Notebook PC. Kensington Lock Port ® The Kensington lock port allows the Notebook PC to be secured using Kensington ® compatible Notebook PC security products. These security products usually include a metal cable and lock that prevent the Notebook PC to be removed from a fixed object. -
Page 20: Front Side
Knowing the Parts Front Side Refer to the diagram below to identify the components on this side of the Notebook PC. Audio Speaker System The built-in stereo speaker system allows you to hear audio without additional attachments. The multimedia sound system features an integrated digital audio controller that produces rich, vibrant sound (results improved with external stereo headphones or speakers). -
Page 21: Getting Started
3. Getting Started Using AC Power Using Battery Power Powering ON the Notebook PC Checking Battery Power Restarting or Rebooting Powering OFF the Notebook PC Special Keyboard Functions Switches and Status Indicators... -
Page 22: Power System
Getting Started Power System Using AC Power The Notebook PC power is comprised of two parts, the power adapter and the battery power system. The power adapter converts AC power from a wall outlet to the DC power required by the Notebook PC. -
Page 23: Using Battery Power
Using Battery Power The Notebook PC is designed to work with a removable battery pack. The battery pack consists of a set of battery cells housed together. A fully charged pack will provide several hours of battery life, which can be further extended by using power management features through the BIOS setup. Additional battery packs are optional and can be purchased separately through a Notebook PC retailer. -
Page 24: Powering On The Notebook Pc
Getting Started Powering ON the Notebook PC The Notebook PC’s power-ON message appears on the screen when you turn it ON. If necessary, you may adjust the brightness by using the hot keys. If you need to run the BIOS Setup to set or modify the system configuration, press [F2] upon bootup to enter the BIOS Setup. -
Page 25: Checking Battery Power
Checking Battery Power The battery system implements the Smart Battery standard under the Windows environment, which allows the battery to accurately report the amount of charge left in the battery. A fully-charged battery pack provides the Notebook PC a few hours of working power. But the actual figure varies depending on how you use the power saving features, your general work habits, the CPU, system memory size, and the size of the display panel. -
Page 26: Restarting Or Rebooting
Getting Started Restarting or Rebooting After making changes to your operating system, you may be prompted to restart the system. Some installation processes will provide a dialog box to allow restart. To restart the system manually, click Windows Start button and select Shut Down and then choose Restart. -
Page 27: Special Keyboard Functions
Scr Lk (Del): Toggles the “Scroll Lock” ON and OFF. Allows you to use a larger portion of the keyboard for cell navigation. Getting Started ASUS F5 ENTERTAINMENT SYSTEM (continued on next page) -
Page 28: Colored Hot Keys (Cont)
You can see the current mode through the on-screen display (OSD). Icons Fn+V: Toggles “ASUS Life Frame” software application. Fn+T: Toggles “ASUS Power 4 Phone” software application. Power4 Gear+ (Fn+Space Bar): The Power4 Gear+ button toggles power savings be- tween various power saving modes. The power saving modes control many aspects of the Notebook PC to maximize performance versus battery time. -
Page 29: Microsoft Windows Keys
Microsoft Windows Keys There are two special Windows keys on the keyboard as described below. The key with the Windows Logo activates the Start menu located at the bottom left of the Win- dows desktop. The other key, that looks like a Windows menu with a small cursor, activates the properties menu and is equivalent to pressing the right mouse button on a Windows object. -
Page 30: Switches And Status Indicators
Getting Started Switches and Status Indicators Switches ASUS F5 ENTERTAINMENT SYSTEM Instant Fun PLUS Pressing this button will launch a media player application to view DVDs, VCDs, videos, photos (in My Documents\My Pictures), or television programs (when equipped with a TV tuner); or listen to music CDs or files. -
Page 31: Power Switch
Wireless Models Only: Toggles the internal wireless LAN or Bluetooth (on selected models) ON or OFF with an on-screen-display. When enabled, the corresponding wireless indicator will light. Windows software settings are necessary to use the wireless LAN or Bluetooth. Getting Started ASUS F5 ENTERTAINMENT SYSTEM EXPRESS... -
Page 32: Status Indicators
Getting Started Status Indicators Front ASUS F5 ENTERTAINMENT SYSTEM Drive Activity Indicator Indicates that the Notebook PC is accessing one or more storage device(s) such as the hard disk. The light flashes proportional to the access time. Number Lock Indicator Indicates that number lock [Num Lk] is activated when lighted. -
Page 33: Multimedia Control Keys (On Selected Models)
Multimedia Control Keys (on selected models) The multimedia control keys allows for convenient controlling of the multimedia application. The fol- lowing defines the meaning of each multimedia control key on the Notebook PC. Use the [Fn] key in combination with the arrow keys for CD control functions. CD Play/Pause During CD stop, begins CD play. - Page 34 Using the Notebook PC...
-
Page 35: Using The Notebook Pc
4. Using the Notebook PC Operating System Pointing Device Storage Devices Expansion Card Optical drive Flash memory reader Hard disk drive Connections Modem Connection Network Connection Wireless LAN Connection Bluetooth Wireless Connection Power Management Modes... -
Page 36: Operating System
Using the Notebook PC Operating System This Notebook PC may offer (depending on territory) its customers the choice of a pre-installed operat- ing system such as Microsoft Windows XP. The choices and languages will depend on the territory. The levels of hardware and software support may vary depending on the installed operating system. The stability and compatibility of other operating systems cannot be guaranteed. -
Page 37: Pointing Device
Pointing Device The Notebook PC’s integrated touchpad pointing device is fully compatible with all two/three-but- ton and scrolling knob PS/2 mice. The touchpad is pressure sensitive and contains no moving parts; therefore, mechanical failures can be avoided. A device driver is still required for working with some application software. -
Page 38: Touchpad Usage Illustrations
Using the Notebook PC Touchpad Usage Illustrations Clicking/Tapping - With the cursor over an item, press the left button or use your fingertip to touch the touchpad lightly, keeping your finger on the touchpad until the item is selected. The selected item will change color. -
Page 39: Caring For The Touchpad
Dragging - Dragging means to pick up an item and place it anywhere on the screen you wish. You can move the cursor over the item you select, and while keeping the left button depressed, moving the cursor to the desired location, then release the button. Or, you can simply double-tap on the item and hold while dragging the item with your fingertip. -
Page 40: Storage Devices
Using the Notebook PC Storage Devices Storage devices allow the Notebook PC to read or write documents, pictures, and other files to various data storage devices. This Notebook PC has the following storage devices: • Expansion Card • Optical drive •... -
Page 41: Optical Drive
Optical Drive Inserting an optical disc 1. While the Notebook PC’s power is ON, press the drive’s eject button and the tray will eject out partially. 3. Hold the disc by the edge and face the disc’s printed side up. Push down on both sides of the disc’s center until the disc snaps onto the hub. -
Page 42: Using The Optical Drive
Using the Notebook PC Optical Drive (Cont.) Removing an optical disc Eject the tray and gently pry the edge of the disc upwards at an angle to remove the disc from the hub. Using the Optical Drive Optical discs and equipment must be handled with care because of the precise mechanics involved. Keep in mind the important safety instructions from your CD suppliers. -
Page 43: Flash Memory Card Reader
The hard disk drive is the most delicate component and will likely be the first or only component that is damaged if the Notebook PC is dropped. Using the Notebook PC SD / MMC MS / MS Pro ASUS F5 ENTERTAINMENT SYSTEM... -
Page 44: Connections
Using the Notebook PC Connections NOTE: The built-in modem and network cannot be installed later as an upgrade. After purchase, modem and/or network can be installed as an expansion card. Modem Connection (on selected models) The telephone wire used to connect the Notebook PC’s internal modem should have either two or four wires (only two wires (telephone line #1) is used by the modem) and should have an RJ-11 connector on both ends. -
Page 45: Network Connection
Network Connection Connect a network cable, with RJ-45 connectors on each end, to the modem/network port on the Note- book PC and the other end to a hub or switch. For 100 BASE-TX / 1000 BASE-T speeds, your network cable must be category 5 or better (not category 3) with twisted-pair wiring. If you plan on running the interface at 100/1000Mbps, it must be connected to a 100 BASE-TX / 1000 BASE-T hub (not a BASE-T4 hub). -
Page 46: Wireless Lan Connection (On Selected Models)
Using the Notebook PC Wireless LAN Connection (on selected models) The optional built-in wireless LAN is a compact easy-to-use wireless Ethernet adapter. Implementing the IEEE 802.11 standard for wireless LAN (WLAN), the optional built-in wireless LAN is capable of fast data transmission rates using Direct Sequence Spread Spectrum (DSSS) and Orthogonal Frequency Division Multiplexing (OFDM) technologies on 2.4GHz/5GHz frequencies. -
Page 47: Bluetooth Wireless Connection (On Selected Models)
Bluetooth Wireless Connection (on selected models) Notebook PCs with Bluetooth technology eliminates the need for cables for connecting Blue- tooth-enabled devices. Examples of Bluetooth-enabled devices may be Notebook PCs, Desktop PCs, mobile phones, and PDAs. Note: If your Notebook PC did not come with built-in Bluetooth, you need to connect a USB or ExpressCard Bluetooth module in order to use Bluetooth. -
Page 48: Trusted Platform Module (Tpm) (On Selected Models)
Using the Notebook PC Trusted Platform Module (TPM) (on selected models) The TPM, or Trusted Platform Module, is a security hardware device on the system board that will hold computer-generated keys for encryption. It is a hardware-based solution that an help avoid attacks by hackers looking to capture passwords and encryption keys to sensitive data. -
Page 49: Power Management Modes
Power Management Modes The Notebook PC has a number of automatic or adjustable power saving features that you can use to maximize battery life and lower Total Cost of Ownership (TCO). You can control some of these features through the Power menu in the BIOS Setup. ACPI power management settings are made through the operating system. -
Page 50: Power State Summary
Using the Notebook PC Power State Summary STATE ENTRY EVENT • “Stand by” through Windows Start button “Stand by” • Timer as set though “Power Management” in Windows Control Panel (higher priority) STR (“Stand by”) • Hotkey (see “Colored Hotkeys” under “Special (Suspend-to-RAM) Keyboard Functions”... -
Page 51: Stand By And Hibernate
Stand by and Hibernate Power management settings can be found in the Windows control panel. The following shows the power options properties in Windows. You can define “Stand By” or “Shut down” for closing the display panel, pressing the power button, or activating sleep mode. “Stand by” and “Hibernate” saves power when your Notebook PC is not in use by turning OFF certain components. - Page 52 Using the Notebook PC...
-
Page 53: Appendix
Appendix Optional Accessories Optional Connections Glossary Declarations and Safety Statements Notebook PC Information... -
Page 54: Optional Accessories
Appendix Optional Accessories These items, if desired, come as optional items to complement your Notebook PC. USB Hub (Optional) Attaching an optional USB hub will increase your USB ports and allow you to quickly connect or disconnect many USB peripherals through a single cable. -
Page 55: Optional Connections
Appendix Optional Connections These items, if desired, may be purchased from third-parties. Printer Connection One or more USB printers can be simultaneously used on any USB port or USB hub. -
Page 56: Glossary
Appendix Glossary ACPI (Advanced Configuration and Power Management Interface) Modern standard for reducing power usage in computers. APM (Advanced Power Management) Modern standard for reducing power usage in computers. AWG (American Wire Gauge) NOTE: This table is for general reference only and should not be used as a source of the American Wire Gauge standard as this table may not be current or complete. -
Page 57: Laser Classifications
CPU (Central Processing Unit) The CPU, sometimes called “Processor,” actually functions as the “brain” of the computer. It interprets and executes program commands and processes data stored in memory. Device Driver A device driver is a special set of instructions that allows the computer’s operating system to communicate with devices such as VGA, audio, Ethernet, printer, or modem. - Page 58 Appendix CLASS 2 & CLASS 3A: Class 2 and Class 3A lasers emit visible, continuous-wave (CW) optical ra- diation levels slightly above the maximum permissible exposure (MPE) level. Although these lasers can cause eye damage, their brightness usually causes observers to look away or blink before eye damage occurs.
- Page 59 Appendix TPM (Trusted Platform Module) (on selected models) The TPM is a security hardware device on the system board that will hold computer-generated keys for encryption. It is a hardware-based solution that can help avoid attacks by hackers looking to capture passwords and encryption keys to sensitive data.
-
Page 60: Declarations And Safety Statements
Appendix Declarations and Safety Statements DVD-ROM Drive Information The Notebook PC comes with an optional DVD-ROM drive or a CD-ROM drive. In order to view DVD titles, you must install your own DVD viewer software. Optional DVD viewer software may be purchased with this Notebook PC. -
Page 61: Network Compatibility Declaration
Appendix Internal Modem Compliancy The Notebook PC with internal modem model complies with JATE (Japan), FCC (US, Canada, Korea, Taiwan), and CTR21. The internal modem has been approved in accordance with Council Decision 98/482/EC for pan-European single terminal connection to the public switched telephone network (PSTN). - Page 62 Appendix Internal Modem Compliancy (Cont.) This table shows the countries currently under the CTR21 standard. Country Applied Austria Belgium Czech Republic Denmark Finland France Germany Greece Hungary Iceland Ireland Italy Still Pending Israel Lichtenstein Luxemburg The Netherlands Norway Poland Portugal Spain Sweden Switzerland...
-
Page 63: Federal Communications Commission Statement
Federal Communications Commission Statement This device complies with FCC Rules Part 15. Operation is subject to the following two conditions: • This device may not cause harmful interference, and • This device must accept any interference received, including interference that may cause undesired operation. -
Page 64: Fcc Radio Frequency Interference Requirements
Appendix FCC Radio Frequency Interference Requirements This device is restricted to INDOOR USE due to its operation in the 5.15 to 5.25GHz frequency range. FCC requires this product to be used indoors for the frequency range 5.15 to 5.25GHz to reduce the potential for harmful interference to co-channel of the Mobile Satellite Systems. -
Page 65: Wireless Operation Channel For Different Domains
Wireless Operation Channel for Different Domains N. America 2.412-2.462 GHz Japan 2.412-2.484 GHz Europe ETSI 2.412-2.472 GHz France Restricted Wireless Frequency Bands Some areas of France have a restricted frequency band. The worst case maximum authorized power indoors are: • 10mW for the entire 2.4 GHz band (2400 MHz–2483.5 MHz) •... -
Page 66: Power Safety Requirement
Appendix UL Safety Notices Required for UL 1459 covering telecommunications (telephone) equipment intended to be electrically connected to a telecommunication network that has an operating voltage to ground that does not exceed 200V peak, 300V peak-to-peak, and 105V rms, and installed or used in accordance with the National Electrical Code (NFPA 70). -
Page 67: Nordic Lithium Cautions (For Lithium-Ion Batteries)
Appendix Nordic Lithium Cautions (for lithium-ion batteries) CAUTION! Danger of explosion if battery is incorrectly replaced. Replace only with the same or equiva- lent type recommended by the manufacturer. Dispose of used batteries according to the manufacturer’s instructions. (English) ATTENZIONE! Rischio di esplosione della batteria se sostituita in modo errato. Sostituire la batteria con un una di tipo uguale o equivalente consigliata dalla fabbrica. -
Page 68: Macrovision Corporation Product Notice
Appendix Optical Drive Safety Information Laser Safety Information Internal or external optical drives sold with this Notebook PC contains a CLASS 1 LASER PRODUCT. Laser classifications can be found in the glossary at the end of this user’s manual. WARNING: Making adjustments or performing procedures other than those specified in the user’s manual may result in hazardous laser exposure. - Page 69 Appendix CTR 21 Approval (for Notebook PC with built-in Modem) Danish Dutch English Finnish French German Greek Italian Portuguese Spanish Swedish...
-
Page 70: Notebook Pc Information
Appendix Notebook PC Information This page is provided for recording information concerning your Notebook PC for future reference or for technical support. Keep this User’s Manual in a secured location if passwords are filled out. Owner’s Name: ___________________________ Owner’s Telephone: ______________ Manufacturer: _______________ Model: ___________ Serial Number: ______________ Display Size: ___________ Resolution: _____________Memory Size: ______________ Retailer: _________________Location: ___________ Purchase Date: ______________... -
Page 71: Limitation Of Liability
ASUS will only be responsible for or indemnify you for loss, damages or claims based in contract, tort or infringement under this Warranty Statement. This limit also applies to ASUS’ suppliers and its reseller. It is the maximum for which ASUS, its sup- pliers, and your reseller are collectively responsible.
Need help?
Do you have a question about the F5GL and is the answer not in the manual?
Questions and answers