Table of Contents
Advertisement
Quick Links
4 0 X-6 4 0 X
MICROSCOP E
ZO O M M IC ROSCO PE K I T W I TH
S M A RT P HO N E A DA PTE R
I N ST RU C T I ON MA N UAL
WARNING:
FUNCTIONAL SHARP POINT — Not for children
under 3 years.
WARNING:
CHOKING HAZARD — Small parts.
Not for children under 3 years.
WARNING:
The lens contains lead that may be harmful.
Wash hands after touching.
WARNING:
This product can expose you to chemicals including lead,
which is known to the State of California to cause cancer
and birth defects or other reproductive harm. For more
information go to www.P65Warnings.ca.gov.
1 1
80-306 40
X
INCLUDED
Do not mix old and new batteries.
Do not mix alkaline, standard (carbon-zinc), or
rechargeable (ni-cad, ni-mh, etc.) batteries.
Non-rechargeable batteries are not to be recharged.
Please recycle batteries responsibly.
8+
E N
2
Advertisement
Table of Contents

Related Manuals for National Geographic 40X-640X MICROSCOPE


Summary of Contents for National Geographic 40X-640X MICROSCOPE
- Page 1 80-306 40 4 0 X-6 4 0 X MICROSCOP E ZO O M M IC ROSCO PE K I T W I TH S M A RT P HO N E A DA PTE R I N ST RU C T I ON MA N UAL WARNING: WARNING: INCLUDED...
- Page 2 Customer Service: Call 1-866-252-3811 READ AND FOLLOW THE INSTRUCTIONS BEFORE USE. IMPORTANT SAFETY INSTRUCTIONS KEEP THESE INSTRUCTIONS FOR LATER USE. • THIS MICROSCOPE SET IS INTENDED FOR CHILDREN OLDER THAN AGE 7. CHILDREN SHOULD ONLY USE THIS DEVICE UNDER ADULT SUPERVISION. NEVER LEAVE A CHILD UNSUPERVISED WITH THIS DEVICE.
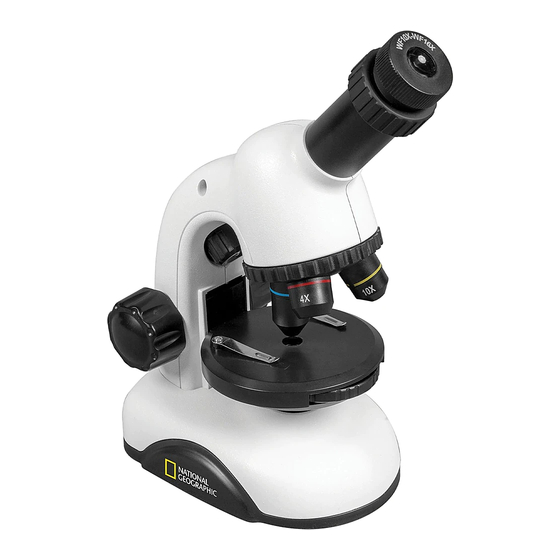
- Page 3 What’s Included: Parts Overview Additional Contents: 11) 3 Prepared Slides 1) Zoom eyepiece 12) 8 Blank Slides 2) Focus knob 13) 8 Slide Covers 3) Stage 14) 3 Specimen Vials 4) Metal stage clips 15) Graduated Cylinder 5) Color Filter wheel 16) Pipette 6) 4x, 10x, 40x objectives 17) Tweezers 7) Objective turret 18) Magnifying Glass 8) LED illumination 19) Round Cutter 9) Base with battery 20) Hatchery compartment 21) Yeast 10) Microscope arm 22) Brine Shrimp Eggs 23) Smartphone Adapter 24) Rubber Eyepiece Cup How Do I Use My Microscope? Before you use your microscope, make sure that the table, desk or whatever surface that you want to place it on is stable, and is not subject to vibration. If the microscope does need to be moved handle the microscope by the arm and base while carefully transferring it. Install two “AA” batteries (included) in the battery box, located in the base of the microscope. Open battery door and insert the batteries according to the displayed +/- information. Close the battery compartment door.
- Page 4 How Do I Operate the LED Illumination? Locate the ON/OFF switch on the base of the microscope. Flip the switch to the on position and the light will illuminate. This microscope is equipped with modern LED lighting (a light-emitting diode) that illuminates the specimen from below. The aperture wheel is located in the middle of the microscope stage. They help you when you are observing very bright or clear specimens. Using these filters, you can choose from various brightness levels. This helps you better recognize the components of colorless or transparent objects (e.g., grains of starch, protozoa). How Do I Adjust My Microscope Correctly? Place in a suitable location as described previously and sit in a comfortable viewing position. Each observation starts with the lowest magnification. Adjust the microscope stage so that the stage is at the lowest position. Then turn the objective turret until it clicks into place at the lowest magnification (objective 4x). Note: Before you change the objective setting, always move the microscope stage to its lowest position. This way, you can avoid causing any damage to the slide or microscope. Make sure the zoom eyepiece is also in the fully lowered position. Magnification Guide Zoom Eyepiece Objective Power 10-16x 40-64x 10-16x 100-160x 10-16x 400-640x Note: The highest magnification is not always the best for every specimen. How do I observe the specimen? Sitting in your location with adequate illumination chosen from the aperture filter wheel, the following basic rules are to be observed: Start with a simple observation at the lowest magnification. This way, it is easier to position the object in the middle (centering) and make the image sharp (focusing). The higher...
- Page 5 For transparent objects (e.g., protozoa), the light shines from below, through the opening in the microscope stage and then through the object. The light travels further through the objective and eyepiece, where it is also magnified, and finally goes into the eye. This is transmitted light microscopy. Many microorganisms in water, many plant components and the smallest animal parts are already transparent in nature. Opaque specimens, on the other hand, will need to be prepared for viewing. Opaque specimens can be made transparent by a process of treatment and penetration with the correct materials (media), or by slicing. You can read more about creating specimens in the following sections. Cleaning Tips To ensure your microscope has a long service life, clean the lens (objective and eyepiece) only with a soft lint free cloth (e.g., microfiber). Do not press hard as this might scratch the lens. Ask your parents to help if your microscope is really dirty. The cleaning cloth should be moistened with cleaning fluid and the lens wiped clean using very little pressure. Make sure your microscope is always protected against dust and dirt. After use, leave it in a warm room to dry off. This microscope can be the gateway to a fun, creative, learning process and will open the door to advanced knowledge of the world around you. It allows you to explore the various fields of science from Biology to Botany to Chemistry and beyond, so have fun exploring the exciting world of science. Troubleshooting Guide: Problem Solution Turn on light Readjust focus No recognizable image Start with the lowest power objective (4x) & lowest power eyepiece (10x) Center object on slide No image Start with the lowest power objective (4x) &...
- Page 6 Using The Smartphone Adapter: SUPERVISION BY ADULTS Read and follow the instructions, safety rules and first aid information The Smartphone Adapter will allow you to connect almost any “smart” device to a 1.25” eyepiece. To use the adapter, place it directly onto the selected eyepiece and secure it by tightening the set screw until snug. Be careful not to overtighten because this could damage the adapter and/or the eyepiece. The camera lens on your smart device will need to be centered over the eyepiece. This alignment is best done by opening the camera function and viewing the image while you center the device. Once you have positioned the device correctly, carefully press it onto the suction cup/non-skid surface of the adapter pad. Never allow the adapter pad to hold your device without you supporting the item as well. The point at which you secure the eyepiece/adapter combination into the diagonal/focuser depends largely on the dimensions of your device. For smaller devices like smart phones, it may be easier to secure it to the eyepiece/adapter combination before inserting the entire unit into the diagonal on the telescope. For larger devices, such as tablets, it may be easier to secure the eyepiece/adapter combination into the diagonal, and then align and attach your device. After positioning your device and capturing images, you can enhance and edit the photos using the imaging software of your choice. One option can be found at https://www.getpaint.net/. WARNING: Do not leave your device unsupported or unattended on the adapter pad. Though the surface of the adapter pad is designed with suction cups and is non-skid, the manufacturer cannot assure that the pad will support the weight of various devices or guarantee that it will adhere to all surfaces on various smart devices. The pad is not intended to secure, balance or support the device on its own, and the operator should not let the device rest solely on the adapter pad. Leaving the device unattended or allowing it to balance on its own without operator support may result in the device falling, unbalancing the entire instrument and possibly damaging the telescope or your smart device. CHEMICALS Any chemicals and liquids used in preparing, using, or cleaning should be kept out of reach of children. Do not drink any chemicals. Hands should be washed thoroughly under running water after use. In case of accidental contact with the eyes or mouth rinse with water. Seek medical treatment for ailments arising from contact with the chemical substances and take the chemicals with you to the doctor. Keep packaging materials (plastic bags, rubber bands, etc.) away from children. There is a risk of SUFFOCATION. Dispose of packaging materials as legally required. Consult the local authority on the matter if necessary. DISPOSAL Dispose of the packaging materials properly, according to their type, such as paper or cardboard. Contact your local waste-disposal service or environmental authority for information on the proper disposal.
- Page 7 Notes:...
- Page 8 ©2021 National Geographic Partners LLC. All rights reserved. NATIONAL GEOGRAPHIC and Yellow Border Design are trademarks of the National Geographic Society, used under license. ©2021 Explore Scientific, LLC 1010 S. 48th Street, Springdale AR 72762. All rights reserved. Made in China.
Need help?
Do you have a question about the 40X-640X MICROSCOPE and is the answer not in the manual?
Questions and answers