Table of Contents
Advertisement
Quick Links
Advertisement
Table of Contents

Related Manuals for Elvid VSW-4H-USB

Summary of Contents for Elvid VSW-4H-USB
- Page 1 VSW-4H-USB 4-Input HDMI Switcher with USB Output USER MANUAL...
- Page 2 The VSW-4H-USB features four HDMI inputs that support up to full HD 1080p video, and a USB input to upload your graphics, logos, and artwork to the switcher’s media library. Two configurable mic/stereo line inputs can add live narration or music to the production. Perform creative transitions, mix audio, and use the pattern generator and extensive pattern library to set up downstream and upstream keyers, all from the intuitive control panel.
-
Page 3: Table Of Contents
Precautions ....................................................4 Overview .......................................................5 Powering the Switcher ................................................6 Connecting the Inputs................................................7 Connecting the Outputs ................................................. 8 Checking Your Video Inputs ..............................................9 Configuring the Outputs ...............................................10 User Interface ....................................................11 Switching ....................................................13 PIP and POP ....................................................15 Screen Patterns ..................................................16 Freezing a Picture ..................................................17 Using the Upstream Keyer ..............................................18 Using the Downstream Keyer ............................................20 Working with Audio................................................21... -
Page 4: Precautions
• Use only the correct, recommended voltage. • Do not attempt to disassemble or repair this product—doing so will void the warranty, and Elvid will not be responsible for any damage. • Handle this product with care. Avoid any impacts to this product. -
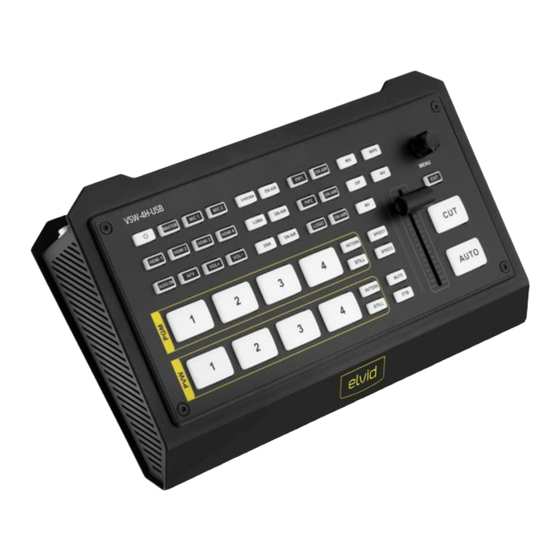
Page 5: Overview
Transition selectors key selectors effects Audio controls Multiview Menu Power selector controls 3.5 mm headphone output USB Standard-A port (input) VSW-4H-USB MASTER MIC 1 MIC 2 CHROMA ON AIR PIP1 ON AIR WIPE HDMI 1 HDMI 2 HDMI 3 HDMI 4... -
Page 6: Powering The Switcher
POWERING SWITCHER 1. Make source and output device connections. 2. Plug the power cord into the switcher and tighten the locking ring until secure. Plug the power adapter into an outlet. 3. Press the Power button to turn on the switcher. To turn off: 1. -
Page 7: Connecting The Inputs
CONNECTING THE INPUTS VIDEO SOURCES Plug HDMI cameras and other HDMI sources into the switcher’s HDMI inputs 1–4. Each of the HDMI windows will display the video signals when viewing in the Multiview screen. COMPUTER CONNECTIONS Computers can be connected to the switcher via an HDMI cable or with an appropriate adapter. -
Page 8: Connecting The Outputs
CONNECTING THE OUTPUTS The switcher has a USB and two HDMI outputs. The HDMI outputs can be connected to monitors, a projector, or broadcast device. The USB output lets your computer simultaneously monitor the Multiview, Program (PGM), or a user-selected signal, and stream it to the internet. -
Page 9: Checking Your Video Inputs
CHECKING YOUR VIDEO INPUTS Make sure the switcher is receiving all connected video signals. In Program view, press the PGM buttons to check your video's connections. In Multiview, press the PVW buttons to check your video connections. -
Page 10: Configuring The Outputs
CONFIGURING THE OUTPUTS The Output menu configures the switcher’s three output ports. The Multiview port is preset to display the Multiview screen. The Program and USB ports are preset to display the Program screen. Each port can output any one of the HDMI 1–4, Program (PGM), Clean Program (Clean PGM), Preview (PVW), Color Bar , and Multiview signals. -
Page 11: User Interface
USER INTERFACE MENU NAVIGATION PGM: The Program window displays the on-air signal that’s being Menus are accessible only in the status window of the Multiview recorded and/or broadcast. Set the Program signal by selecting one screen. of the HDMI 1–4 PGM buttons. PVW: The Preview window appears only in Multiview mode. - Page 12 USING THE AUDIO MIXER The audio mixer displays seven channels that can be individually configured and adjusted. The switcher’s control panel features seven buttons that correspond to each audio channel. Press the corresponding button on the control panel, and it will blink when the channel is activated.
-
Page 13: Switching
SWITCHING The VSW-4H-USB offers four transition options: cut, wipe, mix, and 3. The transition is not complete until the T-Bar is completely up or DIP. Cut instantly transitions from PVW to PGM. Transitions like down. When the T-Bar reaches the top or bottom, the status of... - Page 14 Dip to Color transition (DIP) fades the Program signal to black and then fades up the Preview signal. To use the DIP transition effect, first select the DIP button on the control panel. 1. Select the video signals with the PGM and PVW buttons. The selected PGM button will glow red.
-
Page 15: Pip And Pop
PIP AND POP PICTURE ON PICTURE (POP) The PIP and POP features place two separate windows onscreen, each with its own separate video source. POP places two windows over the background screen, each spanning 50% of the screen’s width and height at the center of the screen. PICTURE IN PICTURE (PIP) When POP is enabled in the Upstream Key menu, it automatically 1. -
Page 16: Screen Patterns
SCREEN PATTERNS The switcher generates patterns that are displayed in the Program Capture Image: Captures screenshots from PGM, Clean PGM, or and Preview windows when no source signal is selected or when the HDMI 1–4 screens. This menu displays the image library for image PATTERN button is enabled. -
Page 17: Freezing Apicture
FREEZING A PICTURE Press the Still button to freeze the picture in the PGM or PVW screens. Press the STILL button again to return to the video signal. Still images can be captured and stored in the Media Library. See Patterns above. -
Page 18: Using The Upstream Keyer
USING THE UPSTREAM KEYER The upstream keyer lets you layer video, titles, graphics, and 3. In the Fill Source menu, select an image, video, or color from the animation over a live video or graphic background with the Luma and menu. - Page 19 CHROMA KEY Chroma Status Menu Chroma key creates a key with a specific color. Any area with that The Chroma Status menu sets the output of the chroma effect. color will be transparent. Chroma key is effective when shooting talent in front of a green or blue screen. The chroma key removes the OFF: The chroma key effect is not visible.
-
Page 20: Using The Downstream Keyer
USING THE DOWNSTREAM KEYER The downstream key overlays all video that’s switched to the Gain: In luma key, key gain adjusts the transparency of the key’s light Program window. Graphics that are added with the downstream or white areas. In chroma key, key gain adjusts the transparency of key remain on the Program window regardless of transitions. -
Page 21: Working With Audio
WORKING WITH AUDIO MIC 1 AND MIC 2 Audio settings are made in the status window audio mixer or in the Audio menu. The MIC 1 and 2 inputs let you add live narration to the program. An audio device or smartphone can be connected to the MIC inputs MASTER VOLUME to add music or other audio, like an interview or phone call, to the The master volume sets the mix output for all enabled audio sources. - Page 22 HEADPHONES (AUDIO MENU ONLY) Enable: Selecting the enable feature toggles the earphone output status. Volume: Scroll to the Earphone channel, and select Volume. Adjust the volume, and press the Menu knob to accept the change. Note: For safety, the earphone output is preset to -24 dB. Audio Source: Listen to the overall mix or each input individually.
-
Page 23: System
SYSTEM NETWORK SETTING This menu configures the switcher’s operating parameters. DHCP / IP Address / Subnet Mask / Gateway SYSTEM SETTING DHCP ON (Preset): The switcher automatically receives IP address Configure onscreen language, fan, reset, time, date, network, and information if there is a DHCP server on the network. user options. -
Page 24: Connecting To Anetwork
CONNECTING TO A NETWORK You can connect the VSW-4H-USB to a network via the LAN connector. This allows you control the switcher over an Ethernet connection with the controller software. You can also operate and control the switcher with the controller software via an internet connection. -
Page 25: Tally
Tally border indicators appear on the Multiview screen to indicate which HDMI source has been switched to the Preview and Program outputs. The VSW-4H-USB automatically recognizes a camera that’s connected to each input. The switcher generates a tally signal that triggers the tally indicator on the appropriate camera. -
Page 26: Firmware Updates
FIRMWARE UPDATES Firmware updates for the VSW-4H-USB are posted to the product page on www.elvidcinema.com. Use a USB flash drive with fat32 formatting and a 64 GB maximum capacity, and follow these steps: 1. Download the latest firmware version. Unzip the downloaded folder, and select to place the unzipped files into the flash drive’s... -
Page 27: Menus
MENUS Menus are accessible only in Multiview mode. Mask Left: 0% to 100%. The preset value is 0% TRANSITIONS Mask Top: 0% to 100%. The preset value is 0% Wipe Style: Select from 11 transition styles. Each style has a graphic Mask Right: 0% to 100%. - Page 28 DOWNSTREAM KEY PIP1 Status: Off, Key (PVW), On Air (PGM), and Key & On Air. The preset value is Off. Tie (on/off): OFF/ON. The preset value is OFF. PIP1 Source: Selects the input source for the PIP1 window. Choose DSK Status: Off, Key (PVW), On Air (PGM), and Key & On Air. The Black, Color Bar, Color 1–2, HDMI 1–4, or Image.
- Page 29 AUDIO MULTIVIEW Master The Multiview menu configures the Multiview screen’s features. Enable: Turns the master volume’s output on or off. The preset value is ON. Layout Layout Style: Select horizontal or vertical orientation of the Multiview Volume: Adjusts the master output volume from -60 to 12 dB. The screen.
- Page 30 Enable: Turns the UMD display in the HDMI 1–4, PGM, and PVW Capture Image: Captures and saves still images from PGM, Clean screens on or off. The preset value is On. PGM, or HDMI 1–4 screens. This menu displays the image library for image selection or deletion.
- Page 31 Brightness/Contrast/Saturation: Adjust the screen settings. All preset User Setting values are 50%. Save all current settings into a user account that can be recalled. Multiple users can be stored in the switcher. FTB/MUTE Speed: Adjusts the Fade to Black speed from 0 to 3 seconds when the FTB button is pressed on the control panel.
-
Page 32: Specifications
SPECIFICATIONS GENERAL VIDEO & AUDIO Keyers Upstream: Luma Key, Chroma Key, PIP (×2), POP Video Input Formats 1080p: 60/59.94/50/30/29.97/25/24/23.98 Downstream: DSK, Logo 1080i: 50/59.94/60 Generators Pattern generator 720p: 60/59.94/50/30/25/24 Color generator (×2) 576i: 50 Number of Windows 6 and status (2 styles of Multiview layout) 576p: 50 Operating System MacOS and Windows... - Page 33 ONE-YEAR LIMITED WARRANTY This Elvid product is warranted to the original purchaser to be free from defects in materials and workmanship under normal consumer use for a period of one (1) year from the original purchase date or thirty (30) days after replacement, whichever occurs later. The warranty provider’s responsibility with respect to this limited warranty shall be limited solely to repair or replacement, at the provider’s discretion, of any product that fails during normal use of this product in its...
- Page 34 ELVID ® A Gradus Group Brand...
Need help?
Do you have a question about the VSW-4H-USB and is the answer not in the manual?
Questions and answers