Table of Contents
Advertisement
Quick Links
Advertisement
Table of Contents

Related Manuals for NOREGON DLA+ 2.0

Summary of Contents for NOREGON DLA+ 2.0
-
Page 2: License Agreement
JPRO® DLA+ 2.0 Adapter Family User’s Manual License Agreement Noregon Systems Inc. retains all ownership to the DLA+ 2.0 Adapter Family ( DLA+ 2.0, DLA+ 2.0 Wireless and the Trailer Diagnostic Adapter) and its documentation. The DLA+ 2.0 Adapter Family ( DLA+ 2.0, DLA+ 2.0 Wireless and Trailer Diagnostic Adapter) source code is a confidential trade secret of Noregon Systems, Inc. You may not decode or de-compile the DLA+ 2.0 Adapter Family ( DLA+ 2.0, DLA+ 2.0 Wireless and Trailer Diagnostic Adapter) software, develop source code for the DLA+ 2.0 Adapter Family ( DLA+ 2.0, DLA+ 2.0 Wireless and Trailer Diagnostic Adapter), or knowingly allow others to do so. The DLA+ 2.0 Adapter Family ( DLA+ 2.0, DLA+ 2.0 Wireless and Trailer Diagnostic Adapter) and its documentation may not be sublicensed or transferred without the prior written consent of Noregon Systems, Inc. This publication, as well as the software it describes, is furnished under license and may only be used or copied in accordance with the terms of such license. The content of this manual is provided for informational use only, is subject to change without notice, and should not be construed as a commitment by Noregon Systems, Inc. Noregon Systems, Inc. assumes no responsibility or liability for any errors or inaccuracies that may appear in this manual. Without the prior written permission of Noregon Systems, Inc., except as permitted by such license, no portion of this documentation may be reproduced, or transmitted, in any form or by any means, electronically, mechanically, or otherwise. is a registered trademark of Noregon Systems, Inc. ©2018 Noregon Systems, Inc. All Rights Reserved. All other marks, trademarks or registered trademarks of the respective holders. Pictures, figures and tables are for illustration purposes only. Product specifications are subject to change without notification. The DLA+ 2.0 Wireless adapter is compliant with Part 15 of the FCC Rules. The device contains an RF transmitter (ID 3867A MTCHDRCT). THE FCC ID is R68 MTCHDRCT. www.noregon.com... -
Page 3: Table Of Contents
Table of Contents Table of Contents License Agreement ..................... 2 Table of Contents ....................3 Introduction ....................... 4 The DLA+ 2.0 Adapter Family ................ 4 LED Indicators ....................4 Product Specifications and System Requirements ..........6 Supported Protocols and Standards ............... 7 Supply Voltage ....................7 Temperature ....................8 Electromagnetic Compatibility ............... 8 Transient Protections ..................8 Electro-Static Discharge Protection ..............8 Installation Notes ....................9 Driver Installation ..................10 DLA+ 2.0 Wireless Configuration ..............13 The DLA+ 2.0 Wireless Minder ..............13 Configuring the DLA+ 2.0 Wireless Adapter (ASSY REV A.xx) ....14 Configuration on a Local / Corporate Network ........16 Configuring the DLA+ 2.0 Wireless Adapter (ASSY REV B.xx) ....37 Establishing the Connection Between your PC and the Adapter ....40 The Favorites Feature to Select IP Addresses ..........43 Updating Adapter Firmware . -
Page 4: Introduction
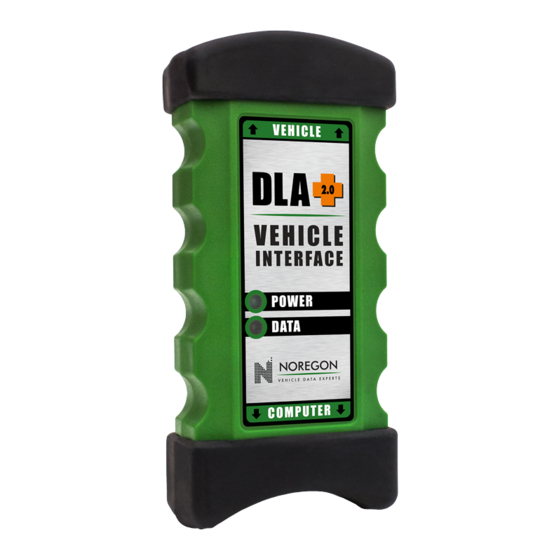
JPRO® DLA+ 2.0 Adapter Family User’s Manual Installation ....................61 Initial Configuration ..................62 Windows Wireless Setting ................64 Adapter Configuration .................. 67 Introduction The Noregon DLA+ 2.0 Adapter Family The DLA+ 2.0 Adapter Family ( DLA+ 2.0, DLA+ 2.0 Wireless Adapter and Trailer Diagnostic Adapters) are diagnostic devices that communicate with vehicle data for display on a PC-based diagnostic software application. Starting in 2016, CARB and EPA mandated standard that all vehicles support 500K J1939, resulting in the development of a new Type-2 9-pin connector. This connector can have up to 3 CAN channels (Tri CAN). The DLA+ 2.0 and DLA+ 2.0 Wireless adapters and their cables will work with all existing vehicles and with newer vehicles that will have the Type-2 9-pin connector. LED Indicators DLA+ 2.0 Adapter Family of products will support different LED indicators. The following table defines the LEDs and meaning per adapter: DLA+ 2.0 Wireless DLA+ 2.0 Trailer Diagnostics J1708 Tri CAN/J1939 K-Line ( KWP, ISO9141 J1850 (VPW – GM) J2497 / PLC4Trucks USB Connectivity Wireless 802.11 b/g Firmware updates ( via USB Power ( from Vehicle... - Page 5 Table of Contents Green LED Red LED Red LED Red LED Adapter (Power) (Data) (ABS AMP) (Wireless) N/A N/A DLA+ 2.0 N/A DLA+ 2.0 Wireless N/A Trailer Diagnostics POWER (green) LED: 1. Off when no power is applied. 2. Illuminates green when vehicle or USB side power is supplied. DATA (red) LED: 1. Flashes red once per second (heartbeat) to indicate Adapter is ready for use and no data is being transmitted on the device (DLA+ 2.0 and DLA+ 2.0 Wireless only). 2. Flashes steady red when the device is reading data regardless of protocol. ABS Lamp (red) LED: (TDA adapter ONLY) 1. The device acts like the tractor ABS light and will follow the SAE J2497 standard. WIRELESS (red) LED: 1. Indicates wireless network (802.11) association. 2. Solid lit LED when adapter is connected to a wireless network. 3. ASSY REV B.xx hardware wireless LED: a. Fast Blink: Reboot/Error. This happens briefly when the wireless reboots. If it persists then the wireless cannot ‘init’ the Wifi subsystem.
-
Page 6: Product Specifications And System Requirements
JPRO® DLA+ 2.0 Adapter Family User’s Manual Product Specifications and System Requirements DLA+ 2.0 Wireless DLA+ 2.0 Trailer Diagnostics 32-Bit Operating System Requirements Windows 7 Pro (current service pack) Windows 8 Windows 10 32-bit Minimum PC Requirements Pentium IV or faster 1 GB RAM 100 MB free hard disk space 1 free USB 2.0 port Wireless PC card required... -
Page 7: Supported Protocols And Standards
Product Specifications and System Requirements Supported Protocols and Standards Trailer Diagnostics DLA+ 2.0 DLA+ 2.0 Wireless RP1210 Protocols CAN (GMLAN, J2284) J1708/J1587 J1850 (VPW – GM) J1939 ISO 15765 ISO 9141-2 ISO 14230 (KWP2000) PLC J2534 Protocols CAN (Raw CAN) ISO 11898 GMLAN (HSCAN) ISO 9141-2 ISO 14230 (KWP2000) ISO 15765-4 J1850 VPW (GM Class II) Supply Voltage The following table specifies the voltage required by the DLA+ 2.0 Adapters. Vehicle Input Voltage 9-36 VDC Range USB Voltage 5.0 VDC Current Consumption No more than 500mA... -
Page 8: Temperature
JPRO® DLA+ 2.0 Adapter Family User’s Manual Temperature The DLA+ 2.0 Adapters shall operate over the following temperatures and meet all of its functional and performance specifications. Storage Range (-40° to 80° C) -40° to 176° F 0° to 149° F (-18° to 65° C) Operating Range Electromagnetic Compatibility The DLA+ 2.0 Wireless Adapters comply with FCC Part 15 technical standards with regard to electromagnetic radiation. Transient Protections The DLA+ 2.0 Wireless Adapters are designed to meet SAEJ1455 requirements for 12-volt systems. Electro-Static Discharge Protection The DLA+ 2.0 Wireless Adapters are designed to meet SAEJ1455 for 12-volt systems. WARNING: DO NOT ATTEMPT TO USE REPROGRAMMING FEATURES WHILE IN WIRELESS MODE (use USB mode). NOTE: Check the www.Noregon.com website for the very latest product specifications and system requirements. -
Page 9: Installation Notes
Installation Notes Installation Notes Before installing drivers and adapters, note: • Installation requires administration privileges. • Installation steps (and subsequent screens) will vary based on user systems (Windows OS version) and type of adapter being installed. Most illustrated installation steps are for a DLA+ 2.0 Wireless Adapter. • Installation files can be accessed using a CD or online at www.Noregon.com. Insert the DLA+ 2.0 Driver CD or the Professional CD into your CD or DVD drive or download the latest adapter drivers from www.Noregon.com. If using the supplied CD, the installation program will begin automatically. Click the Install Adapter Drivers button to begin. If using drivers downloaded from the website, begin the installation process by running the downloaded file. -
Page 10: Driver Installation
JPRO® DLA+ 2.0 Adapter Family User’s Manual Driver Installation Periodically check www.Noregon.com for the latest driver updates. 1. If the install program does not start automatically, start the program by running the Application.exe. 2. When the User Account Control box appears, select Yes to launch the install. 3. The Installer will appear, select Install to begin. Figure 1 NOTE: The screen shown in the example reflects installing a DLA+ 2.0 Wireless Adapter; however, the driver installation steps for all DLA+ 2.0 Adapters are the same. 4. This screen appears; select the Next button. Figure 2... - Page 11 Installation Notes 5. Click the check box to accept the License Agreement and click the Next button. Figure 3 6. Click the Next button. Figure 4 7. Click the Install button. Figure 5...
- Page 12 JPRO® DLA+ 2.0 Adapter Family User’s Manual If your system displays a security window (screen shot for illustration) again click the Install button. Figure 6 8. The installation procedure will continue. Figure 7 Click the Finish button. Figure 8 Once the latest drivers are installed, you can connect the adapter to the computer via USB cable and begin to use you DLA+ 2.0 Family adapter. Please proceed to configure Wireless settings if applicable.
-
Page 13: Dla+ 2.0 Wireless Configuration
Installation Notes DLA+ 2.0 Wireless Configuration Before beginning wireless configuration, check the “Resources” section of the www.Noregon.com website for any notes or changes to the DLA+ 2.0 Wireless configuration process. You must first install the necessary drivers before configuring the DLA+ 2.0 Wireless Adapter to work with your PC for diagnostic applications. Please be sure to follow the instructions in the Installation section beginning on page 10. NOTE: Identify which DLA+ 2.0 Wireless Adapter you have… (ASSY REV A.xx) or (ASSY REV B.xx). The ASSY REV information is found on the label containing the barcode. Follow the appropriate Wireless Configuration section. The DLA+ 2.0 Wireless Minder After drivers are installed, your System Task Bar displays the DLA+ 2.0 Wireless Minder icon (if your system is set to display Task Bar icons). Figure 9 If you scroll your cursor over the icon, the message, “DLA+ 2.0 Wireless Minder: No Adapter IP Found” will appear. If you right click on the icon and select “Show Details”, a box will display that your DLA+ 2.0 Wireless Adapter is not yet configured and therefore not getting a signal as indicated by the red “Round Trip Time (ms)” status bar. Figure 10 Once you have configured and assigned an IP address to the DLA+ 2.0 Wireless Adapter, connected to a wireless network, and the reception is strong, the status bar will become green as seen in Figure 52 on page 53. As just noted, even after you have configured your DLA+ 2.0 Wireless Adapter to a wireless network, you may get a poor transmission signal. To ensure a stronger signal, you may need to move your PC and DLA+ 2.0 Wireless Adapter closer to each other (See Wireless Reception Guidelines pages 64-65). NOTE: Before setting up a connection between your PC and the DLA+ 2.0 Wireless Adapter, you must know if you will use a local / corporate network or peer-to-peer connection. It is recommended you contact your network administrator for local / corporate network configuration. -
Page 14: Configuring The Dla+ 2.0 Wireless Adapter (Assy Rev A.xx)
JPRO® DLA+ 2.0 Adapter Family User’s Manual Configuring the DLA+ 2.0 Wireless Adapter (ASSY REV A.xx) To configure the adapter for the first time, or to change its network settings, follow these steps: NOTE: If you have already installed your drivers (see page 10), Steps 1 and 2 may already be complete. 1. Plug the USB cable into the USB port on the PC. 2. Connect the other end of the USB cable to the port labeled Computer on the adapter. Connect the diagnostic cable to the 26-pin connector and attach the diagnostic cable connector to the diagnostic port on the vehicle. 3. You will see the “Wireless” LED flash and then stop while the “Data” LED pulses regularly indicating the adapter is ready for a data connection. From the Start menu, if DLA+ 2.0 Wireless Configuration Tool does not automatically appear in the list of programs, go to All Programs } Noregon } DLA+ 2.0 Wireless Adapter menu and open DLA+ 2.0 Wireless Configuration Tool. Figure 11 NOTE: Depending on your system security settings, you may receive a Windows Security Alert similar to the one in Figure . If so, verify the name of the program in the alert is the DLA+ 2.0 Wireless Configuration Tool and click the Unblock button. - Page 15 Installation Notes Figure 12 4. Click the Configure Adapter via USB button on the toolbar (see highlighted box in Figure ). Figure 13 Below are default settings that will appear while configuring your DLA+ 2.0 Wireless Adapter: Network Name (SSID) LTRX_IBSS Network Type Peer-to-Peer Channel Security None IP Address 192.168.2.100 Subnet Mask 255.255.255.0 Gateway IP 0.0.0.0 DNS Server IP 0.0.0.0 Adapter Name DLAWIR32 ASSY REV A.xx Default Wireless Settings Table 1...
-
Page 16: Configuration On A Local / Corporate Network
JPRO® DLA+ 2.0 Adapter Family User’s Manual Configuration on a Local / Corporate Network NOTE: If you are configuring your DLA+ 2.0 Wireless Adapter to connect to a local / corporate network, it is highly recommended to consult your network administrator. NOTE: For editing your DLA+ 2.0 Wireless Adapter, your administrator can refer to defaults on page 15. Once you have clicked Configure Adapter via USB, this screen will appear. Figure 14 Toggle between the Network and Wireless tabs where the default settings display. Figure 15... - Page 17 Installation Notes 5. On the Network tab enter the assigned IP address from your network administrator as well as the values for the Subnet Mask, Gateway IP and DNS Server IP. You can also modify the default adapter name. 6. Toggle to the Wireless tab and enter the Network Name (SSID) provided by your administrator. Then, at Network Type, select the radio button, Infrastructure. Figure 16 7. Select the appropriate Security option from the drop down in the Security field. 8. Enter the Network Security values. Authentication, Encryption, Key Type, Key and Retype Key then click Save. 10. After selecting OK, this screen will appear indicating your DLA+ 2.0 Wireless Adapter is configured and ready to be connected with your PC once a network connection is established. (Establishing the Connection Between you PC and the Adapter)
- Page 18 JPRO® DLA+ 2.0 Adapter Family User’s Manual Figure 17 You can minimize this screen so it will be available after you have established your wireless network and are ready to connect to your DLA+ 2.0 Wireless Adapter. Configuration on a Peer-to-Peer Network Configuring a DLA+ 2.0 Wireless Adapter on a peer-to-peer network means the DLA+ 2.0 Wireless Adapter will communicate with your PC without going through a local / corporate Wireless network. ASSY REV A.xx Default Wireless Settings To refer to the DLA+ 2.0 Wireless Adapter default settings you will edit, see Table 1 Once you have clicked Configure Adapter via USB, this screen will appear.
- Page 19 Installation Notes Figure 18 Toggle between the Network and Wireless tabs where the default settings display. Figure 19 Figure 20 From the Network tab, ensure the last 3 digits in the IP Address field are unique (numbers can only be from 1 to 255).
- Page 20 JPRO® DLA+ 2.0 Adapter Family User’s Manual 1. Toggle to the Wireless tab and note the default settings for the DLA + 2.0 Wireless Adapter. Figure 21 2. Click the Save button to commit the settings to the DLA+ 2.0 Wireless Adapter. 4. Select OK on the below dialog.
- Page 21 Installation Notes Figure 22 5. After selecting OK, this screen will appear indicating your DLA+ 2.0 Wireless Adapter is configured and ready to be connected with your PC once a network connection is established. Figure 23 You can minimize this screen so it will be available after you have established your wireless network and are ready to connect to your DLA+ 2.0 Wireless Adapter. Proceed with (UPDATE with document link and page number once finished). Configuring Your PC to use the DLA+ 2.0 Wireless Adapter on a Peer-to-Peer network NOTE: If you have configured your adapter to work on your local / corporate network and your PC is connected to your local / corporate network, then skip to section. Establishing the Connection Between your PC and the Adapter NOTE: Connectify software is required to for running the wireless ASSY REV A.xx adapter on a Peer-to-Peer network with Windows 8 and Windows 10. See Appendix 1. If your PC is using a third-party OEM wireless utility to manage your wireless card, please consult the OEM manual for instructions on wireless configuration........................... 3 4 Wireless Configuration using Windows® 8/10 Configuration…….…….Appendix 1...
- Page 22 JPRO® DLA+ 2.0 Adapter Family User’s Manual Wireless Configuration using Windows® 7 1. Click the Start button and click Control Panel. Figure 24 2. Click the Network and Internet link.
- Page 23 Installation Notes Figure 25...
- Page 24 JPRO® DLA+ 2.0 Adapter Family User’s Manual 3. Under the Network and Sharing Center section, click Connect to a Network. Figure 26...
- Page 25 Installation Notes 4. Select the LTRX_IBSS network in the Wireless Network list and click the Connect button. Figure 27...
- Page 26 JPRO® DLA+ 2.0 Adapter Family User’s Manual 5. Under the Network and Sharing Center section, click again Connect to a Network. Figure 28...
- Page 27 Installation Notes 6. Right click on the LTRX_IBSS network and select Status. Figure 29 7. Click the Properties button. Figure 30 8. Highlight Internet Protocol Version 4(TCP/IPv4) and click the Properties button.
- Page 28 JPRO® DLA+ 2.0 Adapter Family User’s Manual Figure 31...
- Page 29 Installation Notes 9. Select Use the following IP address radio button to assign the static IP address. Ø The first three values of the IP address (i.e. 192.168.2) must match the Adapter’s IP address you entered in Configuration on a Local/Corportate Network. The fourth value must be unique and from 1 to 255. Ø If using the 192.168.2.xxx IP address range, the Subnet mask will default to 255.255.255.0 when you finish entering the IP address or press Tab. Ø The Default gateway IP address should remain blank. Figure 32 10. Click the OK. 11. Click Close twice, first to close the Wireless Network Connection Properties and then the Wireless Network Connection Status. 12. Under the Network and Sharing Center section click the View Network Status and Tasks button.
- Page 30 JPRO® DLA+ 2.0 Adapter Family User’s Manual Figure 33...
- Page 31 Installation Notes 13. On the left side of the dialog, click the Manage Wireless Networks link (see highlighted box in Figure 34 below). Figure 34...
- Page 32 JPRO® DLA+ 2.0 Adapter Family User’s Manual 14. Click the Add button (see highlighted box in below). Figure 35...
- Page 33 Installation Notes 15. Click Manually Create a Network Profile. Figure 36...
- Page 34 JPRO® DLA+ 2.0 Adapter Family User’s Manual 16. Enter LTRX_IBSS in the Network name field exactly as shown (name is case sensitive) in Figure 37. Figure 37 17. Select No authentication (Open) from the Security Type dropdown list. 18. Click the Next button. NOTE: Windows 7 does not support automatic connections on unsecure peer-to-peer networks. You will need to re-select the LTRX_IBSS network each time you reboot your PC. 19. Click the Close button.
- Page 35 Installation Notes Figure 38...
- Page 36 JPRO® DLA+ 2.0 Adapter Family User’s Manual 20. The Wireless Network Connection list is updated to display the network you just added. Figure 39 21. Proceed to Establishing the Connection Between your PC and the Adapter.
-
Page 37: Configuring The Dla+ 2.0 Wireless Adapter (Assy Rev B.xx)
Installation Notes Configuring the DLA+ 2.0 Wireless Adapter (ASSY REV B.xx) The ASSY REV information is found on the label containing the barcode. Each (ASSY REV B.xx) hardware is defaulted to Stand-alone Access Point mode with no password set and broadcasts a unique SSID. The last 6 digits of the SSID are set to match the last 6 of their wireless MAC address. To configure the adapter for the first time, or to change its network settings, follow these steps: NOTE: If you have already installed your drivers (see page 10), Steps 1 and 2 may already be complete. 3. Plug the USB cable into the USB port on the PC. 4. Connect the other end of the USB cable to the port labeled Computer on the adapter. Connect the diagnostic cable to the 26-pin connector and attach the diagnostic cable connector to the diagnostic port on the vehicle. 4. You will see the “Wireless” LED flash and then stop while the “Data” LED pulses regularly indicating the adapter is ready for a data connection. From the Start menu, if DLA+ 2.0 Wireless Configuration Tool does not automatically appear in the list of programs, go to All Programs } Noregon } DLA+ 2.0 Wireless Adapter menu and open DLA+ 2.0 Wireless Configuration Tool. Figure 40 NOTE: Depending on your system security settings, you may receive a Windows Security Alert similar to the one in Figure . If so, verify the name of the program in the alert is the DLA+ 2.0 Wireless Configuration Tool and click the Unblock button. - Page 38 JPRO® DLA+ 2.0 Adapter Family User’s Manual Figure 41 9. Click the Configure Adapter via USB button on the toolbar (see highlighted box in Figure 42). Figure 42 (DEFAULT settings) Configuration as Stand-alone Access Point Once you have clicked Configure Adapter via USB, this screen will appear.
- Page 39 Installation Notes Figure 43 Toggle to the Security tab to add a password (if you want to add one) for the entered Network Name. Once all desired information is entered, click Save. Figure 44 After selecting OK, this screen will appear indicating your DLA+ 2.0 Wireless Adapter is configured and ready to be connected with your PC once a network connection is established. Continue to Establishing the Connection Between your PC and the Adapter. Configuration on Connecting to an existing (wireless) network NOTE: If you are configuring your DLA+ 2.0 Wireless Adapter to connect to a local / corporate network, it is highly recommended to consult your network administrator. Once you have clicked Configure Adapter via USB, this screen will appear. 1. Select “Connect to an existing network”...
-
Page 40: Establishing The Connection Between Your Pc And The Adapter
JPRO® DLA+ 2.0 Adapter Family User’s Manual Figure 45 Figure 46 2. Enter your network SSID name. 3. Select the Security tab, to enter the network’s password. 4. Once all information is entered, click Save. Figure 47 5. After selecting OK, Figure 44 will appear indicating your DLA+ 2.0 Wireless Adapter is configured and ready to be connected with your PC once a network connection is established. Continue to Establishing the Connection Between your PC and the Adapter. Establishing the Connection Between your PC and the Adapter NOTE: Please ensure you have previously followed the Configuration steps for the DLA+ 2.0 Wireless Adapter you have (ASSY REV A.xx) or (ASSY REV B.xx). 1. Connect to Adapter’s network name in available Wireless Networks on your PC. 2. Verify your PC is connected to the adapter’s SSID that was configured. The Wireless LED on the adapter should be lit SOLID. 3. Click the Search button on the DLA+ 2.0 Wireless Configuration Tool toolbar. - Page 41 Installation Notes Figure 48 4. The configured DLA+ 2.0 Wireless Adapter will be listed (Name, IP Address, MAC Address and Firmware are for illustrative purposes only). Figure 49 5. Verify that the adapter you are configuring is listed by matching the MAC Address value printed on the label on the back of adapter with an entry in the DLA+ 2.0 Wireless Configuration Tool list. a. If your adapter is not listed, click the Search button again to refresh the list. b. If your adapter is listed in RED text or is still not listed, go back and compare IP address values. The first three values must be identical and the last value must be unique from 1 to 255. c. If your adapter is grayed out, the connection is unresolved. You can contact your network administrator for information about network status. d. If your adapter is still not listed, go back and confirm your wireless settings or please contact our support. e. If your adapter is still not listed in the Configuration Tool please see the FAQ’s section on page 67. 6. Highlight the desired DLA+ 2.0 Wireless Adapter in the list that will be used for vehicle communications with OEM applications and click the Select Adapter button.
- Page 42 JPRO® DLA+ 2.0 Adapter Family User’s Manual Figure 50 Note multiple adapters that have been configured may be detected and display on a local or corporate network. Be careful to select the appropriate adapter (check the MAC address value) to prevent using an adapter being used by someone else. Once your configured DLA+ 2.0 Wireless Adapter is successfully connected to the network, the “X” icon in your System Tray will change to this green check: Figure 51 When you scroll your mouse over the icon and right click, this window will display the Adapter’s IP address. Also note the green status bar indicates a strong wireless connection. If it turns red refer to the Wireless Reception Guidelines on page 53. Figure 52 7. Close the DLA+ 2.0 Wireless Configuration Tool window by clicking the X button in the top right corner. 8. Congratulations! Your DLA+ 2.0 Wireless adapter is ready to connect with a vehicle. Verify your connection settings are correct in the OEM software. Once you have configured a DLA+ 2.0 Wireless adapter and made a successful wireless connection, you can disconnect and reconnect that Adapter to the same PC without reconfiguration. When you disconnect your configured adapter, the DLA+ 2.0 Wireless Minder green check in the System tray will change:...
-
Page 43: The Favorites Feature To Select Ip Addresses
Installation Notes Figure 53 When you reconnect the configured adapter to the same PC, the “X” will change back to the green “ü“. The Favorites Feature to Select IP Addresses If a configured DLA+ 2.0 Wireless Adapter is connected to your local / corporate network, and after clicking the Search button does not display, the Favorites Feature will allow you to manually enter DLA+ 2.0 Wireless Adapter IP addresses. 1. Start by selecting the Favorites button in your DLA+ 2.0 Wireless Configuration Tool. Figure 54 2. After selecting Favorites, select the New Button. - Page 44 JPRO® DLA+ 2.0 Adapter Family User’s Manual Figure 55 3. Enter the Adapter’s IP address in the field and click Add. Figure 56 Figure 57 4. The IP Address will be listed and click OK. 5. Return to the Wireless Configuration Tool and click the Search button again – the configured adapter(s) will display.
- Page 45 Installation Notes Your adapter is ready for use with your diagnostic application! Windows Security and Firewall Settings The DLA+ 2.0 Wireless Configuration Tool will attempt to discover the DLA+ 2.0 Wireless adapters connected to your network by sending out requests on TCP and UDP ports 30718. Steps may need to be taken to configure firewall software to allow TCP and UDP ports 30718.
-
Page 46: Updating Adapter Firmware
JPRO® DLA+ 2.0 Adapter Family User’s Manual Updating Adapter Firmware NOTE: Check the “Resources” section of www.Noregon.com website for the latest driver. Automatic Firmware Update If a firmware update is required when you connect your DLA+ 2.0 Adapter to your OEM application, you will be alerted: Figure 58 NOTE: Automatic firmware updates are not supported via a wireless connection. Automatic updates must be made using a USB connection. If you are using a DLA+ 2.0 Wireless Adapter that is connected wirelessly, and the latest driver detects outdated firmware, an error message will alert you to perform a USB connection instead. - Page 47 Installation Notes 1. When the OEM application connects to the adapter, this dialog displays and you must select OK to begin auto updates: Figure 59 2. When you select OK from the original alert dialog box, this update dialog displays: Figure 60...
- Page 48 JPRO® DLA+ 2.0 Adapter Family User’s Manual 3. When the update is successfully finished, this screen displays: Figure 61 4. If an error is encountered, this type of message displays. Select OK to return to your OEM application. Figure 62...
-
Page 49: Manual Firmware Update
Installation Notes Manual Firmware Update In special circumstances (tests or support), you can also manually update firmware. To update the firmware (this example uses the DLA+ 2.0): 1. Apply power to the DLA+ 2.0 adapter. 2. Ensure the adapter is connected to the vehicle via the diagnostic cable and the PC via the USB cable. a. The vehicle ‘s diagnostic port is usually located under the dashboard on the driver’s side, or beside the driver’s seat i. If the Adapter’s power LED is not illuminated, ensure the vehicle’s key is set to the “ON” position. 3. Plug the USB cable into the USB port on the PC. 4. Connect the other end of the USB cable to the port labeled Computer on the adapter. 5. Launch USB Device Update Tool from the Start Menu } All Programs } Noregon } DLA+ 2.0 Adapter menu. - Page 50 JPRO® DLA+ 2.0 Adapter Family User’s Manual 6. Verify a device shows up in the ‘Connected Devices’ list column. Figure 63 7. Select the Open… button contained in the ‘Firmware Image’ section.
- Page 51 Installation Notes 8. Highlight the DLA.dfu file and then click Open. Figure 64 9. Click the Upgrade button. 10. Click Yes to continue (do not disconnect or power down device). Figure 65...
- Page 52 JPRO® DLA+ 2.0 Adapter Family User’s Manual 11. The device will be programmed. Figure 66 12. Verify that the version is updated in the ‘Connected Devices’ list column.
-
Page 53: Wireless Reception Guidelines For Dla+ 2.0 Wireless
Wireless Reception Guidelines for DLA+ 2.0 Wireless Wireless Reception Guidelines for DLA+ 2.0 Wireless Reduce obstructions between the PC and the DLA+ 2.0 Wireless: • All metallic surfaces in the area will reflect radio signals and can disturb and reduce reception. • Non-metallic obstructions will absorb radio signals and can reduce reception. This includes walls, furniture, other vehicles, etc. Minimize interference: • Cordless phones share the 2.4Ghz radio band used by the PC and DLA+ 2.0 Wireless. These devices will interfere with the radio signal. Use cordless phones that use the 5.8Ghz or 900Mhz bands. • Microwave ovens radiate in the 2.4Ghz radio band used by the PC and DLA+ 2.0 Wireless. Keep microwave ovens out of the shop area. • Cell phones interfere with radio signals – keep phone conversations away from the PC and DLA+ 2.0 Wireless. • Electrical machinery causes radio noise. Try to stay away from machinery and take note if the signal is affected when certain equipment is activated. Maximize antenna reception: • DLA+ 2.0 Wireless: The DLA+ 2.0 Wireless’ antenna is on the back side of the adapter (opposite the LED’s). Keep the back side facing the PC and away from metal surfaces. The best orientation for the adapter is to be hung vertically with the back facing the PC and away from floorboards or other metal surfaces (adapter LED’s turned away from you). ü ü • PC/Laptop: Keep antennas away from power cords and other computer wires. A laptop’s antenna is contained inside the laptop casing – keep the laptop out in the clear and out of any enclosures. If reception is poor, move the PC to another location. Sometimes moving a few feet can help. - Page 54 JPRO® DLA+ 2.0 Adapter Family User’s Manual WARNING: DO NOT ATTEMPT TO USE REPROGRAMMING FEATURES WHILE IN WIRELESS MODE (use USB mode).
-
Page 55: Testing Vehicle Connections
Testing Vehicle Connections Testing Vehicle Connections Go to Start then select } All Programs } Noregon } DLA+ 2.0 Wireless Adapter } DLA+ Connectivity Adapter Suite. Select the Start Test button. Figure 67 Within a few seconds this screen will open and the scroll boxes that correspond to the selected adapter will be populated. NOTE: The screen shot above shows a DLA+ 2.0 Wireless Adapter connected via USB. -
Page 56: Frequently Asked Questions And Troubleshooting
JPRO® DLA+ 2.0 Adapter Family User’s Manual Frequently Asked Questions and Troubleshooting NOTE: Check the “Resources” section of www.Noregon.com website for the latest FAQs and Troubleshooting steps. Question POSSIBLE CAUSES SOLUTION The adapter power Check to see that the light is on but my The drivers have not appropriate drivers were application isn't been installed installed communicating. The connection Check to see that the settings are incorrect connection settings are correct The cables are not Check to see if the cables are connected securely connected The vehicle ECU is Check to see that the vehicle not powered up ignition is on Voltage to the Check to see that a minimum adapter is not of 8.5V? is being supplied sufficient The data light will flash How do I know when the adapter is continuously when communicating? communication has be established. The adapter alone will not read codes. You will need Fleet... - Page 57 Frequently Asked Questions and Troubleshooting with your application for guidance.
-
Page 58: Technical Support
JPRO® DLA+ 2.0 Adapter Family User’s Manual RP1210 Error Codes RP1210 standard Error Codes Code Description 128 DLL was not initialized. 129 The client ID is not valid. 130 The client is already connected to the specified device. 131 The maximum number of connections has been reached. 132 A memory de-allocation error has occurred. 133 A memory allocation error has occurred. 134 The requested device ID was invalid. 135 The specific device does not handle multiple clients. 136 The protocol requested was not found in the API INI file. 137 The API DLL's transmit message queue is full. 138 The API DLL's transmit message queue is corrupt. 139 The API DLL's message receive queue is full. 140 The API DLL's message receive queue is corrupt. 141 The message to be sent exceeds protocol size limit. 142 The interface hardware is not connected (to the computer). 143 The command requested is defined by RP1210A, but not supported. 144 Invalid command number or incorrect parameters. 145 The was a problem in the transmit status to PostMessage. 146 The API was not able to claim the requested address. - Page 59 453 ERR_ADAPTER_NOT_RESPONDING 454 ERR_CAN_BAUD_SET_NONSTANDARD 455 ERR_MULTIPLE_CONNECTIONS_NOT_ALLOWED_NOW 456 ERR_J1708_BAUD_SET_NONSTANDARD 457 ERR_J1939_BAUD_SET_NONSTANDARD 458 ERR_ISO15765_BAUD_SET_NONSTANDARD 600 ERR_INVALID_IOCTL_ID 601 ERR_NULL_PARAMETER 602 ERR_HARDWARE_NOT_SUPPORTED 603 ERR_CANNOT_DETERMINE_BAUD_RATE Noregon Error Codes 704 An invalid buffer parameter was used. 705 The packetization flag should be 1 or 0. 706 Blocking while using window handle notifications is not allowed. 707 One or more of the Filters have an invalid length. 708 The data length for this protocol has been exceeded. 709 The Command buffer is too small. 710 The CAN Bit Timing values are invalid. 711 This command is not supported with the current protocol. 712 The J1939 address is no longer valid. 713 Multiple J1939 clients must use same packetizing methods.
-
Page 60: Appendix 1 - Connectify Or Windows 8/10 Configuration
725 The USB interface is in use. Wireless connections is not allowed at this time. 726 The Wireless interface is in use. USB connections is not allowed at the time. 727 Failed to get the protocol connection speed. 728 A DLA+Wireless adapter is not configured for connection. 729 An existing client is connected to the WIRELESS_CONFIG protocol. 730 ERR_FAILED_TO_START_SERVER 731 ERR_FAILED_TO_CONNECT_TO_SERVER 732 Failed to get the protocol connection speed. 733 Incorrect or invalid firmware version for your DLA+ family adapter. 734 Failed to load the registry values for your DLA+ family adapter. 735 Failed to load the firmware update files for your DLA+ family adapter. 736 Failed to update the firmware version of your DLA+ family adapter. 737 Failed to read the firmware version of your DLA+ family adapter. 738 Failed to obtain the device status during firmware update connect. 739 Failed to obtain the device status during firmware perform update. Technical Support For additional support for connecting your adapter via other protocols, diagnostic applications, speeds, etc., please contact Noregon Systems Help Desk using one of the following: E-mail: support@noregon.com Online: http://www.Noregon.com/ Toll Free Phone: +1(855) 889-JPRO (5776) Appendix 1 – Connectify or Windows 8/10 Configuration NOTE: Connectify software is only needed with (ASSY REV A.xx) DLA+ 2.0 Wireless adapters. If you have (ASSY REV B.xx) DLA+ 2.0 Wireless hardware, please see section Configuring the JPRO DLA+ 2.0 Wireless Adapter (ASSY REV B.xx) -
Page 61: Infrastructure Connection Setup Instructions
Infrastructure Connection Setup Instructions Infrastructure Connection Setup Instructions Connectify will ship on a USB Flash Drive that includes Connectify Software and Registration Key. Installation 1. Connect and open Connectify USB 2. Launch “ConnectifyInstaller” a. If prompted for User Account Control, click “Yes” 3. Agree to license Figure 68 4. Click Next 5. On Windows Security popup, Click Install... - Page 62 JPRO® DLA+ 2.0 Adapter Family User’s Manual Figure 69 6. Select “Reboot Now” option and click “Finish” 7. Computer will reboot 8. Open Connectify 9. License window should appear automatically a. If it does not, click Tools b. Click “Activate License” 10. Click “Already Bought” 11. Click “Already purchased but don’t have an account” 12. Enter Your Email Address 13. Enter Connectify License Key a. License Key is on Connectify USB b. Open Folder “Connectify License Key” to view 14. Complete registration with your email + password Initial Configuration 1. After Connectify has been activated the application will be launched. 2. Click on "Settings" in the upper left hand corner. 1. Hover over "Display" and click to uncheck "Show News/Banners” (This will turn off banner at bottom of Connectify screen) 2. Hover over “Advanced” and click to uncheck “Pause On No Internet” 3. Click “Startup Options”...
- Page 63 Infrastructure Connection Setup Instructions 1. Find the Hotspot setting 2. Click to check the box “Start interface on login” This will ensure the app will ALWAYS start up on boot Figure 70 4. In the main Connectify Window, select the “Settings” tab (a) In the “Hotspot Name” field enter: “CONNECTjPRO” (b) In the “Password” field enter: “diagnostics”...
- Page 64 JPRO® DLA+ 2.0 Adapter Family User’s Manual Figure 71 Windows Wireless Setting 1. Click Start 2. Type “Control Panel” 3. Click “Control Panel” 5. Open “Network and Sharing Center” Figure 72 6. Click “Change adapter settings” on the left...
- Page 65 Infrastructure Connection Setup Instructions Figure 73 7. Right Click on wireless network adapter Figure 74 8. Select Properties 9. Click “Configure” button...
- Page 66 JPRO® DLA+ 2.0 Adapter Family User’s Manual Figure 75 10. Select “Advanced” tab *The option names under the “Advanced” tab may vary depending on your computer manufacturer 11. Select “Preferred Band” 12. Select “2.4GHz band” from the dropdown...
- Page 67 Infrastructure Connection Setup Instructions Figure 76 13. Click “OK” 14. Close “Network Connections” 15. Close “Control Panel” Adapter Configuration 1. Connect your DLA+2.0 Wireless Adapter via USB cable (make sure you have already installed drivers for the adapter following the installation disk and instructions provided) 2. Click on Start>All Programs>Noregon> JPRO DLA+ 2.0 Wireless Adapter> DLA+ 2.0 Wireless Configuration Tool 3. Hover over and click on "Configure Adapter via USB " 4. Make sure the "Network" tab is selected in the upper left corner of the configuration screen. Then select the "Obtain IP automatically" radio button. 5. Now select the "Wireless" tab in the upper left hand corner of the configuration screen. 6. Under Network Configuration and in the "Network Name (SSID)" field type in "CONNECTjPRO" (or copy and paste the name used to set up your Connectify hotspot.). 7. Next to "Network Type" select the "Infrastructure" radio button.
- Page 68 JPRO® DLA+ 2.0 Adapter Family User’s Manual 8. Under Network Security click on the drop down menu next to "Security" and select "802.11i/WPA2" 9. Type in "diagnostics" into the "Key" and "Retype Key" boxes. (or copy and paste the password used to set up your Connectify hotspot.). 10. Below SELECT THE ENCRYPTION TYPE AS TKIP+WEP Figure 77 12. Click on save. 13. The configuration tool will automatically search and find no adapter the first time and this is normal. 14. Wait for the Red LED on the wireless adapter to turn on solid, shortly thereafter you will see a POP up message from Connectify on the desktop indicating a device has connected. 15. Click on the search button. You will see your adapter listed.
- Page 69 Infrastructure Connection Setup Instructions Figure 78 Figure 79 10. Highlight the adapter by hovering over it and clicking on it. Then click on "Select Adapter". This will put a check next to the adapter in the list and your adapter will be ready to use.