Table of Contents
Advertisement
Quick Links
TorqueStar Plus & Pro - Quick Start Guide
Getting started with your TorqueStar torque data collector.
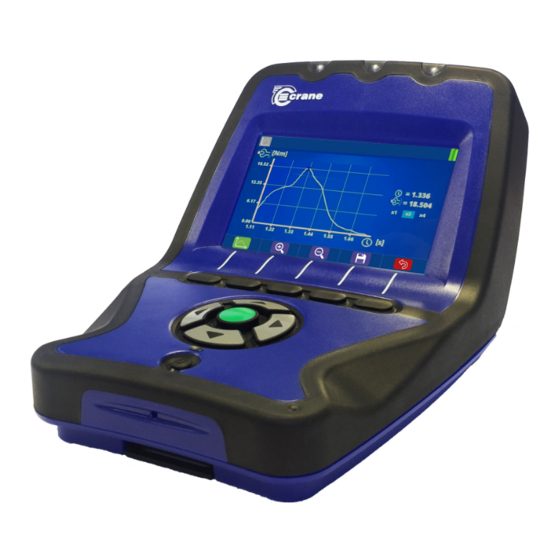
Front
LEDs
Directional
Arrow Keys
Green 'Accept' Key
Switching On
1
Turn on your TorqueStar by pressing the on/off button
situated below the arrow keys. Pressing this button
whilst the TorqueStar is on will turn it off.
Home Screen
3
After a few seconds the Home Screen will appear.
Depending on your TorqueStar model, using your
arrow keypad you can select between Check, Jobs or
Rounds modes or User Login. Using the function keys,
you can also access these modes as well as General
Settings.
4" Backlit Colour
Display Screen
Function
Soft Keys
On/Off Button
Micro USB
25-Way D-type
Female Transducer Port
Starting the TorqueStar
2
The first screen you will see is below. It confirms what
version of TorqueStar you have, the serial number,
software version, calibration due date and also what
features are available.
Connecting a Transducer
4
The screen below will be displayed when there is no
transducer connected. To connect your transducer,
plug the transducer cable into the connection port
on the back of the TorqueStar. The TorqueStar will
automatically recognise all Crane UTA and CheckStar
Multi transducers. For IS transducer set-up please see
the operator's manual.
Crane Electronics Ltd
The force in torque management
Back
(Flash Drive or
OMS Lite Cable)
5V DC Power Supply
USB Slot
Advertisement
Table of Contents

Related Manuals for Crane Electronics TorqueStar Plus


Summary of Contents for Crane Electronics TorqueStar Plus
- Page 1 Crane Electronics Ltd The force in torque management TorqueStar Plus & Pro - Quick Start Guide Getting started with your TorqueStar torque data collector. Front Back LEDs 4” Backlit Colour Display Screen Function USB Slot Soft Keys (Flash Drive or...
- Page 2 TorqueStar Plus & Pro Icons The following is a guide to the various function key icons that will appear throughout the TorqueStar Plus & Pro model screens. Function Modes: Check...
Need help?
Do you have a question about the TorqueStar Plus and is the answer not in the manual?
Questions and answers