Advertisement
Quick Links
Advertisement

Related Manuals for Dynamix UM-A4WPlus

Summary of Contents for Dynamix UM-A4WPlus
-
Page 2: Table Of Contents
1. Panel Descriptions ....................1 2. Connecting 4 Ports 11g Wireless ADSL2/2+ Router .......... 3 3. Setting up the TCP/IP in Windows ..............5 Windows ME/98 ....................5 Windows 2000 ...................... 6 Windows XP ......................7 4. Setting up the 4 Ports 11g Wireless ADSL2/2+ Router ........8 5. -
Page 3: Panel Descriptions
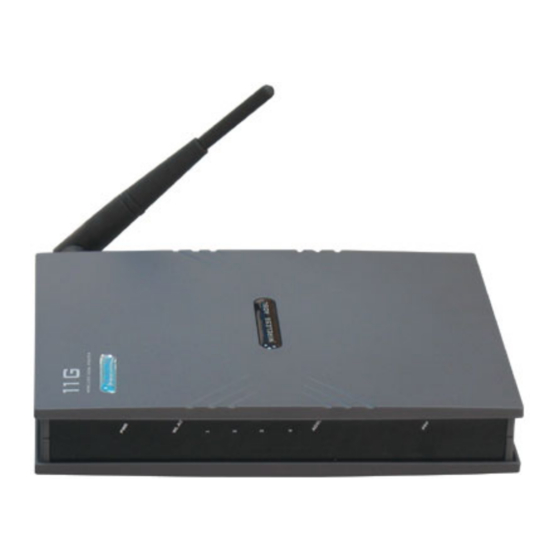
1.1 Back Panel: The back panel of the 4 Ports 11g Wireless ADSL2/2+ Router contains ADSL, Ethernet Switches, Reset Button, Power Adaptor connection and SMA Connector. ADSL Port for connecting to the ADSL/ADSL2/ADSL2+ Service Provider. Ports 1~4 Four 10/100Mbps Ethernet Ports for connecting to the network devices Restore the 4 Ports 11g Wireless ADSL2/2+ Router to factory default RESET setting. - Page 4 1.2 Front Panel: The 4 Ports 11g Wireless ADSL2/2+ Router’s LED indicators display information about the device’s status. Lights up when 4 Ports 11g Wireless ADSL2/2+ Router is powered on. Lights up when Wireless system is ready. WL ACT Blinking when 4 Ports 11g Wireless ADSL2/2+ Router is sending or receiving data.
-
Page 5: Connecting 4 Ports 11G Wireless Adsl2/2+ Router
2.1 Connection Mechanism: This section describes the hardware connection mechanism of your 4 Ports 11g Wireless ADSL2/2+ Router on your Local Area Network (LAN) connect to the Internet, how to configure your 4 Ports 11g Wireless ADSL2/2+ Router for Internet access or how to manually configure your Internet connection. - Page 6 2.2 Steps for Connection: Following are the steps to properly connect your 4 Ports 11g Wireless ADSL2/2+ Router: 1. Turn off your computer. 2. Connect the ADSL port of your 4 Ports 11g Wireless ADSL2/2+ Router to the wall jack of the ADSL Line with a RJ-11 cable.
-
Page 7: Setting Up The Tcp/Ip In Windows
Windows Me / 98 Step 1: Click Start→Settings→Control Panel. Step 4: Go to IP Address icon and select Obtain an IP address. icon. Step 2: Double-click the Network Step 5: Go to Gateway icon and erase all previous setting. Step 3: Go to Configuration icon, select network Step 6: Go to DNS Configuration icon, select adapter installed and click Properties. -
Page 8: Windows 2000
Windows 2000 Step 1: Click Start→Settings→Control Panel. Step 4: Select Internet Protocol (TCP/IP) and click Properties. Step 2: Double-click the Network and Dial-up Connections. Step 5: Select Obtain an IP address automatically and DNS server address automatically. Then, click OK. Step 3: Right Click the Local Area Connection and select Properties. -
Page 9: Windows Xp
Windows XP Step 1: Click Start→Control Panel→Classic View. Step 4: Go to General icon, select Internet Protocol (TCP/IP) and click Properties. Step 2: Double-click the Network Connections. Step 5: Go to General icon, select Obtain an IP address automatically and DNS server address automatically. -
Page 10: Setting Up The 4 Ports 11G Wireless Adsl2/2+ Router
1. Launch your web browser, and enter the 4 Ports 11g Wireless ADSL2/2+ Router’s IP Address: “192.168.1.1” in the address field then press the “Enter” key to login. 2. Enter the default User Name: “Admin” and Password: “Admin”. Then press “OK” to login. - Page 11 3. Upon entering the address into the web browser, the configurable HOME page with all the device configuration information will pop up. 4. Click “EZ SETUP -- Wizard” and proceed with the following steps to help you install the 4 Ports 11g Wireless ADSL2/2+ Router quickly and easily. 4 Ports 11g Wireless ADSL2/2+ Router...
- Page 12 Step 1 Select your country from the list and note the “Encapsulation” type. The “Encapsulation” type differs in each country and there are two different kinds of setup windows wizard that will pop-up. Click “Config” or “CONFIG – New Connection” if you can’t find any available parameters from the presetting country list.
- Page 13 For countries with the following “Encapsulation” after clicking the “Next” button, you will enter into “Set PPP Password” window as shown below. PPPoA VC-Mux PPPoA LLC PPPoE LLC Manually enter your “Username” and “Password” which will be provided by your Service Provider (ISP).
- Page 14 For countries with the following “Encapsulation” after clicking the “Next” button from STEP 1, you will enter into the “Set Area” window as shown below. 1483 Bridged LLC 1483 Routed VC-MUX In this current window, you will find 3 different Connection Type: Static (Fixed IP by ISP), DHCP (Get IP dynamically from ISP), III.
- Page 15 Static (Fixed IP by ISP): Click the radio button to enable Static (Fixed IP by ISP) option, then click “Next”. The following window will pop-up: Manually enter the “IP Address”, “Mask”, “Default Gateway” and “DNS”. Click “Apply” after your setting. Refer to your ISP for further details on the correct setting. 4 Ports 11g Wireless ADSL2/2+ Router...
- Page 16 DHCP (Get IP dynamically from ISP): Click the radio button to enable DHCP (Get IP dynamically from ISP) option, then click “Next”. The following window will pop-up: Click to enable the “Default Gateway” then click “Apply” after your setting. Refer to your ISP for further details on the correct setting.
- Page 17 III. Bridge: Click the radio button to enable Bridge connection option, then click “Next”. The following screen will pop-up: Click and choose “Select LAN” from the dropdown manual or leave it as it’s default then click “Apply” after your setting. Refer to your ISP for further details on the correct setting.
- Page 18 Step 2 Click “Apply” after setup. Following windows will pop-up. The device’s system will save and activate your setting after clicking the “Apply” button. 4 Ports 11g Wireless ADSL2/2+ Router...
- Page 19 The following windows will pop up after the reboot process. Check the following items when the above window pop-up. All the setting should be exactly the same with your setting in STEP1. Name: Show the ISP name selected in STEP 1. Type: Show the Encapsulation type selected in STEP 1.
- Page 20 NOTE: The 4 Ports 11g Wireless ADSL2/2+ Router can be configured to maintain up to 8 Connection Profiles. Different Connection Profiles may be required if you connect to more than one ADSL service provider, or if you vary the connection type/setting you use. Note that in many cases, only one Connection Profile will be required and only one Connection Profile in used at one time.
-
Page 21: Making Sure Of Internet Connection
Go to “STATUS” “Modem Status” and the following window will pop-up. Check the “Connection Status”, “Us Rate” and “Ds Rate”, the numbers/data show you the actual ADSL connection speed in Kbps. Launch your browser, enter Google Website Address: “www.google.com” in the address field then press “Enter”. 4 Ports 11g Wireless ADSL2/2+ Router... - Page 22 The following Google website index page will display on your screen. This shows your ADSL connection is correctly set and access to the Internet is now available. NOTE: For more detailed information regarding settings and connections, refer to “Users Manual”. UI845G_03 4 Ports 11g Wireless ADSL2/2+ Router...
Need help?
Do you have a question about the UM-A4WPlus and is the answer not in the manual?
Questions and answers