Advertisement
Quick Links
9889 Garrymore Ln
Missoula, MT 59808
888-687-3552 | +1-406-549-0769
www.aquacreek.com
Check entire box and all packing materials for parts. Before beginning assembly, read the
instructions and identify parts using the fi gures and parts listed in this document.
It is critical that all parts be carefully inspected prior to installation. If any damage occurred in
transit, Aqua Creek Products, LLC must be notifi ed within three days of receipt of unit.
Proper installation cannot be overstressed, as an improper installation voids Aqua Creek's
warranty and may affect the safety of the user.
Copyright © 2017 Aqua Creek Products All Rights Reserved
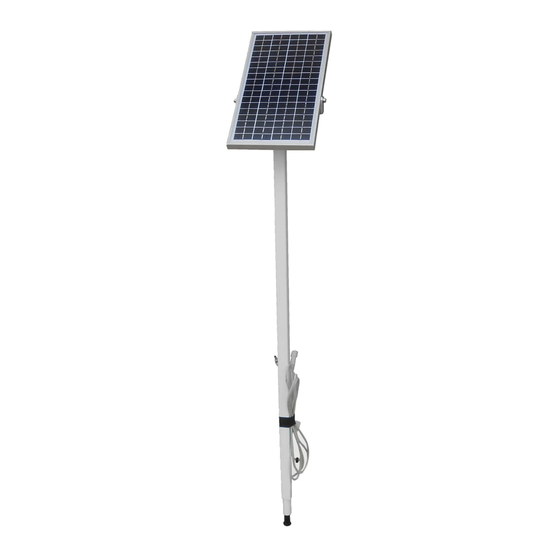
24V Solar Charger
Lift safety can only be ensured if the lift is installed and
• NEVER permit children to play on or around the lift
• Do not allow children to use the lift without adult
supervision
• NEVER apply direct water pressure to the electronics
• NEVER use the lift with a dry pool
READ CAREFULLY
Instructions
PART #: F-044SCH
(For use with Pro Pool, Ranger,
Ambassador & Pathfi nder)
MANDATORY
LEAVE THIS MANUAL WITH LIFT OWNER
Read and follow all instructions.
operated according to these instructions.
1
Revised 12/4/17
Advertisement

Related Manuals for Aqua Creek Products F-044SCH


Summary of Contents for Aqua Creek Products F-044SCH
- Page 1 It is critical that all parts be carefully inspected prior to installation. If any damage occurred in transit, Aqua Creek Products, LLC must be notifi ed within three days of receipt of unit. Proper installation cannot be overstressed, as an improper installation voids Aqua Creek’s warranty and may affect the safety of the user.
-
Page 2: Unpacking And Assembly
Install the 2nd fl at washer and the Nylock nut on the opposite side, and tighten until snug. The Solar Charger is now ready to install on your pool lift. Copyright © 2017 Aqua Creek Products All Rights Reserved Revised 12/4/17... - Page 3 STEP 4: Run the BATTERY CABLE under the MAIN FRAME TUBE as shown. It will run to the CONTROL BOX, and the CONNECTOR will plug into the control box. (See INSTALLING THE CHARGE CONNECTOR). Copyright © 2017 Aqua Creek Products All Rights Reserved Revised 12/4/17...
- Page 4 STEP 4: Run the BATTERY CABLE along the base frame, back under the main frame, and up the actuator frame as shown. The battery cable runs behind the CONTROL BOX, and the CONNECTOR will plug into the control box (see INSTALLING THE CHARGE CONNECTOR). Copyright © 2017 Aqua Creek Products All Rights Reserved Revised 12/4/17...
- Page 5 Use a 1” wrench to make sure it is snug. STEP 4: Run the BATTERY CABLE up the CONTROL BOX POST behind the control box. The CONNECTOR will plug into the control box (see INSTALLING THE CHARGE CONTROLLER). Copyright © 2017 Aqua Creek Products All Rights Reserved Revised 12/4/17...
- Page 6 STEP 4: Run the BATTERY CABLE under the MAIN FRAME TUBE as shown. It will run to the CONTROL BOX, and the CONNECTOR will plug into the control box. (See INSTALLING THE CHARGE CONNECTOR). Copyright © 2017 Aqua Creek Products All Rights Reserved Revised 12/4/17...
- Page 7 TO OPEN THE CONTROL BOX “TORX” T20 DRIVER FOR USE A TORX T20 DRIVER OPENING CONTROL-BOX REMOVE THE FOUR (4) SCREWS FROM THE TOP OF THE CONTROL BOX: LEAVE SCREWS IN HOLES Copyright © 2017 Aqua Creek Products All Rights Reserved Revised 12/4/17...
- Page 8 REMOVE THE COVER AND PLACE ON TABLE RIGHT-SIDE UP: NOTE POSITION OF EMERGENCY-SWITCH CAP USE A “TORX” T10 DRIVER TO REMOVE THE THREE (3) SCREWS FROM THE CONTROL BOARD Copyright © 2017 Aqua Creek Products All Rights Reserved Revised 12/4/17...
- Page 9 Control Box Modification Instructions REMOVE THE CONTROL BOARD FROM THE CONTROL BOX USE SCREWDRIVER, AND MALLET IF NECESSARY, TO PUNCH-OUT AND REMOVE PLASTIC-DISC ON 24V INPUT/OUTPUT PORT Copyright © 2017 Aqua Creek Products All Rights Reserved Revised 12/4/17...
- Page 10 PLACE THE CONTROL BOARD BACK IN PLACE INSIDE THE CONTROL BOX RETURN THE THREE (3) SCREWS TO SECURE REPLACE THE EMERGENCY-SWITCH CAP WITH THE CONTROL BOARD BACK IN PLACE “ARROW” POINTING DOWN AS SHOWN Copyright © 2017 Aqua Creek Products All Rights Reserved Revised 12/4/17...
- Page 11 Control Box Modification Instructions PUT COVER ON AND REINSTALL SCREWS TEST EMERGENCY-SWITCH WITH DRIVER, LISTEN FOR “CLICK” Copyright © 2017 Aqua Creek Products All Rights Reserved Revised 12/4/17...
- Page 12 NOTE: The BATTERY CABLE must be run along the main frame as shown so it follows the lift as it goes down into the water. Run the lift up and down to make sure the cable has been installed properly. Copyright © 2017 Aqua Creek Products All Rights Reserved Revised 12/4/17...
- Page 13 The 24V Solar Charger will continue to charge the battery, even as the lift is being used. So once the 24V Solar Charger has been installed it will function without any need for adjustment. The user should check the indicators periodically to make sure it is working. Copyright © 2017 Aqua Creek Products All Rights Reserved Revised 12/4/17...
-
Page 14: Battery Maintenance
Scotch-Brite pad and then apply dielectric grease (supplied with lift) as shown in the figure below. Clean with alcohol and a cotton swab and apply dielectric grease to terminals Copyright © 2017 Aqua Creek Products All Rights Reserved Revised 12/4/17... - Page 15 THREAD PROTECTOR, 1/2” OD X 2” INSIDE HEIGHT 00918174 LINAK DUMMY PLUG FOR DC PORT 450 DEGR SILICON, BLISTER PACKET, 450 DEGREE ANTI SIEZE, PACKET, .75 ANTI SIEZE, PACKET, 5 GRAMS Copyright © 2017 Aqua Creek Products All Rights Reserved Revised 12/4/17...
- Page 16 (ITEM #’s F-043SCH, F-044SCH, F-045SCH, F-046SCH, F-047SCH) Aqua Creek Products, LLC (a.k.a. Aqua Creek) warrants to the original end user purchaser that products manufactured by Aqua Creek, when properly installed in accordance with assembly and installation instructions and properly used and maintained, shall be...
Need help?
Do you have a question about the F-044SCH and is the answer not in the manual?
Questions and answers