Table of Contents
Advertisement
Quick Links
OIL PRESS OPERATING
MANUAL
MODEL: USSOILP1
This manual should be made available to all users of this equipment. For best results, and for maximum durability of the
equipment, carefully read and follow all instructions. Failure to do so can lead to serious injury or catastrophic damage to
the user, machine, supplies, or surrounding areas. All safety suggestions must be followed closely, and extreme precaution
must be taken to assure proper use of the equipment by only qualified personnel who have read this guide.
For questions or concerns, e-mail service@ussolid.com, visit www.ussolid.com, or
call (800) 209-4177
Advertisement
Table of Contents

Related Manuals for U.S. Solid USSOILP1


Summary of Contents for U.S. Solid USSOILP1
- Page 1 OIL PRESS OPERATING MANUAL MODEL: USSOILP1 This manual should be made available to all users of this equipment. For best results, and for maximum durability of the equipment, carefully read and follow all instructions. Failure to do so can lead to serious injury or catastrophic damage to the user, machine, supplies, or surrounding areas.
- Page 2 Contents Getting Started Safety Notes III. Unpacking the Oil Press Installation Operating the Machine Cleaning the Machine VII. Processing and Storing Oil VIII. Preparing Raw Materials Raw Material Guide Factors Affecting Oil Extraction Troubleshooting XII. Specifications...
-
Page 3: Getting Started
I. Getting Started Hello new US Solid Oil Press user! Thank you for choosing our US Solid Oil Press. For smooth and safe operations, please read and understand this manual. The operation and maintenance information listed within has been updated as of its printing. In light of the ever-changing nature of technology, the company reserves the right to modify specifications or procedures for this oil press without notice. -
Page 4: Safety Notes
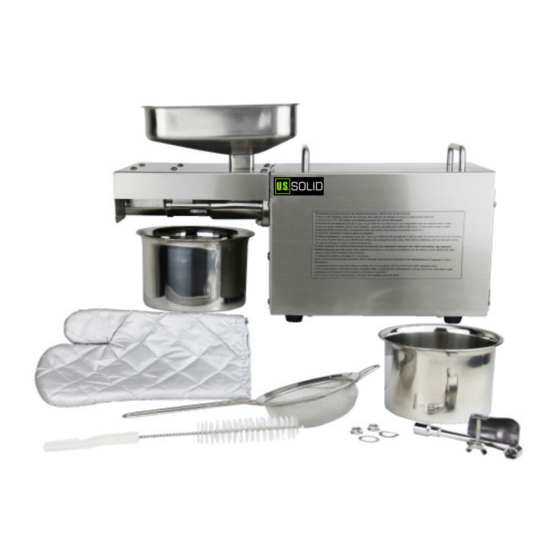
II. Safety Notes • Always use a grounded outlet. • Only press raw materials discussed specifically in this manual. • Do not press the dry residue, as it can lead to blockage in the pressing chamber. • Never use an induction cooker, light wave stove, or electric radiant cooker to fire or heat raw materials. - Page 5 III. Unpacking the Oil Press Opening the Oil Press First check whether there is damage due to transportation. Make sure the aluminum heater cover stays close to pressing chamber. Otherwise clog- ging will occur and no oil will come out! As for the manufactured equipment: there may be discoloration or unevenness in the surface of the pressing chamber.
- Page 6 Figure 2 In Figure 2, the hopper will be where all raw materials are held for pressing. Take careful note of the heater, as this element can be quite hot, and lead to burns or other injuries if the user is not careful. The oil cup is where the extracted oil will fall into.
-
Page 7: Installation
IV. Installation 1. Place oil press on solid level table. 2. Install hopper according to Figure 2. Place the oil cup below the oil outlet and prepare container for slag. 3. Plug in power supply that corresponds to the socket on the machine. - Page 8 Pressing for Oil 1. Turn on heating switch and wait for 25 minutes; extend the waiting time appropriately during the cold seasons (never turn it off during the oil pressing process). 2. Put dry ingredients into the hopper. 3. Press the “Pressing” switch and begin pressing oil. 4.
-
Page 9: Cleaning The Machine
VI. Cleaning the Machine 1. Shut off the power and unplug the machine. 2. If pressing chamber is hot, wear cotton, heat-protective gloves to prevent burns. Alternatively, wait for 60 minutes to let the pressing chamber cool down completely. 3. According to the graphic below, remove the four nuts from the pressing chamber with a wrench. - Page 10 VII. Processing and Storing Oil Because the oil that is pressed out contains liquid from the raw materials, the coloration of the oil will vary with the material used. Peanut oil, walnut oil, and white sesame oil should appear a light ivory.
- Page 11 IX. Raw Material Guide Camellia seeds Camellia seeds are special. They can be dried out enough for pressing with only exposure to sunlight. In case this does not do the trick, or there is no ample sunlight, they can be put into the micro- wave and heated for 3-4 minutes, roughly 35 oz.
- Page 12 Peanuts First confirm the quality of peanuts. To confirm dryness, press peanut kernels and if at least one-third of the red skin falls off then they are dry enough. Fresh and dry enough peanut kernels are fit for oil pressing direct- ly.
- Page 13 White or Black Sesame Seeds Refer to the “peanut pressing method” White sesame and unshelled sesame must be fired till slightly yellow or half mixed with black sesame (please refer to the hot pressing method). In many cities, there are a lot of grain stores or supermarkets that sell sesame seeds and peanuts and provide roasting and milling services at the same time.
- Page 14 Walnut Kernels Put walnut kernels into a cloth bag and slightly crack them with a wooden mallet into pieces the size of a regular peanut kernel. Since walnut kernels contain lots of oil but few fibers, they are not that easy to press. Make sure to add a few soybeans while pressing walnut kernels.
- Page 15 Soybeans Soybeans contain little oil. 500g of local soybeans contains 60-90g of oil; transgenic soybeans contain 90-125g of oil. You can refer to the steps to press peanuts for hot pressing, namely, heat soybeans till their skins crack and then press them. Rapeseeds There are two kinds of rapeseeds, winter and spring, both of which contain 30%-40% oil in most cases.
-
Page 16: Troubleshooting
XI. Troubleshooting Problem: During pressing, lots of residue in the oil outlet. Causes: • The preheating switch is not on or was not left on long enough. • Raw material contains too much water or the moisture was not properly removed. •... - Page 17 Problem: The electric motor buzzes and shakes. Cause: • The motor is jammed. Solution: • Stop pressing immediately and remove raw material from hopper. Preheat for one hour and then press “Clean” for up to two seconds ,then press “Start” for one second. Repeat and the lever will ease out.
-
Page 18: Specifications
(big pumpkin seeds, camellia seeds and large peanuts) of raw materials is, the slower the speed will be. Maximum Pressing Particle: the press barrel of U.S. Solid Oil Press is designed based on the volume of a peanut. If the particle size... - Page 19 INTENTIONALLY LEFT BLANK For questions or concerns, e-mail service@ussolid.com, visit www.ussolid.com, or call (800) 209-4177...
Need help?
Do you have a question about the USSOILP1 and is the answer not in the manual?
Questions and answers