Advertisement
Available languages
Available languages
Quick Links
Advertisement

Related Manuals for KTM 60312935044


Summary of Contents for KTM 60312935044
- Page 1 Information PowerParts 60312935044 04. 2013 3.211.906 *32119 6* www.ktm.com...
- Page 2 Le rogamos seguir las instrucciones para el montaje. A fin de garantizar la máxima seguridad y un funcionamiento correcto es imprescindible acudir a un concesionario autorizado de KTM para obtener el mejor asesoramiento técnico e instalar correctamente las KTM PowerParts.
-
Page 3: Montage
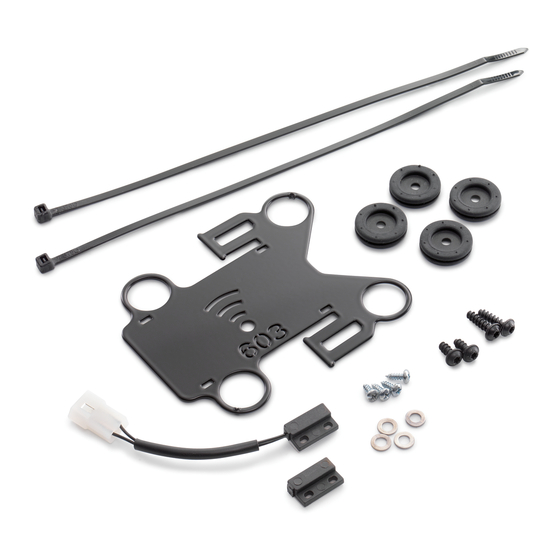
Lieferumfang: 1x Halteblech (1) 60312935010 4x Gummitülle (2) 60006001023 4x Unterlegscheibe (3) 0125050003 1x Reedschalter selbstklebend (4) 60012035185 2x Kabelband (5) 44011076305 2x EJOT-Schraube 50x18 (6) 0081050181 2x EJOT-Schraube 50x12 (7) 0081050121 4x Blechschraube (8) 0981350103 Vormontage - Sitzbank abnehmen (siehe Bedienungsanleitung). - Schrauben (9) entfernen und Staufachdeckel (10) abnehmen. - Page 4 - Reedschalter mit Kabel (16) wie dargestellt aufkleben (selbstklebend) und mit den Blechschrauben (8) am Rahmenheck befestigen. - Stecker (17) und Stecker des Reedschalters (18) miteinander verbinden. HINWEIS: Der Stecker (17) befindet sich unter der rechten Seitenverkleidung beim Rahmenausleger. - Reedschalter ohne Kabel (19) wie dargestellt aufkleben (selbstklebend) und mit den Blechschrauben (8) an der Sitzbank (20) befestigen.
-
Page 5: Pre-Assembly
Scope of supply: 1x retaining bracket (1) 60312935010 4x rubber grommets (2) 60006001023 4x washers (3) 0125050003 1x reed switch, self-adhesive (4) 60012035185 2x cable ties (5) 44011076305 2x EJOT screws 50x18 (6) 0081050181 2x EJOT screws 50x12 (7) 0081050121 4x tapping screws (8) 0981350103 Preassembly... -
Page 6: Final Steps
- Bond the reed switch with the cable (16) as shown (self-adhesive) and secure it to the rear frame with the sheet metal screws (8). - Connect the connector (17) with the reed switch connector (18). NOTE: The plug (17) is located below the right-hand side cover beside the subframe. - Bond the reed switch without the cable (19) as shown (self-adhesive) and attach it to the seat (20) with the sheet metal screws (8). - Page 7 Volume della fornitura: N. 1 piastrina (1) 60312935010 N. 4 passacavi in gomma (2) 60006001023 N. 4 rondelle (3) 0125050003 N. 1 contatto Reed autoadesivo (4) 60012035185 N. 2 fascette serracavi (5) 44011076305 N. 2 viti EJOT 50x18 (6) 0081050181 N.
- Page 8 - Incollare il contatto Reed (autoadesivo) con il cavo (16), come raffigurato, e fissarlo al telaietto posteriore con le viti autofilettanti (8). - Collegare il connettore (17) al connettore del contatto Reed (18). NOTA: Il connettore (17) si trova sotto la fiancatina destra in corrispondenza del telaietto posteriore.
- Page 9 Contenu de la livraison : 1x Tôle de fixation (1) 60312935010 4x Gaine en caoutchouc (2) 60006001023 4x Rondelle de calage (3) 0125050003 1x Contacteur Reed autocollant (4) 60012035185 2x Collier pour câbles (5) 44011076305 2x Vis EJOT 50x18 (6) 0081050181 2x Vis EJOT 50x12 (7) 0081050121...
- Page 10 - Coller le contacteur Reed avec le câble (16) comme illustré (autocollant) et le fixer avec les vis à tôle (8) sur l’arrière du cadre. - Relier la fiche (17) à la fiche du contacteur Reed (18). REMARQUE : Le connecteur (17) est situé sous le cache latéral de droite, au niveau de la partie arrière du cadre.
-
Page 11: Montaje
Volumen de suministro: 1 chapa de sujeción (1) 60312935010 4 manguitos de goma (2) 60006001023 4 arandelas (3) 0125050003 1 interruptor de lengüeta autoadhesivo (4) 60012035185 2 cintas sujetacables (5) 44011076305 2 tornillos EJOT 50x18 (6) 0081050181 2 tornillos EJOT 50x12 (7) 0081050121 4 tornillos roscachapa (8) 0981350103... - Page 12 - Pegar el interruptor de lengüeta (autoadhesivo) con el cable (16) tal como se muestra en la ilustración y fijarlo al subchasis con los tornillos rosca- chapa (8). - Conectar el conector (17) y el conector del interruptor de lengüeta (18). NOTA: El conector (17) se encuentra debajo del carenado lateral derecho, en el sub- chasis.
Need help?
Do you have a question about the 60312935044 and is the answer not in the manual?
Questions and answers