Table of Contents
Advertisement
Available languages
Available languages
ARM601-4
DIGITAL TORQUE WRENCH
THIS MANUAL CONTAINS IMPORTANT INFORMATION REGARDING SAFETY,
OPERATION, MAINTENANCE AND STORAGE OF THIS PRODUCT.
CE MANUEL CONTIENT DES INFORMATIONS IMPORTANTE CONCERNANT LA
SECURITE, L'OPERATION, LA MAINTENANCE ET LE STOCKAGE DE CE
PRODUIT.
ESTE MANUAL CONTIENE INFORMACIÓN IMPORTANTE ACERCA DE LA
SEGURIDAD, FUNCIONAMIENTO, MANTENIMIENTO Y ALMACENAMIENTO DE
ESTE PRODUCTO.
DO NOT ATTEMPT TO OPERATE THE TOOL UNTIL YOU HAVE READ AND UNDERSTOOD ALL
INSTRUCTIONS AND SAFETY RULES CONTAINED IN THIS MANUAL. FAILURE TO COMPLY
MAY RESULT IN ACCIDENTS INVOLVING FIRE, ELECTRIC SHOCK, OR SERIOUS PERSONAL
INJURY. SAVE THIS OWNER'S MANUAL FOR FUTURE REFERENCE AND REVIEW IT
FREQUENTLY FOR SAFE OPERATION.
NE PAS TENTER D'OPERER L'OUTIL TANT QUE VOUS N'AVEZ PAS LU ET COMPRIS TOUTES
LES INSTRUCTIONS ET REGLES DE SECURITE CONTENUES DANS CE MANUEL. SINON VOUS
RISQUEZ DES ACCIDENTS TELS QU'UN INCENDIE, UNE ELECTROCUTION, OU DES
BLESSURES CORPORELLES GRAVES. CONSERVEZ CE MODE D'EMPLOI EN CAS DE BESOIN ET
RELISEZ-LE SOUVENT POUR UTILISER VOTRE OUTIL EN TOUTE SECURITE.
NO UTILICE ESTA HERRAMIENTA HASTA HABER LEÍDO Y COMPRENDIDO TODAS LAS
INSTRUCCIONES Y NORMAS DE SEGURIDAD CONTENIDAS EN ESTE MANUAL. SI NO LO
HACE PODRÍA PROVOCAR ACCIDENTES CON FUEGO, DESCARGA ELÉCTRICA O LESIONES
PERSONALES SERIAS. GUARDE ESTE MANUAL DE INSTRUCCIONES PARA SU CONSULTA EN
EL FUTURO Y REVÍSELO FRECUENTEMENTE PARA UN USO SEGURO.
PRODUCT INFORMATION MANUAL
Manuel informations du produit
Manual información del producto
English
Français
Español
Advertisement
Table of Contents

Subscribe to Our Youtube Channel
Related Manuals for ACDelco ARM601-4


Summary of Contents for ACDelco ARM601-4
- Page 1 ARM601-4 DIGITAL TORQUE WRENCH PRODUCT INFORMATION MANUAL Manuel informations du produit Manual información del producto English Français Español THIS MANUAL CONTAINS IMPORTANT INFORMATION REGARDING SAFETY, OPERATION, MAINTENANCE AND STORAGE OF THIS PRODUCT. CE MANUEL CONTIENT DES INFORMATIONS IMPORTANTE CONCERNANT LA SECURITE, L'OPERATION, LA MAINTENANCE ET LE STOCKAGE DE CE PRODUIT.
- Page 2 1English1 THANKS FOR CHOOSING THIS PRODUCT ACDelco provides you with products at an affordable price, and we would like you to be fully satisfied with this product and our technical support. If any help or advice is needed, please kindly contact us.
-
Page 3: Warning Label Identification
1English1 WARNING LABEL IDENTIFICATION Read Manuals Before Operating Product. Wear Eye Protection. Keep body stance balanced and firm. Do not overreach when operating this tool. The risk of hands, fingers or other body parts being caught or wrapped in gear or other moving parts. The risk of electrical shock. -
Page 4: Electrical Safety
1English1 ELECTRICAL SAFETY WARNING Electrical shock can cause injury. Plastic part is not insulated. Do not use on live electrical circuits. PERSONAL SAFETY WARNING Stay alert, watch what you are doing and use common sense when operating a power tool. Do not use a power tool while you are tired or under the influence of drugs, alcohol or medication. - Page 5 1English1 POWER TOOL USE AND CARE CAUTION For hand use only. Do not apply excessive torque or force to the tool housing. The torque only applies on the driver head. Do not shake or shock. Never use this digital torque tool to loosen fasteners. This digital torque tool is for hand use only.
-
Page 6: Specific Safety Rules And Symbols
1English1 BATTERY TOOL USE AND CARE CAUTION Under abusive conditions, liquid may be ejected from the battery, avoid contact. If contact accidentally occurs, flush with water. If liquid contacts eyes, additionally seek medical help. Liquid ejected from the battery may cause irritation or burns. -
Page 7: Functional Description
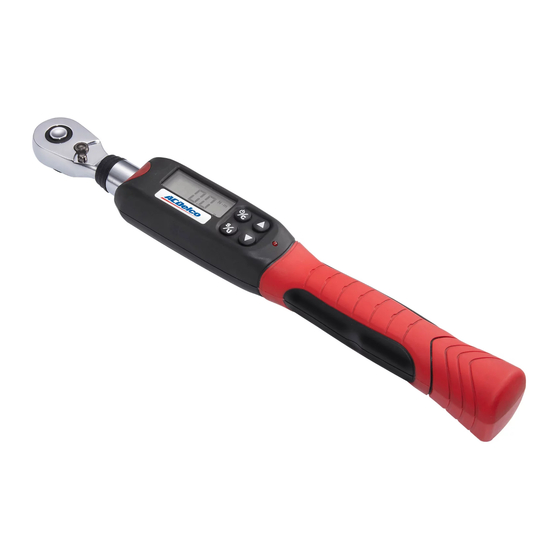
1English1 FUNCTIONAL DESCRIPTION CONTROLS AND COMPONENTS: 1. Socket Release Button 2 Reverse Control Button 3. LCD Panel 4. Operation Button 5. LED Warning Light 6. Anti-slip Handle 7. 1/2” Square 8. Calibrate Button Inside 9. Beeper 10. Battery Cover English... -
Page 8: Specifications
1. S: Set Mode 2. kg-cm: Kilogram Centimeters 2. P: Peak Mode 3. ft-lb: Foot Pounds 3. T: Trace Mode 4. in-lb: Inch Pounds SPECIFICATIONS Model Number ARM601-4 Drive 1/2” Square Voltage 6 Vdc Head Type Quick Release Ratchet Gear Teeth Length 17-5/16"... - Page 9 1English1 ASSEMBLY BATTERY INSTALL AND REPLACEMENT Loosen the 2 screws on the battery cover by a screwdriver. Prepare 4 new coin cells of “AAA (Alkaline) Battery”. Install batteries in the battery cartridge. Install cartridge in the wrench handle. Cover the wrench handle with the battery cover. Tighten the screws to fix the battery cover.
-
Page 10: Operation
1English1 OPERATION WARNING To reduce the risk of injury, wear safety goggles or glasses with side shields. Always remove battery pack before changing accessories or making adjustments. POWER ON Press and release the Power Button (13) to turn the digital torque tool on. ZERO FUNCTION When powers on, the digital torque tool can be zeroed at measure mode by press and release the Power Button (13). - Page 11 1English1 2. When you see the digits start blinking, press the Up Button (14) and Down Button (15) discontinuously to adjust the target torque value. 3. If you want to quickly go through to the target torque value, just press it the Up Button (14) and Down Button (15) continuously.
- Page 12 1English1 AUTO POWER OFF/POWER OFF This wrench will be shut off automatically after 60 seconds of no use. Or directly shut off the wrench, just press the Power Button (13) more than 2 seconds. HOW TO USE AS A TORQUE WRENCH Connects this wrench and a socket together.
-
Page 13: Maintenance
ACDelco, ACDelco Emblem and the ACDelco related graphics are General Motors Trademarks used under license to Mobiletron Electronics Co., Ltd. - Page 14 1Français1 MERCI D'AVOIR CHOISI CE PRODUIT ACDelco offre des produits à des prix abordables et nous espérons que ce produit et notre support technique vous satisferont pleinement. Si vous avez besoin d'assistance, n'hésitez pas à nous contacter. UTILISATION PREVUE Cet outil est uniquement prévu pour une utilisation personnelle et manuelle.
-
Page 15: Règles Importantes De Sécurité
1Français1 AVIS fournit des informations supplémentaires utiles pour AVIS l'utilisation et la maintenance de cet outil. Assurez-vous de comprendre parfaitement les AVIS indiqués. IDENTIFICATION D'ÉTIQUETTE D'AVERTISSEMENT Lisez les manuels avant d'utiliser le produit. Port de protection oculaire. Positionnez votre corps de manière bien équilibrée et stable. Ne jouez pas au plus malin lorsque vous utilisez cet outil. -
Page 16: Sécurité Électrique
1Français1 SÉCURITÉ ÉLECTRIQUE AVERTISSEMENT Un choc électrique risque de vous blesser. Le composant en plastique n'est pas isolé. N'utilisez pas l'outil sur des circuits électiques sous tension. SÉCURITÉ PERSONNELLE AVERTISSEMENT Restez attentif, faites attention à ce que vous faites et utilisez votre bon sens lorsque vous utilisez l'outil électrique. - Page 17 1Français1 Vérifiez toujours que la capacité de l'outil dynamométrique numérique est correspond ou excède l’application avant de procéder. Vérifiez toujours l'étalonnage de l'outil dynamométrique numérique si savez ou si vous soupçonnez que sa capacité a été dépassée. Pour garantir la précision des mesures, un étalonnage périodique est nécessaire.
- Page 18 1Français1 UTILISATION ET ENTRETIEN D'UNE BATTERIE ATTENTION Dans des conditions abusives, du liquide risque d'être éjecté de la batterie.Évitez tout contact. Si un contact se produit accidentellement, rincez abondamment à l'eau. Si du liquide entre en contact avec vos yeux, consultez votre médecin. Le liquide éjecté...
-
Page 19: Description Fonctionnelle
1Français1 DESCRIPTION FONCTIONNELLE COMMANDES ET COMPOSANTS: 1. Bouton de libération de la douille 2 Bouton de marche arrière 3. Écran LCD 4. Bouton d'opération 5. Témoin lumineux d'avertissement 6. Poignée anti-dérapante 7. 1/2" Carré 8. Intérieur du bouton d'étalonnage 9. Avertisseur 10. -
Page 20: Spécifications
1. S: Définir le mode 2. kg-cm: kilogrammes-centimètres 2. P: Mode crête 3. ft-lb: pied-livre 3. T: Mode tracé 4. in-lb: pouce-livre SPÉCIFICATIONS Numéro de modèle ARM601-4 Entraînement Carré 1/2" Tension 6 Vcc Type de tête Cliquet à Relâchement Rapide Denture Longueur 17-5/16"... -
Page 21: Montage
1Français1 MONTAGE INSTALLATION ET REMPLACEMENT DES PILES Desserrez les 2 vis sur le capot des piles avec un tournevis. Préparez 4 piles AAA. Installez-les dans le compartiment à piles. Installez le compartiment à piles dans la poignée de l'outil. Remettez le capot sur la poignée de l'outil. Serrez les vis pour fixer le capot. -
Page 22: Opération
1Français1 OPÉRATION AVERTISSEMENT Pour réduire les risques de blessures, portez un masque ou des lunettes de sécurité avec écrans latéraux. Retirez toujours la batterie avant de changer les accessoires ou de faire des réglages. ALLUME Appuyez et relâchez le bouton Marche/Arrêt (13) pour mettre l'outil dynamométrique numérique sous tension. - Page 23 1Français1 CONFIGURATION DE LA VALEUR DE L'ALARME DU COUPLE 1. Appuyez sur le bouton Marche/Arrêt (16) pendant plus de 2 secondes pour définir le mode. 2. Lorsque les chiffres commencent à clignoter, appuyez sur le bouton haut (14) et le bouton bas (15) de manière discontinue pour régler la valeur cible du couple.
- Page 24 1Français1 AVIS Le système enregistre automatiquement cette durée quand la valeur du couple atteint la valeur cible que vous avez définie. L'unité du compteur est le millier comme l'indique le “K”, et le maximum est 999K. ALARME DE SURCHARGE/ENREGISTREMENT Le système affiche « Err » à l'écran si le couple excède 110% du couple maximum et une alarme stridente se déclenchera pour vous avertir de ne plus tirer.
- Page 25 1Français1 MAINTENANCE AVERTISSEMENT Retirez les piles avant de nettoyer l'outil. NETTOYAGE Utilisez un chiffon doux, sec et propre pour nettoyer la clé et l'écran LCD. Nettoyez la clé dynamométrique en l'essuyant. N'immergez pas l'outil. Stockez la clé dynamométrique dans un boîtier de protection et réglez-la sur son couple le plus faible.
-
Page 26: Protection De L'environnement
ACDelco, l'emblème de ACDelco et les illustrations associées à ACDelco sont des marques commerciales déposées de General Motors utilisées sous licence à Mobiletron Electronics Co., Ltd. - Page 27 1Español1 GRACIAS POR ELEGIR ESTE PRODUCTO ACDelco le ofrece productos a un precio asequible y nos gustaría que quedara completamente satisfecho con este producto y nuestro soporte técnico. Si necesita ayuda o consejo, contacte con nosotros. USO INTENCIONADO Esta herramienta es sólo para uso personal y manual.
-
Page 28: Normas De Seguridad Importantes
1Español1 NOTA ofrece información adicional que resulta útil para un NOTA uso y mantenimiento adecuados de esta herramienta. Si ve una NOTA asegúrese de entenderla por completo. IDENTIFICACION DE LA ETIQUETA DE ADVERTENCIA Lea los manuales antes de utilizar el producto. Lleve protección para los ojos. -
Page 29: Seguridad Eléctrica
1Español1 SEGURIDAD ELÉCTRICA ADVERTENCIA La descarga eléctrica puede provocar lesiones. La parte de plástico no está aislada. No utilizar en circuitos eléctricos con corriente. SEGURIDAD PERSONAL ADVERTENCIA Manténgase atento, mire lo que está haciendo y utilice el sentido común cuando trabaje con una herramienta de potencia. - Page 30 1Español1 USO Y CUIDADOS DE LA BATERÍA DE LA HERRAMIENTA DE POTENCIA PRECAUCIÓN Sólo para uso manual. No aplicar torque excesivo o forzar la carcasa de la herramienta. El torque sólo se aplica al cabezal del destornillador. No agitar ni golpear. Nunca utilice esta herramienta de torque digital para aflojar cierres.
- Page 31 1Español1 USO Y CUIDADOS DE LA BATERÍA DE LA HERRAMIENTA PRECAUCIÓN En condiciones de uso abusivo, podría salir líquido de la batería; evite el contacto directo. Si entra en contacto accidental, lávese bien con agua. Si el líquido entra en contacto con los ojos, además de lavarse, busque ayuda médica. El líquido expulsado de una batería puede causar irritación o quemaduras.
-
Page 32: Descripción De Las Funciones
1Español1 DESCRIPCIÓN DE LAS FUNCIONES CONTROLES Y COMPONENTES: 1. Botón de liberación del zócalo 2 Botón de control inverso 3. Pantalla LCD 4. Botón de operación 5. LED de luz de advertencia 6. Agarre antideslizante 7. Cuadro 1/2” 8. Botón interno de calibración 9. -
Page 33: Especificaciones
2. P: Podo pico 3. ft-lb: Libras por pies 3. T: Modo de seguimiento 4. in-lb: Libras por pulgada ESPECIFICACIONES Número de modelo ARM601-4 Cuadrado de 1/2” Voltaje 6 Vdc Tipo de cabezal Trinquete de Liberación Fácil Dientes del engranaje Longitud 17-5/16"... -
Page 34: Montaje
1Español1 MONTAJE INSTALACIÓN Y CAMBIO DE BATERÍA Afloje los 2 tornillos de la tapa de las pilas con un destornillador. Prepare 4 pilas de botón nuevas tipo “pilas AAA (Alkalinas)”. Instale las pilas en el cartucho. Instale el cartucho en el mango de la llave. Cubra el mango de la llave con la tapa de las pilas. -
Page 35: Operación
1Español1 OPERACIÓN ADVERTENCIA Para reducir el riesgo de lesión, lleve gafas de seguridad o gafas con protección lateral. Siempre quite la batería antes de cambiar los accesorios o realizar ajustes. ENCENDIDO Presione y suelte el botón de encendido (13) para encender la herramienta de torque digital. - Page 36 1Español1 AJUSTAR EL VALOR DE LA ALARMA DEL TORQUE 1. Presione el botón de Configuración (16) durante más de 2 segundos para entrar en el modo de Ajuste. 2. Cuando vea que los dígitos comienzan a parpadear, presione el botón Arriba (14) y el botón Abajo (15) para ajustar el valor de torque deseado.
- Page 37 1Español1 ALARMA/GRABACIÓN DE SOBRECARGA El sistema mostrará “Err” en la pantalla cuando el torque sobrepase el 110% del torque máximo y un timbre frecuente le avisará para que no tire más. Después, el aviso “Err” aparecerá 1 segundo cada vez que encienda esta llave. NOTA La sobrecarga dañará...
-
Page 38: Mantenimiento
1Español1 OPERACION INCORRECTA El torque o la fuerza sólo se aplican al centro del mango. MANTENIMIENTO ADVERTENCIA Quite las baterías antes de la limpieza. LIMPIEZA Utilice un trapo suave, seco y limpio para limpiar la llave y la pantalla LCD. Limpie la llave de torque frotando. -
Page 39: Proteccion Del Medioambiente
ACDelco, el Emblema ACDelco y los gráficos relacionados con ACDelco son Marcas de General Motors usados bajo la licencia de Mobiletron Electronics Co., Ltd.
Need help?
Do you have a question about the ARM601-4 and is the answer not in the manual?
Questions and answers