
Subscribe to Our Youtube Channel
Related Manuals for Bushnell ImageView 11-8338


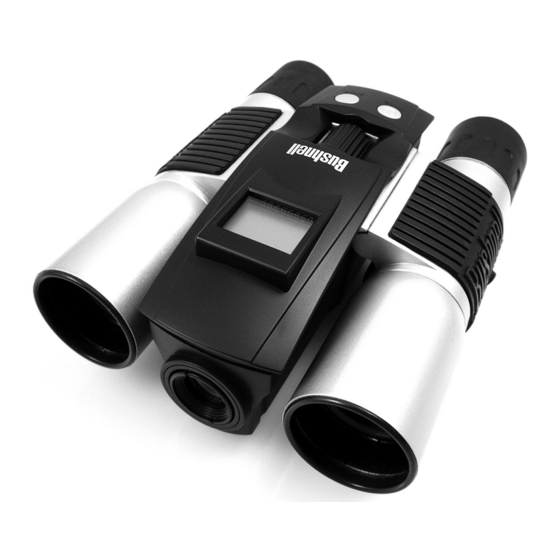
Summary of Contents for Bushnell ImageView 11-8338
- Page 1 3.0 Megapixel Instruction Manual Model: 11-8338 Lit.#: 98-1041/08-07 FINAL 118338 QVC Imageview 1LIM 1 1 9/17/07 7:48:03 PM...
- Page 2 Congratulations on your purchase of the Bushnell ImageView ® binocular! The Bushnell ImageView binocular takes the technology of digital photography and combines it with a high-quality compact binocular. This allows you to observe sporting events, wildlife, scenic vistas or anything you would normally use a binocular for, and then save the image in a built-in attached digital camera.
- Page 3 QUICK GUIDE: BUSHNELL IMAGEVIEW 11-8338 INSTALL BATTERIES insert 2 AAA batteries (alkaline, lithium, or NiMh) as indicated inside the battery compartment on the bottom of the imageView. ADJUST THE BINOCULAR FOR COMFORTABLE VIEWING Adjust the center focus knob while viewing a distant object through the binocular, until it appears sharp.
- Page 4 QUICK GUIDE: BUSHNELL IMAGEVIEW 11-8338 TAKE A PHOTO (TIPS FOR BETTER QUALITy PHOTOS) Holding the imageView as steadily as possible with both hands wrapped around the binocular, lightly press down the SNAP button using the flat end of a finger. Leaning against a wall, tree, etc. to brace yourself can also help insure the camera does not move as you take the photo.
-
Page 5: Turning The Camera On And Off
Congratulations on your purchase of a Bushnell imageView binocular. Before using the product, please read these instructions and take time to familiarize yourself with the different parts and features of the product. BASIC OPERATION TURNING THE CAMERA ON AND OFF insert 2 AAA alkaline batteries as indicated on the inside of the battery compartment, located on the bottom of the camera unit. -
Page 6: Basic Operation
LCD DispLay High Quality Mode (less file compression) Deletes all the pictures in the memory. Low Quality Mode (more file compression) Deletes the last picture taken. Select the timer to take a delayed picture. This gives you approximately a 10-second delay. SD mark appears when an SD card is inserted. - Page 7 CHANGING OPERATIONAL MODES Pressing the MODE button briefly will cycle through several special camera modes and settings. A corresponding icon or symbol (indicated in parentheses below) will be displayed on the LCD for each mode or setting as you cycle through them by tapping the MODE button. When the icon for a mode or setting is displayed, pressing SNAP will select that mode or change that setting.
- Page 8 CHANGING OPERATIONAL MODES continued return to normal operation in a few seconds (all your photos will not be deleted). When the process is complete, the photo number display will reset to zero. If no button is pressed for 5 seconds, the camera returns to stand-by.
-
Page 9: Other Display Icons
visible “flickering” in the images, especially when shooting video clips where fluorescent lighting is present. The “60” setting should be used for operation in the United States. If you are using the camera in a country with 50 Hz (cycle) AC power frequency, press SNAP to select “50” instead. Escape (ESC): Select ESC and press SNAP to exit the Setting menu options, and return to normal mode. -
Page 10: Additional Specifications
Photo Storage Capacity Reference Image Size # of Star Megapixels Icons (approx) 2034x1728 4.0 (Interpolated) High 2048x1536 3.1* 1600x1200 640x480 0.3 (“VGA”) * Default settings: 3.1 megapixel resolution (3 stars), High quality (Hq) ADDITIONAL SPECIFICATIONS Video Clip Resolution: 320x240 pixels per frame @10 fps rate, avi file format Maximum Video Recording Time: determined by available internal or card memory. - Page 11 DOWNLOaDiNG THE pHOTOs/ViDEOs TO yOUR COMpUTER: 1. The camera will be recognized as a USB mass storage device (if USB Mode is set to "STO" and not "PCC"), which means no special drivers are required for all operating systems later than Windows 98 (Me, 2000, XP, Vista) Mac OS 9 and OSX are also compatible.
-
Page 12: Software Installation
System Requirements (Minimum) OS: Windows® 98/98SE/2000/ME/XP/Vista (Note: the Imageview is compatible with Vista, however, the optional Photosuite software is not) CPU: MMX Pentium® 200MHZ equivalent or faster ( Memory: 32MB minimum (64MB recommended for PhotoSuite) SVGA video card w/2MB VRAM, 800x600 screen display, 16 bit High color 200 MB available hard disk space (if installing PhotoSuite) Internal USB Port Software Installation... - Page 13 Transferring The Photos & Videos to Your Computer continued 3. The LCD display will indicate “STO”, and the ImageView will be recognized as a standard “USB Mass Storage” device. This means that the camera files can be easily viewed, edited, or copied to your hard drive, just as if they were stored on an external hard drive or a CD-ROM.
- Page 14 Transferring The Photos & Videos to Your Computer continued 7. You’re now ready to open the photo files in any photo editing software. Just use File>Open and go to the folder where you stored the photos earlier. If you are using PhotoSuite, select File>Open Photo, then use the “Look in” pull down menu at the top of the Open window, select “My Computer”, select your hard drive, and double click any photo in the folder where you copied the files from the camera.
- Page 15 How to Adjust For individual Eye Strength As individual eyesight varies from one person to another, Bushnell binoculars have a diopter setting feature which allows you to fine-tune the binocular to your vision. Follow the focusing instructions below for your binocular.
- Page 16 EYEcuPS (Figure 3) Your Bushnell binocular is fitted with rubber roll-down eyecups designed for your comfort and to exclude extraneous light. if you wear sun/ eyeglasses, roll down the eyecups. this will bring your eyes closer to the binocular lens thus providing improved field of view.
- Page 17 FOr cArE OF BiNOculArS Your Bushnell binocular will provide years of trouble-free service if it receives the normal care you would give any fine optical instrument. Non-waterproof models should not be exposed to excessive moisture. 1. if your binocular has roll-down, flexible eyecups, store it with the eyecups up. this avoids excessive stress and wear on the eyecups in the down position.
- Page 18 Notes FINAL 118338 QVC Imageview 1LIM 18 18 9/17/07 7:48:06 PM...
- Page 19 In the event of a defect under this warranty, we will, at our option, repair or replace the product, provided that you return the product postage prepaid. This warranty does not cover damages caused by misuse, improper handling, installation, or maintenance provided by someone other than a Bushnell Authorized Service Department.
- Page 20 INNOVATION THAT THRIVES OUTSIDE For further questions or additional information please contact: Bushnell Outdoor Products 9200 Cody, Overland Park, Kansas 66214 (800) 423-3537 • www.bushnell.com ©2007 Bushnell Outdoor Products FINAL 118338 QVC Imageview 1LIM 20 20 9/17/07 7:48:07 PM...
Need help?
Do you have a question about the ImageView 11-8338 and is the answer not in the manual?
Questions and answers