Table of Contents
Advertisement
Quick Links
Advertisement
Table of Contents

Subscribe to Our Youtube Channel
Related Manuals for MicroPort CRM SORIN SPIDER SAS


Summary of Contents for MicroPort CRM SORIN SPIDER SAS
- Page 1 Spider SAS Apnea & Rhythm recorder U S E R M A N U A L...
-
Page 3: Table Of Contents
TABLE OF CONTENTS INTRODUCTION ......................6 1.1. Typography convention ....................6 1.2. Description of symbols on the case................6 DEFINITIONS......................8 2.1. Acronyms and definitions ................... 8 2.2. Abbreviations (rhythm) ....................8 2.3. Abbreviations (Sleep apnea) ..................9 2.4. Other useful abbreviations ..................9 SPIDER SAS OVERVIEW .................. - Page 4 PATIENT USE......................24 8.1. Description ....................... 24 8.2. Recommended position.................... 24 8.3. Electrode placement....................25 8.4. Chest belt placement....................26 8.5. Abdominal belt placement ..................26 8.6. Nasal cannula placement ..................26 8.7. Finger pulse oxymeter placement ................26 8.8. Positioning of Spider SAS &...
- Page 5 APPENDIX 1: PATIENT RECOMMENDATIONS ............ 51 15.1. Pediatric use......................51 15.2. Reminders ........................ 51 15.3. Nasal cannula......................51 15.4. How to connect finger sensor to φ Hub..............52 15.5. Patient Booklet ......................53 APPENDIX 2: ELECTROMAGNETIC COMPATIBILITY......... 54 16.1. Guidance and manufacturer's declaration..............54 16.2.
-
Page 6: Introduction
1. INTRODUCTION INTRODUCTION 1.1. TYPOGRAPHY CONVENTION This manual often refers to screenshots, originated from the programming software HookUp RS used in its initial English version. The references to these screens are displayed in English and in the local language; they are identified by the following symbols: [ ]: English (original text in the screenshots - bold font). - Page 7 1. INTRODUCTION Medical equipment with respect to electric shock, fire, and mechanical haz- ards, only in: ― AAMI/ES 60601-1(2006) / A2 (2010) and ― CSA 22.2 NO 60601-1 CAN/CSA:2008. This symbol confers the approval of the US Federal Communications Commis- sion.
-
Page 8: Definitions
2. DEFINITIONS DEFINITIONS 2.1. ACRONYMS AND DEFINITIONS Bluetooth : Generic term for naming all types of wireless interfaces according to Blue- tooth consortium specifications (regardless of the Bluetooth protocol version). BTLE Bluetooth® Low Energy, also called Bluetooth 4.0., enables HookUp RS to commu- nicate with Spider SAS. -
Page 9: Abbreviations (Sleep Apnea)
2. DEFINITIONS Periods of supraventricular tachycardia detected during a recording. Tachycardia threshold’s value defined in the rhythm protocol. Tachycardia only detected if the mean rate is higher than the threshold value for at least 5 seconds. All ventricular premature beats detected during a recording. VPB/1: one isolated ventricular premature beat. -
Page 10: Spider Sas Overview
3. SPIDER SAS OVERVIEW SPIDER SAS OVERVIEW 3.1. PRESENTATION AND INTENDED USE Spider SAS is an ECG and Apnea monitor able to record relevant physiologic signals for evaluating Sleep Apnea Syndrome. Spider SAS features a continuous 7-channel recording: ― ECG (2 channels) ―... -
Page 11: Performances
3. SPIDER SAS OVERVIEW 3.2. PERFORMANCES Main performance of Spider SAS and PhysioHub is to record data from various sensors (see § 3.1). 3.3. CONTRAINDICATIONS AND SIDE EFFECTS There are no contraindications or side effects associated to the use of Spider SAS and its accessories. -
Page 12: Precautions For Use And Maintenance
According to the duration and conditions of storage and the battery quality type, there is a risk of electrolyte leak into the Spider SAS’s plastic case. In such a case the device must be returned to the MicroPort After Sales Department for repair. Repair is excluded from the warranty and a fee will be charged. -
Page 13: Electromagnetic Environment
4. PRECAUTIONS FOR USE AND MAINTENANCE CAUTION: Spider SAS does not start if a MicroPort SD card is not inserted. NOTE: µSD cards designed for MicroPort devices cannot be used with other devices. µSD cards can be used up to 300 000 times. These cards resist electrostatic discharges of ±... -
Page 14: End Of Service
Damaged, bent or dust-polluted µSD cards and sensors are not covered by warranty. 4.6. END OF SERVICE When Spider SAS or Physio Hub reaches end of service, it should be returned to MicroPort for appropriate recycling. The batteries should be recycled according to the local regulation and/or procedures. - Page 15 4. PRECAUTIONS FOR USE AND MAINTENANCE necessary for successful communication. This equipment complies with IC radiation exposure limits set forth for an uncontrolled environment and meets RSS-102 of the IC radio frequency (RF) Exposure rules. This equipment has very low levels of RF energy that is deemed to comply without testing of specific absorption rate (SAR).
-
Page 16: Cleaning
5. CLEANING CLEANING CAUTION: A recently cleaned device must be dried carefully to avoid any oxidation of the electrical contacts before long term storage. 5.1. SPIDER SAS AND PHYSIO HUB The external case and the patient cable (including snap-on clips) must be cleaned with professional liquid soap and disinfectants. -
Page 17: Piezo Effort Sensor For Respiration
5. CLEANING 5.3. PIEZO EFFORT SENSOR FOR RESPIRATION This sensor is manufactured by SleepSense. The Piezo Film Effort Sensor Kit requires a L or XL band (see § 13 Software, Hardware & Accessories). The bands can be wiped with a mild detergent or washed in a gentle machine cycle. - Page 18 5. CLEANING To be efficient, the duration of contact with each element of Spider SAS must be strictly respected according to the instructions provided by the product manufacturer. CAUTION: If the protocol used requires disinfection of the electrical contacts (battery contacts of the recorder and the contacts of µSD card), it is essential to carefully dry these contacts before reusing the Spider SAS and the µSD card.
-
Page 19: User Profile
6. USER PROFILE USER PROFILE Any person who followed the required training based on the local regulation. Training completion and effectiveness are under his/her medical supervisor’s responsibility. SPIDER SAS – PHYSIO HUB – HOOKUP RS – U908F... -
Page 20: General Description
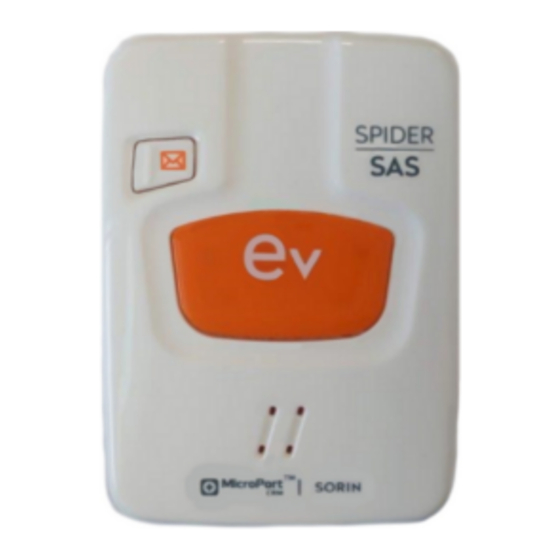
7. GENERAL DESCRIPTION GENERAL DESCRIPTION 7.1. SPIDER SAS PARTS ➊ Status LED (green/orange) ➎ µSD card ➒ Reset switch ➋ Send button ➏ Red writing led ➓ AAA Alkaline or Lithium battery ➌ Event Button ➐ On/Off button ⑪ Physio Hub connector ⑫... -
Page 21: Bluetooth Dongle
7. GENERAL DESCRIPTION 7.3. BLUETOOTH DONGLE Before commencing the recording, Spider SAS must be prepared with HookUp RS software which requires a BTLE interface. Bluetooth 4.0 Low Energy USB (BTLE) BlueGiga™ BLED112 is provided with Spider SAS. NOTE: Hookup requires a BTLE interface for setting up Spider SAS. The embedded interface can be used if the laptop is equipped with a Bluetooth Low Energy interface which integrates a Broadcom, Intel or Texas Instruments chipset. -
Page 22: How To Close Spider Sas
7. GENERAL DESCRIPTION 7.6. HOW TO CLOSE SPIDER SAS To close Spider SAS clip the right side of the back part into the orange plastic part then apply a light pressure (black arrows) on the left part with your thumb until the back cover is locked (with a click) onto the orange plastic part. - Page 23 7. GENERAL DESCRIPTION A new Lithium battery ensures 1 day 2 channel ECG recording including 2 nights of 8 hour nocturnal respiratory polygraph. NOTE: Place a new battery for each new recording in order to ensure the duration announced above. 7.8.2.
-
Page 24: Patient Use
8. PATIENT USE PATIENT USE 8.1. DESCRIPTION NOTE: Advise the patient to wear a T-shirt before setting up the recording. This way, Spider SAS, Physio Hub and belt(s) are not directly in contact with the skin. The long ECG cable (RC013) should be used instead of the short one (RC032). -
Page 25: Electrode Placement
8. PATIENT USE NOTE: Spider SAS is worn by the patient for at least one night. Both reusable and disposable neck holsters have been designed to guarantee maximum comfort and hygiene for the patient and to protect the recorder from sweat. Spider SAS is firmly maintained in the holster locked by a simple metal clip. -
Page 26: Chest Belt Placement
8. PATIENT USE WARNING: Conductive parts of electrodes (including the neutral electrode), should not be put in contact with conductive parts or earthed parts. 8.4. CHEST BELT PLACEMENT Apply the thoracic belt on the patient’s chest to measure the thoracic respiratory effort. The recommended placement of the thoracic belt is between the axillae (underarms) and above the lower part of the sternum (xiphoid). - Page 27 8. PATIENT USE 8000S Sensor Digit Thickness Type Size (mm) Size (in) 7.5 - 12.5 0.3 – 0.5 10.0 – 19.0 0.4 – 0.75 12.5 – 25.5 0.5 – 1.0 8.7.2. How to place the sensor The sensor can be positioned on index, middle or ring finger. The choice of finger does not affect accuracy of measurement;...
-
Page 28: Positioning Of Spider Sas & Accessories
8. PATIENT USE 8.8. POSITIONING OF SPIDER SAS & ACCESSORIES Picture provided as an indication only. The position of each part can vary from case to case. SPIDER SAS – PHYSIO HUB – HOOKUP RS – U908F... -
Page 29: How To Pair Spider Sas (Windows)
9. HOW TO PAIR SPIDER SAS (WINDOWS) HOW TO PAIR SPIDER SAS (WINDOWS) NOTE: Depending on provider, abbreviation of Bluetooth can be either BL, BLE, BTLE or BT 4.0 9.1. DESCRIPTION NOTE: The pairing operation or Bluetooth COM port emulation installation must be performed before using HookUp RS. -
Page 30: Belkin Bluetooth Interface
9. HOW TO PAIR SPIDER SAS (WINDOWS) 9.2. BELKIN BLUETOOTH INTERFACE NOTE: The pairing operation is possible only after a successful installation of the BTLE interface Belkin with the CD Rom joined with the dongle. This operation must be done before using HookUp RS). -
Page 31: Native Bluetooth Interface
9. HOW TO PAIR SPIDER SAS (WINDOWS) Spider SAS is recognized by the BTLE interface as {MicroPort Sensor BLE 05}. Click on the icon (framed in purple above) to pair Spider SAS with the computer. If a password is required type "0"... -
Page 32: Bluegiga Bluetooth Interface
"Add a Bluetooth Device". Once BTLE is activated, the interface will search all detectable devices close to the PC (max 3 or 4 meters). Spider SAS is recognized by the BTLE interface as {MicroPort Sensor BLE 05}. 9.4. BLUEGIGA BLUETOOTH INTERFACE NOTE: BLED112 pairing operation must be done only after a successful installation of the BTLE interface and before using HookUp RS for the first time. -
Page 33: Installation Of Hookup Rs Software
9. HOW TO PAIR SPIDER SAS (WINDOWS) The Bluetooth key must be installed according to the instructions of the manufacturer of the BTLE interface (see left). To check the BTLE adapter was correctly installed, on the desktop, right click on the icon {My computer} then select consecutively {Properties} ⇨{Hardware} ⇨{Device manager ❶} the BTLE adapter should be displayed ➋. - Page 34 9. HOW TO PAIR SPIDER SAS (WINDOWS) NOTE: Status LED (2) is a two-colored device: ― Orange and Green Orange for initialization mode ― Green for functioning mode ― Once Spider SAS is On (programming mode), status LED flashes orange every second. SPIDER SAS –...
-
Page 35: 10. Starting A Recording With Hookup Rs
10. STARTING A RECORDING WITH HOOKUP RS 10. STARTING A RECORDING WITH HOOKUP RS HookUp RS is the programming software to set-up, initialize and start Spider SAS. It allows to quickly review the parameters of the recording and the signal quality before starting the recording. - Page 36 10. STARTING A RECORDING WITH HOOKUP RS ➁ COM port number (BlueGiga dongle) Automatically added to the list of COM ports but not selected by default. ➋ Connection: Start BTLE communication with Spider SAS Recorder ➌ Patient to record [Patient to record]: ―...
-
Page 37: Launching Hookup Rs
10. STARTING A RECORDING WITH HOOKUP RS ➐ [Shutdown] and [Start] buttons respectively for stopping the recording and beginning the recording NOTE: To stop the recording, Spider SAS must be paired with and connected to the PC. ➑ Tabs: [ECGs]/: 2 ECG channels collected with RC013 or RC032, respectively short and long patient cable [Belts –... -
Page 38: Ecgs Screen
10. STARTING A RECORDING WITH HOOKUP RS Click on [Connection] / {Connection} button, HookUp RS initiates the BTLE communication with Spider SAS. When the communication is successful, serial numbers of recorders detected by HookUp RS are listed in a popup window in order to select the Spider SAS. - Page 39 10. STARTING A RECORDING WITH HOOKUP RS 10.3.1. ECG signal Quality Make sure that the patient’s skin has been properly cleaned and dried before electrodes are positioned. The upper channel displays lead A (red and white electrode), the lower channel displays lead B (brown and white electrode).
-
Page 40: Belts & Respiration Screen
10. STARTING A RECORDING WITH HOOKUP RS To evaluate sleep disordered breathing (SDB), it is necessary to activate all sensors during the nocturnal period. By default that period is activated between 10:00 pm and 06:00 am. According to patient's habits, it is possible to select another period from the drop down list shown on the left. -
Page 41: Oxygen Saturation And Plethysmography Screen
10. STARTING A RECORDING WITH HOOKUP RS ― Abdominal belt ➍ Refer to § 8.4 and § 8.5 for the belt(s) and §8.6 for detailed information on placement of cannula. 10.5. OXYGEN SATURATION AND PLETHYSMOGRAPHY SCREEN To display the screen below click on [SpO - Plethysmo] tab ➊. -
Page 42: Steps To Setup And Start A Recording With Spider Sas
10. STARTING A RECORDING WITH HOOKUP RS ➌ Plethysmography signal is provided for checking the quality of the current oxygen saturation signal captured by the sensor. ➍ Click on the [Start] / {Start} button to begin recording. When done, Spider SAS beeps. Once the status led is flashing green, Spider SAS is recording all signals and Hookup RS can be closed. - Page 43 10. STARTING A RECORDING WITH HOOKUP RS 2. Insert µSD card (See § 7.1) 3. Insert a new battery in the recorder (See § 7.1) 4. Connect the clips of the ECG cable to electrodes 5. Apply the electrodes to the patient’s chest (See § 8.3) 6.
-
Page 44: 11. Starting Recording: Anonymous Mode
11. STARTING RECORDING: ANONYMOUS MODE 11. STARTING RECORDING: ANONYMOUS MODE 11.1. GENERAL DESCRIPTION The procedure described in this chapter is named [Anonymous] / {Anonymous}. This naming comes from the ID automatically given by Spider SAS when that mode is used. There are 2 recording modes: ―... -
Page 45: Starting The Recorder In Anonymous Mode
11. STARTING RECORDING: ANONYMOUS MODE NOTE: If Spider SAS is started several times without the assistance of HookUp RS software, date and time are not the current one. To re-synchronize, launch a procedure with HookUp RS. (See §10.3.2) When the update is done the tick-box is "ON". You can then change the Time and Date with the function [Adjust Time-Date] / {Adjust Time-Date}. - Page 46 11. STARTING RECORDING: ANONYMOUS MODE 10. Insert Spider SAS into holster (RG017) then secure it by closing the holster 11. Adjust the position of the holster around the neck (see § 8.2) 12. Click on "ev" button (front face of Spider SAS recorder) to begin the recording (see § 7.1) NOTE: To ensure the recording has started properly, Spider SAS must be flashing green.
-
Page 47: 12. Stopping A Recording
12. STOPPING A RECORDING 12. STOPPING A RECORDING CAUTION: Extraction of the card while ending the recording will immediately stop the recorder. Possibility of data loss. There is a high risk of major errors during the download of the recording. This chapter describes how to stop Spider SAS under the best conditions and to avoid the errors which could cause the loss of the recording. -
Page 48: 13. Software, Hardware And Accessories
13. SOFTWARE, HARDWARE AND ACCESSORIES 13. SOFTWARE, HARDWARE AND ACCESSORIES The following products, items and accessories are available for the Spider SAS recorder. Code Description Qty / unit AA Catalogue & spare parts RE152 Pack of AAA Alkaline batteries ✓ RE153 Pack of AAA Lithium batteries ✓... -
Page 49: 14. Technical Specifications
14. TECHNICAL SPECIFICATIONS 14. TECHNICAL SPECIFICATIONS 14.1. DESCRIPTION Spider SAS is a respiratory polygraph with O2 saturation, thoracic and abdominal respiration effort, nasal pressure, 2 ECG channels, the body position and an event button. This recorder is a class IIA medical device (according to directive EEC 93/42). 14.2. -
Page 50: Radio Equipment Emission
14. TECHNICAL SPECIFICATIONS 14.5. RADIO EQUIPMENT EMISSION Radio Equipment Transmitter Bands / Maximal Power Receiver Frequency Bands [2400 ; 2483.5] MHz ; ≤ 10 mW (0 dB) [2400 ; 2483.5] MHz Spider SAS Bluetooth Low Energy SPIDER SAS – PHYSIO HUB – HOOKUP RS – U908F... -
Page 51: 15. Appendix 1: Patient Recommendations
15. APPENDIX 1: PATIENT RECOMMENDATIONS 15. APPENDIX 1: PATIENT RECOMMENDATIONS 15.1. PEDIATRIC USE ― In the case of pediatrics, it is highly recommended that a nurse or physician demonstrates the use to the parents. ― Such a recording must be operated under parental supervision. CAUTION: If Spider SAS is not used, it must be placed in the blue transportation bag and out of reach of children and animals. -
Page 52: How To Connect Finger Sensor To Φ Hub
15. APPENDIX 1: PATIENT RECOMMENDATIONS 15.3.1. Connection to φ Hub 1. Insert the tube onto the connector 2. Gently screw clockwise a quarter turn to ensure a perfect connection with the pressure sensor. Adjust the other end of the nasal cannula as described in § 8.6 15.3.2. -
Page 53: Patient Booklet
15. APPENDIX 1: PATIENT RECOMMENDATIONS 15.5. PATIENT BOOKLET Before recording (steps ➊ and ➍), after recording (steps ➋, ➌, ➎ and ➏). SPIDER SAS – PHYSIO HUB – HOOKUP RS – U908F... -
Page 54: Appendix 2: Electromagnetic Compatibility
The use of accessories other than those specified or sold by MicroPort CRM as replacement parts, may result in an increase in the emission or a decrease in the immunity of the medical device. -
Page 55: Guidance And Manufacturer'sdeclaration: Electromagnetic Emissions
16. APPENDIX 2: ELECTROMAGNETIC COMPATIBILITY 16.3. GUIDANCE AND MANUFACTURER'S DECLARATION: ELECTROMAGNETIC EMISSIONS The Spider SAS is intended for use in the electromagnetic environment specified below. The customer or the user of the Spider SAS should ensure that it is used in such an environment. Emissions test Compliance Electromagnetic environment - guidance... -
Page 56: Guidance And Manufacturer'sdeclaration: Electromagnetic Immunity, Portable Rf
16. APPENDIX 2: ELECTROMAGNETIC COMPATIBILITY Immunity test IEC 60601 test Compliance Electromagnetic environment level level - guidance Voltage dips 0% U for 0.5 cycle Mains power quality should be that of applicable a professional health care (IEC At 0°, 45°, 90°, establishment. - Page 57 16. APPENDIX 2: ELECTROMAGNETIC COMPATIBILITY Immunity test IEC 60601 test Compliance level Electromagnetic environ- level ment - guidance Professional health care Proximity fields emit- 9 V/m 9 V/m establishment. ted by RF wireless 710 MHz, 710 MHz, communication de- 745 MHz, 745 MHz, vices IEC61000-4-3 780 MHz,...
-
Page 58: Spider Sas And Mobiles (Recommendations)
16. APPENDIX 2: ELECTROMAGNETIC COMPATIBILITY 16.6. SPIDER SAS AND MOBILES (RECOMMENDATIONS) 16.6.1. Guidance and manufacturer's declaration: electromagnetic immunity Recommended separation distances between portable and mobile RF communications equipment and the Spider SAS. The Spider SAS is intended for use in an electromagnetic environment in which radiated RF disturbances are controlled. - Page 60 MANUFACTURED IN FRANCE FOR: MicroPort CRM S.r.l. Via Crescentino S.N. 13040 Saluggia (VC) Italy Tel: +39 0161 487095 US Phone: 877.663.7674 www.crm.microport.com FOR US ONLY - CAUTION: FEDERAL LAW RESTRICTS THIS DEVICE TO SALE BY OR ON THE ORDER OF A PHYSICIAN...
Need help?
Do you have a question about the CRM SORIN SPIDER SAS and is the answer not in the manual?
Questions and answers