Table of Contents
Advertisement
Quick Links
SC-SL4-AE2
SC-SL4-BE2
This center console complies with EMC Direc�ve 2014/30/EU, LV
Direc�ve 2014/35/EU, RoHS Direc�ve 2011/65/EU.
CE marking is applicable to the area of 50 Hz power supply.
Ce�e console centrale est conforme à la direc�ve CEM 2014/30/UE,
à la direc�ve basse tension 2014/35/UE et à la direc�ve RoHS
2011/65/UE.
La marque CE s'applique aux régions alimentées en courant de 50 Hz.
Diese Mi�elkonsole erfüllt die Richtlinien zur elektromagne�schen
Verträglichkeit 2014/30/EU, die Niederspannungsrichtlinien
2014/35/EU und die RoHS-Richtlinie 2011/65/EU.
Die CE-Marke gilt für Bereiche mit einer Netzstromversorgung von
50 Hz.
Questa console centrale è conforme alla Dire�va EMC 2014/30/UE,
alla Dire�va LV 2014/35/UE e alla Dire�va RoHS 2011/65/UE.
Il marchio CE è applicabile alla fascia di alimentazione 50 Hz.
Esta consola central cumple con la Direc�va de Compa�bilidad
Electromagné�ca 2014/30/UE, con la Direc�va de Baja Tensión
2014/35/UE y con la Direc�va RoHS 2011/65/UE.
La indicación CE solo corresponde al área de suministro eléctrico de
50 Hz.
Deze centrale console voldoet aan EMC-Richtlijn 2014/30/EU,
LV-Richtlijn 2014/35/EU, RoHS-Richtlijn 2011/65/EU.
CE-markering is van toepassing op het gebied met een netstroom
van 50 Hz.
SC-SL4-AE2, SC-SL4-BE2
SC-SL4-AE2, SC-SL4-BE2
SC-SL4-AE2, SC-SL4-BE2
SC-SL4-AE2, SC-SL4-BE2
SC-SL4-AE2, SC-SL4-BE2
SC-SL4-AE2, SC-SL4-BE2
SC-SL4-AE2, SC-SL4-BE2
SC-SL4-AE2, SC-SL4-BE2
SC-SL4-AE2, SC-SL4-BE2
SC-SL4-AE2, SC-SL4-BE2
SC-SL4-AE2, SC-SL4-BE2
Esta consola central está em conformidade com a Dire�va EMC
2014/30/UE, a Dire�va LV 2014/35/UE e a Dire�va RoHS
2011/65/UE.
A marca CE aplica-se à zona de fornecimento de energia a 50 Hz.
Αυτή η κεντρική κονσόλα συμμορφώνεται προς την Οδηγία
2014/30/ΕΕ περί ηλεκτρομαγνητικής συμβατότητας , προς την
οδηγία 2014/35/ΕΕ περί χαμηλής τάσης και προς την Οδηγία
2011/65/ΕΕ περί RoHS.
Tο σήμα CE ισχύει μόνον σε περιοχές όπου η τροφοδοσία είναι
50 Hz.
Этот центральный пульт управления соответствует
требованиям директивы по электромагнитной
совместимости 2014/30/EU, директивы по низковольтному
оборудованию 2014/35/EU, директивы RoHS 2011/65/EU.
Маркировка CE нанесена в области источника питания,
работающего на частоте 50 Гц.
Bu orta konsol, 2014/30/EU sayılı EMC Direk�fi, 2014/35/EU
sayılı LV Direk�fi ve 2011/65/EU sayılı RoHS Direk�fi ile
uyumludur.
CE işare�, 50 Hz güç kaynağı için geçerlidir.
Sterownik centralny spełnia wymagania dyrektywy EMC
2014/30/EU, dyrektywy niskonapięciowej 2014/35/EU oraz
dyrektywy RoHS 2011/65/EU.
Oznakowanie CE dotyczy wyłącznie regionów, w których
częstotliwość napięcia zasilającego wynosi 50 Hz.
PJZ012A207
202103
Advertisement
Table of Contents

Related Manuals for Mitsubishi Heavy Industries SC-SL4-AE2


Summary of Contents for Mitsubishi Heavy Industries SC-SL4-AE2
- Page 1 SC-SL4-AE2 SC-SL4-AE2, SC-SL4-BE2 SC-SL4-BE2 SC-SL4-AE2, SC-SL4-BE2 SC-SL4-AE2, SC-SL4-BE2 SC-SL4-AE2, SC-SL4-BE2 SC-SL4-AE2, SC-SL4-BE2 SC-SL4-AE2, SC-SL4-BE2 SC-SL4-AE2, SC-SL4-BE2 SC-SL4-AE2, SC-SL4-BE2 SC-SL4-AE2, SC-SL4-BE2 SC-SL4-AE2, SC-SL4-BE2 SC-SL4-AE2, SC-SL4-BE2 This center console complies with EMC Direc�ve 2014/30/EU, LV Esta consola central está em conformidade com a Dire�va EMC Direc�ve 2014/35/EU, RoHS Direc�ve 2011/65/EU.
-
Page 2: Table Of Contents
Thank you for purchasing Central Control SC-SL4-AE2, SC-SL4-BE2 from Mitsubishi Heavy Industries, Ltd. Before using the product, read this user’s manual thoroughly to ensure you learn how to operate it correctly. After reading this manual, store it in a safe location for future reference. -
Page 3: Introduction
Introduction This web monitoring system monitors and operates air conditioner, hydro module units or heat pump water heaters connected to Central Control SC-SL4-AE2 or SC-SL4-BE2 (hereafter called “SL4”) from a web browser on your PC. Also, please refer to the User’s Manual of the SL4 central control. -
Page 4: Connection
• Operating System and Web Browser The following table shows the supported combinations of operating systems and web browsers. If you want to use other combinations, contact your dealer. Google Chrome Microsoft Edge Windows ® : Can be used * Restart Internet Explorer regularly. * Windows is the registered trademarks of Microsoft Corporation in the United States and/or other countries. -
Page 5: Operation
Operation Note • The screens in this manual may diff er from the actual screens. Logging In LOGIN screen is the startup page of the web monitoring system. To display the login screen, enter the URL of the web monitoring system from the web browser of your PC. Start the web browser (Internet Explorer) of the PC. -
Page 6: Operations Common To All Screens
Operations Common to All Screens Selecting each screen From the menu bar at the top of the screen, click the link to the screen name you want to use. The selected screen appears. The links to screens can be used on all screens. The following lists the screens available in this product. - Page 7 Monitoring all groups list ■ After logging in, the MONITORING (ALL GROUPS LIST) screen appears. MONITORING (ALL GROUPS LIST) screen The ALL GROUPS LIST screen centrally monitors the status of all target groups in the group type, and displays the group names and operating status icons for the registered groups. To change a group type, click above “7”.
- Page 8 Monitoring group list ■ Click GROUP LIST from the menu bar (MONITORING), or LIST button on the MONITORING (BLOCK LIST) screen. MONITORING (GROUP LIST) screen Select a block. To change a group type, click above “7”. ■ Monitoring block layout Click BLOCK LAYOUT from the menu bar (MONITORING), or LAYOUT button on the MONITORING (GROUP LIST) screen.
- Page 9 Select a block. [Types and indications of operating status icons] Running state : At least one unit is running in the target group. Paused state : All units have paused in the target Q-ton group. Stopped state : All units have stopped in the target group. Error state : One or more units in the target group are malfunction.
- Page 10 [MODE] AUTO, COOL, DRY, FAN, HEAT AUTO mode requires the SL4 central control setting. For details, refer to the User’s Manual of the SL4 central control. * The AUTO setting is not available for some air conditioner models. [SET TEMP.] By default, the temperature can be set in the range of 18 deg C to 30 deg C in increments of 0.5 deg C.
- Page 11 [OTHERS] Displays the fi lter sign, maintenance, schedule sign, energy saving and silent mode. This shows the group that is the target of the current day’s schedule. Energy saving (This shows the group that is the target for energy saving.) Silent mode (This shows the group that is the target for silent mode.) If at least one air conditioner in a block or group needs fi...
- Page 12 [ENERGY SAVING] Click the ON or OFF button. When the ON button is selected, energy saving operation starts. When the OFF button is selected, energy saving operation stops. Use this operation to save energy. A unit shifts its set temperature by outside temperature. [SET TEMP.
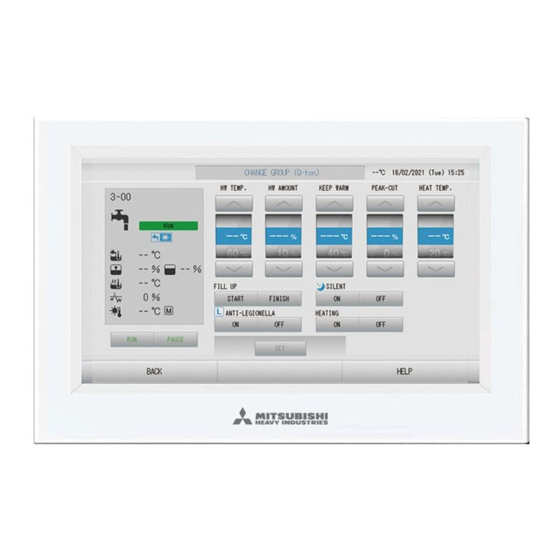
- Page 13 [SET HW AMOUNT ] Hot water storage amount can be set in the range of 10 % to 100 % in increments of 10 %. [KEEP WARM TEMP.] The temperature can be set in the range of 40 deg C to 63 deg C in increments of 1 deg C. (Only when the tank type is OPEN, refer to the User’s Manual of the SL4 central control.
- Page 14 Changing settings Select an item from the pull-down menu for the setting you want to change. Apply the changed setting. Click the SET button. If you select multiple items and click the SET button, you will be able to change the settings of the multiple items collectively.
- Page 15 <For air conditioner group ( page 32)> UNIT LIST screen [REP. ] : Displays the “” mark to indicate the representative unit of the target group. Information from the representative unit is refl ected on the group operating setting except for the information on the run/stop/home leave on/home leave off and fi lter sign items.
- Page 16 <For HMU group ( page 32)> [REP. ] : Displays the “*” mark to indicate the representative unit of the target group. Information from the representative unit is refl ected on the group operating setting except for the information on the run/stop and fi lter sign items. [UNIT] : Displays the unit number.
- Page 17 <For Q-ton group ( page 32)> [REP. ] : Displays the “*” mark to indicate the representative unit of the target group. Information from the representative unit is refl ected on the group operating setting except for the information on the run/pause/stop item. [UNIT] : Displays the unit number.
-
Page 18: Change All
Change All The CHANGE ALL screen enables you to perform collective operation for the target group. The target group for collective operation must be specifi ed in advance. page 31 Click CHANGE ALL from the menu bar. CHANGE ALL screen Changing settings collectively From the pull-down menu for the setting you want to change, select an item. - Page 19 Today’s Schedule ■ The TODAY’S SCHEDULE screen enables you to confi gure the current day’s operation schedule for each group. The settings determined by yearly schedule and detailed daily schedule are refl ected on today’s schedule. Select the TODAY’S SCHEDULE from the menu bar (SCHEDULE SETTING). TODAY’S SCHEDULE screen Select a target group.
- Page 20 [MODE] Blank (Not specifi ed), AUTO, COOL, DRY, FAN, HEAT, SEASON page 25 * As selectable items vary according to the current settings, refer to the User’s Manual of the SL4 central control. [SET TEMP.] By default, the temperature can be set in the range of 18 deg C to 30 deg C in increments of 0.5 deg C.
- Page 21 Click the ON or OFF button. [HEATING] [HEAT SET TEMP.] The temperature can be set in the range of 20 deg C to 52 deg C in increments of 1 deg C. Note • Click the item to be changed on the list SELECT SCHEDULE, when you want to rewrite the current settings to the detailed daily schedule such as WEEKDAY, etc.
- Page 22 Enter new settings. Click the position displaying the current setting of a date you want to change. From the pull-down menu, select a new setting from the menu. Two or more schedules can be changed at a time. The following fi ve detailed daily schedules can be selected.
- Page 23 Detailed Daily Schedule ■ The DETAILED DAILY SCHEDULE screen enables you to confi gure the detailed daily schedule. The schedule indicates WEEKDAY, HOLIDAY, SPECIAL1, and SPECIAL2. The operation schedule can be confi gured for each group. Select the DETAILED DAILY SCHEDULE from the menu bar (SCHEDULE SETTING). DETAILED DAILY SCHEDULE screen Select a target group.
- Page 24 Enter new setting. From the pull-down menu, select an item of which setting you want to change. On this screen, you can register up to 16 schedule settings of the following items per day. [TIME] Operation time setting (by the minute) <For air conditioner group ( page 32)>...
- Page 25 <For Q-ton group ( page 32)> Note • Set the items depend on the application. • Set storage hot water temperature (HW TEMP.) higher than keep warm temperature by 5°C or more. Ex.) When keep warm temperature is 60°C, set storage hot water temperature higher than 65°C. [HW TEMP.] By default, the temperature can be set in the range of 60 deg C to 90 deg C in increments of 1 deg C.
- Page 26 Season Setting ■ The SEASON SETTING screen enables you to confi gure the operation to be refl ected on unit of which operating mode is set to “SEASON”. The operation can be set for each group. Selecting “SEASON” mode enables you to change the operating mode and temperature setting collectively at the changing seasons.
- Page 27 Setting a default schedule ■ Select the DEFAULT SCHEDULE SETTING from the menu bar (SCHEDULE SETTING). DEFAULT SCHEDULE SETTING screen Select a target group. From the SELECT GROUP pull-down menu on the upper left side of the screen, select a target group name. Enter new settings.
- Page 28 [Copy the settings to apply them to other groups] ■ The schedule setting for the group currently selected can be copied to apply the same settings to other groups. Click COPY on the left side of the each schedule setting screen. Select groups to which to copy the setting.
-
Page 29: Operation Time History
Operation Time History The OPERATION TIME HISTORY screen displays a graph showing the accumulated daily operation time for 31 days by the group. You can also download operation data (in CSV format) from this screen. Click the OPERATION TIME HISTORY from the menu bar (HISTORY). OPERATION TIME HISTORY screen Select a target group. -
Page 30: Energy Consumption History
Energy Consumption History The ENERGY CONSUMPTION HISTORY screen displays a graph showing the daily, monthly or yearly energy consumption history by the group (except the Q-ton group). You can also download data (in CSV format) from this screen. Click the ENERGY CONSUMPTION HISTORY from the menu bar (HISTORY). ENERGY CONSUMPTION HISTORY screen Select a target group. -
Page 31: Hot Water Amount History
Hot Water Amount History Click the HOT WATER AMOUNT HISTORY from the menu bar (HISTORY). HOT WATER AMOUNT HISTORY screen Select a target unit. From the UNIT LIST pull-down menu on the upper left side of the screen, select a target unit number. A graph for the selected unit is displayed. -
Page 32: Operator Menu
Operator Menu The OPERATOR MENU enables you to confi gure the system settings for operators. The following items can be viewed and confi gured on this screen. • GROUP DEFINITION • OPERATOR SETTING • GROUP USER SETTING • DOWNLOAD MONTHLY DATA FILES (SC-SL4-BE2 only) •... - Page 33 [UNIT No.] : Displays the list of unit numbers belonging to the target group. [DEMAND] : Displays the processing level (LEVEL1, 2, or 3) when a demand signal is entered. (For details on the demand, refer to the User’s Manual of the SL4 central control.) [ALL COMMAND] : Prompts you to determine whether to apply collective settings.
- Page 34 Enter new settings. Enter or select a new setting. The following items can be confi gured. [GROUP NAME] : Type in a name using up to 16 one-byte characters (The name must be unique and not be overlapped with other group names.) [UNIT TYPE] : Select unit type (Air-Conditioner, Other, HMU or Q-ton) for the target group.
- Page 35 • Group User Setting This screen enables you to specify the group user's ID and password to be used for logging in the web system. When this screen appears, the current settings are displayed in the USER ID and PASSWORD fi elds. Select the GROUP USER SETTING from the menu bar (OPERATOR MENU).
- Page 36 Apply the changed setting. Click the SET button at the bottom of the screen. This applies the changed settings. Note Same characters cannot be set for multiple ID. • Operator Setting This screen enables you to specify the operator’s ID and password to be used for logging in the web system. When this screen appears, the current settings are displayed in the ID and PASSWORD fi...
- Page 37 • Download Monthly Data Files (SC-SL4-BE2 only) The DOWNLOAD MONTHLY DATA FILES screen enables you to download the accounting data. Accounting data of 12 months including the data from the current month can be downloaded. Select the DOWNLOAD MONTHLY DATA FILES from the menu bar (OPERATOR MENU). DOWNLOAD MONTHLY DATA FILES screen Download the confi...
-
Page 38: Log Out
• System Information The SYSTEM INFORMATION screen enables you to view the system information of this product. This screen displays the following information. Select the SYSTEM INFORMATION from the menu bar (OPERATOR MENU). SYSTEM INFORMATION screen VERSION Displays the version of the management system currently used. ENERGY CALCULATION Displays VALID. -
Page 39: Using Maintenance Menu
Using MAINTENANCE MENU The MAINTENANCE MENU is provided for dealers and qualifi ed professionals responsible for maintaining the central control units. When logging in with a normal operator’s ID, you are not permitted to operate the MAINTENANCE MENU. Operation Data Monitoring You can monitor the operation data of indoor unit and outdoor unit. -
Page 40: Troubleshooting
Troubleshooting Forgot the IP address Forgot the IP address, made an incorrect setting Refer to the SL4 central control setting. Forgot the ID/password Check whether the entered address was correct. A connection error occurs Click the “Refresh” button in Internet Explorer. If this will not fi... - Page 41 2-3 Marunouchi 3-chome, Chiyoda-ku, Tokyo 100-8332, Japan (Wholly-owned subsidiary of MITSUBISHI HEAVY INDUSTRIES AIR-CONDITIONING EUROPE, LTD.) Herikerbergweg 238, Luna ArenA, 1101 CM Amsterdam, Netherlands P.O.Box 23393 1100 DW Amsterdam, Netherlands Tel : +31-20-406-4535 http://www.mhiaeservices.com/ Block E, 391 Park Road, Regents Park, NSW, 2143...
Need help?
Do you have a question about the SC-SL4-AE2 and is the answer not in the manual?
Questions and answers