
Related Manuals for Russell Hobbs RH14CLR4001B


Summary of Contents for Russell Hobbs RH14CLR4001B
- Page 1 14L Cooler & Warmer Model Number: RH14CLR4001 (B) (SCW) (SCG) For customer services & spare parts please call 0345 208 8750 or visit us at mda.russellhobbs.com IMPORTANT: RETAIN FOR FUTURE REFERENCE...
-
Page 2: Table Of Contents
Contents Safety Instructions ………………………………………. Electrical Safety ………………………………………. Transportation & Handling ………………………………………. Before Switching On ………………………………………. Installing & Switching On Your Appliance ………………………………………. Your Appliance ………………………………………. Unit & Spare Parts ………………………………………. Where To Put Your Appliance ………………………………………. Usage Information ………………………………………. 10-13 Cleaning &... -
Page 3: Safety Instructions
Safety Instructions This appliance is a semi-conductor electric refrigerating appliance, which is a ‘Category 10 other’ appliance according to ERP 643/2009. Its design temperature is 17°C. Important Note: Please read this booklet before installing and switching on this appliance. The manufacturer assumes no responsibility for incorrect installation and usage as described in this booklet. - Page 4 • D o not plug in the appliance if there is damage to the plug. • D o not pull, twist or damage the power cable. • D o not plug-in or un-plug the appliance with wet hands in order to prevent electrical shock.
-
Page 5: Electrical Safety
Electrical Safety IMPORTANT NOTE: THIS APPLIANCE MUST BE PLUGGED INTO AN EARTHED SOCKET • Operating voltage for your appliance is 220-240V at 50Hz / DC 12V . • B efore plugging in the power supply, ensure that the voltage on the rating label corresponds to the working voltage of your electrical system in your home or automobile. -
Page 6: Transportation & Handling
Transportation & Handling • For safe lifting, ensure the door is closed and carry the appliance by the carry handle. • Lift the appliance carefully and never use the door handle for lifting. Before Switching On • Remove all transport tapes and foam protection pieces. •... -
Page 7: Installing & Switching On Your Appliance
Installing & Switching On Your Appliance • Place your appliance in an area that is not exposed to direct sunlight. • Your appliance should be placed at least 10 cm away from stoves, ovens and other heating cores. • This appliance should never be used outdoors or left in the rain. •... -
Page 8: Your Appliance
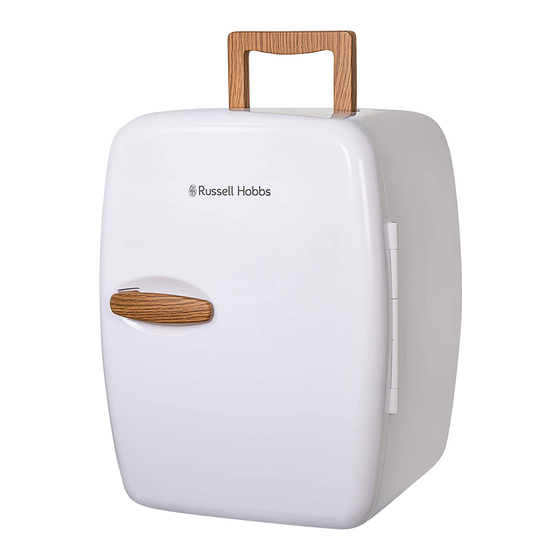
Your Appliance Door handle Door catch Heating indicator light 10. DC/AC power switch Off/Mode selection switch 11. AC input Cooling indicator light 12. DC input Carry handle 13. Door rack Air vent 14. AC adaptor 15. DC adaptor Shelf Parts may vary according to the appliance model. Unit &... -
Page 9: Where To Put Your Appliance
Where To Put Your Appliance • When placing situating your appliance, choose a dry and well-ventilated space. • No less than 10cms must be left around the sides and 10cms must be left around the back of the appliance to allow sufficient cooling. •... -
Page 10: Usage Information
Usage Information Important Note: • Do not use this appliance when car engine is off to avoid running down the car battery. • The ambient temperature and air circulation condition can affect the cooling speed and temperature of the appliance. •... - Page 11 Usage Information • The unit should be kept away from direct sunlight. • Place the appliance on flat and even surface with good ventilation. • This appliance is suitable to use in a household or inside an automobile. • Ensure the correct power cord is used for the appropriate environment. •...
- Page 12 Usage Information • Plug in the appliance and move the mode switch at rear of the appliance to ‘COLD’ or ‘HOT’. Close the door. • If you have selected the ‘COLD’ mode, then leave the appliance for a minimum of 4 hours for the correct temperature to be reached before placing anything inside.
- Page 13 Usage Information IMPORTANT NOTE: When the product is first turned on and set to COLD mode the unit will go into MAX COLD mode. This means the thermoelectric cooling and fans work to their maximum level (the noise level will be quite loud) for approximately 2 hours in order to cool the internal compartment as quickly as possible.
-
Page 14: Cleaning & Maintenance
Cleaning & Maintenance • Disconnect the appliance from the power supply before cleaning. • Do not pour water directly over or on the appliance. • The compartment should be cleaned periodically using a solution of bicarbonate of soda and lukewarm water. •... -
Page 15: Connection To The Mains Supply
Connection To The Mains Supply For UK use only – Plug fitting details (where applicable): As the colours of the wires in the mains lead of this appliance may not correspond with the coloured markings identifying the terminals in your plug, proceed as follows: The GREEN/YELLOW wire is the EARTH and must be connected to the terminal which is marked with the letter E or by the earth symbol or coloured... -
Page 16: Troubleshooting
Troubleshooting Problem Solution Check that the appliance is switched on. Check that there has not been a power cut. Check that the plug is not faulty. Check that the fuse has not blown. The appliance doesn't work Check that the voltage is correct for the appliance. Ensure that the AC/DC switch is switched to the correct mode, so that it matches the input you have selected (i.e. - Page 17 Troubleshooting Problem Solution Check that the appliance is on a flat, level surface and is stable. Unusual noises Check the spacing around the appliance and ensure it is not touching other items. The appliance smells/has an Check that nothing has leaked or any stagnant liquid is at odour the bottom of the appliance.
-
Page 18: Product Guarantee
Product Guarantee This product is guaranteed for 12 months from the date of the original purchase. If any defect arises due to faulty materials or workmanship the faulty product must be returned to the place of purchase. Refund or replacement is at the discretion of the retailer. The following conditions apply: •... -
Page 19: Technical Specification
Technical Specification Model number RH14CLR4001 (B) (SCW) (SCG) Rated Voltage AC 220-240V~50Hz / DC 12V Net Capacity (litres) 14 litres Cooling Performance 16-20°C below ambient temperature Heating Performance 60°C +/- 5°C Dimensions (CMs) (H)42.2 x (W)32.3 x (D)32.4... - Page 20 Russell Hobbs is a registered trademark used under license from Spectrum Brands (UK) Ltd. Made under license by G2S Limited, Wigan, WN2 4AY/G2S (NI) Ltd, Belfast, BT5 5AD. Russell Hobbs Support: call 0345 208 8750 or visit: mda.russellhobbs.com The ‘wheelie bin’ symbol is known as the 'Crossed-out wheelie bin Symbol'.
Need help?
Do you have a question about the RH14CLR4001B and is the answer not in the manual?
Questions and answers