Table of Contents
Advertisement
MOFI4500-4GXELTE-SIM
Card Version V1/V2/V3
3G/4G/LTE/LTE Advanced High
Performance Router
Updated Manual can be located
at:
www.MoFiNetwork.com
1-888-499-0123 (Toll Free)
Please note that is it recommended to download our full User Manual on
our site since this is current version that is enclosed does not have all
the features listed.
Manual revision version is 1.5
Advertisement
Table of Contents

Related Manuals for MOFI NETWORK MOFI4500-4GXELTE-SIM


Summary of Contents for MOFI NETWORK MOFI4500-4GXELTE-SIM
- Page 1 MOFI4500-4GXELTE-SIM Card Version V1/V2/V3 3G/4G/LTE/LTE Advanced High Performance Router Updated Manual can be located www.MoFiNetwork.com 1-888-499-0123 (Toll Free) Please note that is it recommended to download our full User Manual on our site since this is current version that is enclosed does not have all the features listed.
-
Page 2: Table Of Contents
User Manual v1.5 Table of Contents About the Product ..........................3 Features ............................4 Requirements ............................ 5 Device Design............................ 6 Getting Started........................... 8 Plan Your Network: .......................... 10 Remove or Disable Conflicts: ......................11 Installing your Router: ........................13 Connecting to the Internet VIA 3G/4G/LTE: ..................14 WPD (Wi-Fi Protected Setup): ...................... -
Page 3: About The Product
User Manual v1.5 About the Product The MOFI4500-4GXELTE SIM Version is an IEEE802.11n wireless broadband Router with 3G/4G/LTE support. Simply put your SIM Card in and plug in the Router, an Internet connection can be accessed and shared virtually anytime anywhere within a wireless broadband network. -
Page 4: Features
User Manual v1.5 Features Multi function Router - Support for 3G/4G/LTE/LTE Advanced mobile broadband plus 4-port wireless N router Support (3G/4G/LTE) USB modem connection - to offer a network connection with full mobility Latest Cellular Embedded Modem that allows the fastest and most stable connection possible ... -
Page 5: Requirements
User Manual v1.5 Requirements Your computer must meet the following minimum requirements. Any internet browser to surf the internet Ethernet network adapter or wifi network adaptor The MOFI router will work with basically any operating system and devices. ... -
Page 6: Device Design
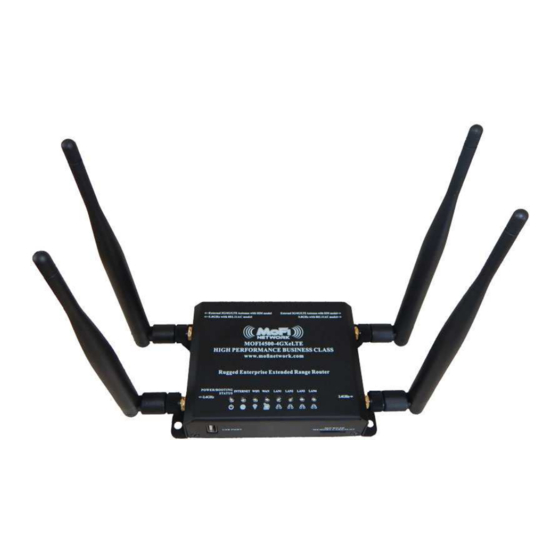
User Manual v1.5 Device Design - Front Panel Note: Includes 2 External Antenna for just the WiFi signal & 4 External Antenna for the Cellular Signal Behavior Description Power/Boot Status Blink when booting, Solid when competed boot. Have internet access Internet No Internet access Wireless is enabled (will blink to show the wireless traffic) - Page 7 User Manual v1.5 Label Description Ethernet Port 1-4 Connecting with computers/devices using an Ethernet cable Connect to a modem using an Ethernet cable Press for 10 seconds to reset to the Factory Default. Reset/WPS Press for 2 seconds to set in WPS mode Power Jack Use 12V 1.0A Power Adapter Page 7 of 64...
-
Page 8: Getting Started
User Manual v1.5 Getting Started Plan your Network You may need to check some Remove/Disable setting or disable some application before installation. Conflicts Connect the modem, Setup the Router computer, and power adaptor to the router. Open a browser to access the Connect to the Web User Interface and then use Setup Wizard to connect to the... -
Page 9: Plan Your Network
User Manual v1.5 Plan Your Network 1. Using a 3G/4G/LTE USB Modem Stick 2. Using a DSL/Cable modem (If your DSL/Cable modem is both a router and a modem, contact us. Page 9 of 64... -
Page 10: Remove Or Disable Conflicts
User Manual v1.5 Remove or Disable Conflicts To make sure the router installation moves on smoothly, you need to remove or disable conflicts that may interfere the installation. Probable conflicts may include: Internet sharing applications Proxy software Security software ... - Page 11 User Manual v1.5 Configuring Internet Properties To set the Internet Properties: Click the Start button, and then click Run. This opens the Run dialog box. Type in inetcpl.cpl, and then click Ok. This opens the Internet Properties. Click the Connections Tab. In Dial-up and Virtual Private Network settings, select Never dial a connection.
-
Page 12: Installing Your Router
User Manual v1.5 Installing your Router The MOFI4500-4GXELTE V2 SIM Version can be used in many ways including as a 3G/4G/LTE/LTE2 router or just a regular Cable/DSL/Satellite high speed router. Using a SIM card from your provider direct from provider Insert your SIM card in the SIM card slot on the side of the router and connect all 4 antennas to router. -
Page 13: Connecting To The Internet Via 3G/4G/Lte
User Manual v1.5 Connecting to the Internet VIA 3G/4G/LTE/LTE2 Here is a video to help also on using the wizard to set up the router https://www.youtube.com/watch?v=jevcVD5t0G8&t=1s If you have a cable, DSL or Satellite modem that does not need to have a username/password, just connect the output from the Cable/DSL/Satellite to the WAN port of the router then repower your Cable/DSL/Satellite box and you should be online. -
Page 14: Wpd (Wi-Fi Protected Setup)
User Manual v1.5 WPS (Wi-Fi Protected Setup) (Note this feature is not recommended and is disabled by default) WPS button allows you to activate Wi-Fi Protected Setup (WPS). When you press the reset button and hold it down for 2-3 seconds, it automatically detects and connects wireless clients into the wireless network by broadcasting the wireless network settings from your Access Point to you wireless device/s. -
Page 15: Usb Print Server
User Manual v1.5 USB PRINT SERVER This option is used if you have an old USB printer and want to share this on your network so all devices that can install your printer driver can print to. In basic mode, go to Network --> USB Print Server Check to enable it and then save and reboot router Now, you will need to re-install the driver for your printer on all your device you can do and configure it using the instruction in next part. - Page 16 User Manual v1.5 Click on Hardware and Sound > Devices and Printers > Add a printer If needed, click on “The printer that I want isn’t listed” Select “Add a printer using a TCP/IP address or hostname” Page 16 of 64...
- Page 17 User Manual v1.5 Stop the Auto Detect and click on "The printer that I want isn't listed" Enter IP address: 192.168.10.1 or whatever your router’s ip address is and then click on Next Windows will now search for the printer Page 17 of 64...
- Page 18 User Manual v1.5 Select: "Add a printer using a TCP/IP address or hostname" and press Next Page 18 of 64...
- Page 19 User Manual v1.5 For Device type: Select TCP/IP Device Enter Hostname or IP address: 192.168.10.1 The Port Name should auto file with same: 192.168.10.1 You can leave the check box "Query the printer and automatically select the driver to use" and then go Next Windows should detect the settings Select Custom Settings and leave everything as default: Page 19 of 64...
- Page 20 User Manual v1.5 port number should be 9100 as RAW press OK to continue At this point, this is why you will need to have your printer driver (same as you have when you installed it on your Select Have Disk, locate and it will install the printer. You printer will show up, go Next to continue Select "Use the driver that is currently installed (recommended)"...
- Page 21 User Manual v1.5 Page 21 of 64...
- Page 22 User Manual v1.5 FOR WINDOWS 7 Click on the Start Button > Control Panel > Hardware and Sound > Devices and Printers > Add a printer Select Add a network, wireless Printer Stop the Auto Detect and click on "The printer that I want isn't listed" Select: "Add a printer using a TCP/IP address or hostname"...
- Page 23 User Manual v1.5 For Device type: Select TCP/IP Device Enter Hostname or IP address: 192.168.10.1 The Port Name should auto file with same: 192.168.10.1 You can leave the check box "Query the printer and automatically select the driver to use" and then go Next Windows should detect the settings Select Custom Settings and leave everything as default: Page 23 of 64...
- Page 24 User Manual v1.5 port number should be 9100 as RAW press OK to continue At this point, this is why you will need to have your printer driver (same as you have when you installed it on your Select Have Disk, locate and it will install the printer. You printer will show up, go Next to continue Select "Use the driver that is currently installed (recommended)"...
- Page 25 User Manual v1.5 Click on the File Menu > Add Printer. Click on Next on the Add Printer Wizard page. Choose Local Printer attached to this computer and click Next, on the Local or Network Printer page.
- Page 26 User Manual v1.5 Choose Create a new port and on the drop down box choose Standard TCP/IP Port then click Next. Click Next button on Welcome to the Add Standard TCP/IP Printer Port Wizard. Enter your MOFI4500-4GXELTE Default Gateway IP address 192.168.10.1 then click Next. Page 26 of 64...
- Page 27 User Manual v1.5 Under Additional Port Information Required choose Custom then click Next Once the computer detects the printer on the Print Server, it will ask for the printer manufacturer and model, a list of printers will be shown, select the your printer from the list and click OK. Choose Keep existing driver (recommended) then click Next until you reach Completing the Add Printer Wizard.
- Page 28 User Manual v1.5 Click Finish to complete the installation. PRINTING A TEST PAGE AFTER INSTALLATION Open the Printers and Faxes page from Control Panel. Right click on the new printer and click on Properties. Click on the Print Test Page button on the Printer properties page, the test page will be printed on the network printer.
- Page 29 User Manual v1.5 Click on Add a Printer. Click on Add a local printer then click Next. Select Create a new port, on the drop down box choose Standard TCP/IP port then click Next.
- Page 30 User Manual v1.5 Enter the Default Gateway IP address of your MOFI4500-4GXELTE-SIM4 router 192.168.10.1 then click Next. Under Additional Port Information Required window, select Custom then click Next. Page 30 of 64...
- Page 31 User Manual v1.5 Once the computer detects the printer on the Print Server, it will ask for the printer manufacturer and model, a list of printers will be shown, select the your printer from the list and click OK. Select Use the driver that is currently installed then click Next. To print a test page click on Print a test page on the confirmation screen, click Finish to complete the installation.
- Page 32 User Manual v1.5 If Printing was unsuccessful right click on the Printer’s icon then select Properties. Under printer’s Properties click Port Tab and tick the IP address (192.168.10.1) that was set on previous settings then click Apply. Page 32 of 64...
- Page 33 User Manual v1.5 Note: Scanning, Faxing and Photocopying functions on Multifunction printers are currently not supported on the MOFI4500- 4GXELTE-SIM4 , Print function is the only feature that will work on these printers type when connected to the MOFI4500- 4GXELTE-SIM4 . Page 33 of 64...
-
Page 34: Wan Connection
User Manual v1.5 WAN connection By default, the WAN connection type is set to automatic which is DHCP. Most Cable and DSL connections are automatic. On this section you can choose your Internet connection type from Static IP (manual), PPPoE, PPTP, and DHCP (Automatic) If you need to change this to PPPoE or PPTP or just want to disable it, log into the router and in basic mode, click on Network and go to the bottom "Internet Connection"... -
Page 35: Wireless
User Manual v1.5 Wireless By default, the wireless network name is: MOFINETWORKXXX where the XXXX is the last 4 digits of your router's mac address. If you do not require changing this and do not want to set up a wireless password, you do not have to do anything else. -
Page 36: Port Forwarding
User Manual v1.5 How to forward ports: (Note you will need a public IP address in order to do any port forwarding) MOFI offers a public IP service that you may be able to get depending on what you need this for. By default, most cellular connection does not provide a public IP so you may need this server. -
Page 37: How To Open Ports In The Router
User Manual v1.5 How to open ports in the router: Note that normally, you would not have to do this. If you feel you need to, first double check as when you do a port forward, it should automatically open the ports for you. These are the default port that are open by default WEB 80 SSH 22... - Page 38 User Manual v1.5 Page 38 of 64...
-
Page 39: How To Set A Wireless Bridge/Repeater
User Manual v1.5 How to Set a Wireless Bridge/Repeater: The first thing you need to know ahead of time is the wireless SSID (network name) and password of the device that you want to connect to if it has a security enable on it. Note it is case sensitive so make sure you have everything exactly the way it is. - Page 40 User Manual v1.5 4. Enter the SSID of the main router you are trying to connect to and the wireless password. You can select this from the box. If you are unable to select this, click on the Wifi Bridge/Repeater on the left hand side again to refresh that screen.
-
Page 41: How To Do A Firmware Upgrade
User Manual v1.5 How to do a Firmware Upgrade: There are 2 ways to do an update. One is if you have internet access, you can do a remote update. This is located in Basic Mode --> System --> Remote Update If you do not have internet access on the router, you may have to do a manual firmware update Go to... -
Page 42: How To Remote Login Into Router
User Manual v1.5 How to Remote Login into the Router: Remote Login is enabled by default and can be access on port 80,81 and 8080 Port 8080 is the official port for remote access If you have a public IP address, you will be able to access your router remotely by going to: http://yourpublicIPaddress:8080 However, if you are using a cellular connection and have not paid or added a public ip option to your account, you cannot get direct access to the router as the NAT will not let you do this,... - Page 43 User Manual v1.5 How to modify settings/ports for remote access to the router: By default, the router is set to receive on port 80, 81 and 8080 If you want to change this, log into the router and go into Basic Mode --> Mofi Business --> Web Server To change the port, click on the HTTP Port option and select custom You can now delete what is there by default: 0.0.0.0:80 0.0.0.0:81 0.0.0.0:8080...
- Page 44 User Manual v1.5 There are many more features that are not covered in this manual such as We are currently making some changes to this section but below is some more options not fully documented Parental Control Scheduler (ability automatically to allow or block access to individual devices via the mac address).
-
Page 45: Fail Over
User Manual v1.5 FAIL OVER If you require the highest stability, Fail Over can be a life saver. This feature is used if you have 2 activate internet connection. You can specify which connection you want as your main connection and if that is not available, it will jump to the secondary connection and then jump back to the primary connection when it is available. - Page 46 User Manual v1.5 Page 46 of 64...
-
Page 47: Load Balancing
User Manual v1.5 LOAD BALANCING If you require the fastest internet possible, the Load Balancing feature will allow you to take two WAN connections and make the work as one. This feature is currently being worked on. Contact us for more details on this. To active fail over, go to Mofi Business -->... -
Page 48: Ip Pass Through
User Manual v1.5 IP Pass Through With IP Pass Through, this feature will make your router to work as a modem. Only 1 device can be connected via Ethernet Port 1. Enable, save and then reboot router. You normally never need to change any of the default settings here. When IP Pass Through is on, your wifi will automatically be disabled. -
Page 49: Mofi Recovery
User Manual v1.5 MOFI RECOVERY (For MOFI4500 V1/V2 only, note for the V3 version, it has a bit different process) How to recover router from wrong file update or other problem This MOFI utility will restore your MOFI MOFI4500-4GXeLTE V1/V2 router back to working mode. - Page 50 User Manual v1.5 under network connections, right click on local area connections and then select properties click on Internet Protocol TCP IP V4 so it turns blue click on properties and select “Obtain an IP address automatically” Also, make sure the DNS is set to “Obtain DNS server address automatically Step 5: Log into the router Now, you will be able to log back in the router.
- Page 51 User Manual v1.5 MOFI RECOVERY (For MOFI4500 V3 only, note for the V1/V2 version, it has a bit different process) How to recover router from wrong file update or other problem This MOFI utility will restore your MOFI MOFI4500-4GXeLTE V1/V2 router back to working mode.
- Page 52 User Manual v1.5 Plug back in power in router and after 10 seconds, release the reset button. The Wifi status should be blinking fast and as such, the router is now is recovery mode. If it does not blink, try it again. Step 2: Set your network connection to static ip address: 192.168.10.7 To set your static ip address, you can do this: Go to control panel -->...
- Page 53 User Manual v1.5 Step 5: Log into the router Now, you will be able to log back in the router. To log in router, go to http://192.168.10.1 username: root password: admin Once you are in You can now load the latest firmware to bring the router to the latest version. Page 53 of 64...
-
Page 54: Remote Management
User Manual v1.5 MOFI REMOTE MANAGEMENT How to Enable Remote Management With your MOFI router, you have the ability to access your router status and make various changes if need all from an online interface on our server. To use this feature, you will need to enable this option that is located in: Basic Mode -->... - Page 55 User Manual v1.5 ID: This show your ID for your router that is internet to MOFI NETWORK User: This is your MAC Address on your router Version: This is the firmware version that is being used on your router Model: This is the model router you are using...
-
Page 56: Mofi Cloud Link
User Manual v1.5 MOFI CLOUD LINK STATIC DEDICATED PUBLIC IP SERVICE Do you need a public IP? Do you know what is? 99% of all provider gives you what is called a private IP address. With a private IP address, you cannot do any port forwarding so if you have a device that needs to forward a port like a camera system, you will need to get a public IP. - Page 57 User Manual v1.5 Now you have your public IP address assigned and can access your router anytime http://YourPublicIP:8080 To add a device like a video camera recorder (DVR) to get this public IP address and be able to view your video for example from the outside, Go back to the MOFI Cloud section where you put in your username and password and in the bottom, there is an option to add the mac address of the device you want to use a public IP address with.
- Page 58 User Manual v1.5 In some cases, you might not want to use port 80 which is set as default in the router. If you want to use this, you will have to de-select port 80 that is in the router. To do this, go to Mofi Business -->...
-
Page 59: Bandlock
User Manual v1.5 BAND LOCK Manually Setting LTE Band An LTE band is the frequencies that the provider is using. Here are some potential bands for various provider. If using the MOFI4500-4GeLTE-SIM4: AT&T: B2, B4, B5, B12/B17, B30 Sprint: B26, B26, B41 T-Mobile: B2, B4, B12/B17 Verizon: B2, B4, B5, B13 If using the MOFI4500-4GXeLTE-SIM7... -
Page 60: Bandwidth Monitoring/User Limits
User Manual v1.5 BANDWIDTH MONITORING If you want to set a limit of usage per device, this is where you set this. 1. You will need to enable Bandwidth Monitoring To Enable, this, go to Bandwidth & Filters on the left hand side Then Check the Enable option and set the day of the month that your billing cycle starts over at. - Page 61 User Manual v1.5 Bandwidth - USER LIMITS Make sure the Bandwidth Monitor is enabled as explained above. If you are looking to set a limit of data use to an individual device, you would enable the User Limits Enable the User Limits by clicking on the check box Click on Add and add the device you want to set the limit for.
-
Page 62: Troubleshooting
User Manual v1.5 TROUBLESHOOTING Here are some basic troubleshooting steps: Here is a video to look at also https://www.youtube.com/watch?v=KPqpnsHaPA0&t=3s For most customers, the first step in trouble shooting is to do a module reset then a factory default. Log into router http://192.168.10.1 user name: root password: admin... - Page 63 User Manual v1.5 go to mofi internal modem What does it say for the carrier ID? By seeing the carrier ID, you know that the SIM card is being read fine. What does it say for the phone number? If the sim card is activated, a phone number should show up there If this is still not working, You should contact your provider and verify what APN (access point name) that you...
-
Page 64: Regulatory Compliance Notices
The FCC requires the user to be notified that any changes or modifications made to this device that are not expressly approved by MoFi Network could void the user’s authority to operate the equipment. This device complies with Part 15 of the FCC rules.
Need help?
Do you have a question about the MOFI4500-4GXELTE-SIM and is the answer not in the manual?
Questions and answers
Is there a feature on the router to modify the imei number