Advertisement
Available languages
Available languages
Quick Links
Advertisement

Subscribe to Our Youtube Channel
Related Manuals for Nitho DRIVE PRO V16


Summary of Contents for Nitho DRIVE PRO V16
- Page 1 Model: MLT-DP16-K QUICK START GUIDE...
-
Page 2: Specifications
SPECIFICATIONS THANK YOU FOR BUYING NiTHO DRIVE PRO WHEEL. WE WOULD LIKE TO INTRODUCE ITS SPECIFICATIONS : A、Compatible with Windows® VISTA®/7/8/10, PS3®, PS4®, XBOX ONE®, SWITCH® and supports US, EU, Japan versions` consoles B、Home button to enter into Settings on PS3®, PS4®, XBOX ONE® consoles C、It`s provided with 2 axis a D-pad and 12 action buttons... -
Page 3: Button Layout
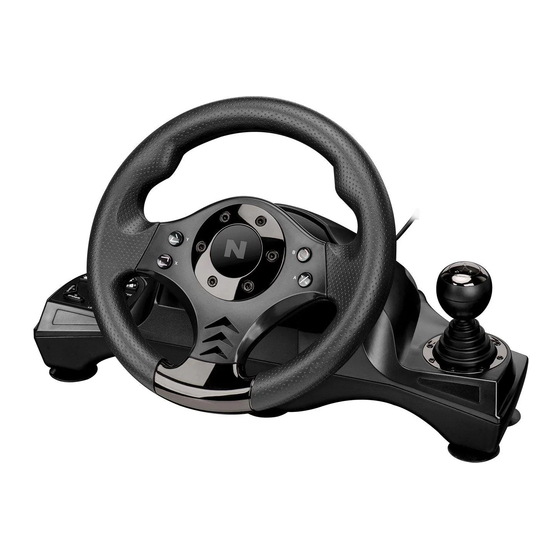
BUTTON LAYOUT Programmable buttons Home/Options /Share Buttons Sensibility LED light: selector Mode Selector R-Wing L-wing gear shift gear shift Pedals Port Controller sync port Accelerator (X/Y+/RT) Brake (□/Y-/LT) -
Page 4: Function Keys
FUNCTION KEYS XBOX Mode PS3® PS4® SWITCH® (X-INPUT) (D-INPUT) ONE® ○ ○ □ □ △ △ Action Key DOWN DOWN DOWN DOWN DOWN DOWN D-pad LEFT LEFT LEFT LEFT LEFT LEFT RIGHT RIGHT RIGHT RIGHT RIGHT RIGHT START OPTIONS Menu Menu Function Key SELECT... -
Page 5: Function Introduction
FUNCTION INTRODUCTION PROGRAM FUNCTIONS · INTRODUCTION You can assign to some buttons (PROGRAMMABLE) functions of other buttons (DEFAULT) 1、Here below are the DEFAULT buttons (the ones you can assign to other functions): □//1/X, ○/3/B, △/4/Y, X/2/A, L1/5/LB, L2/7/LT, R1/6/RB, R2/8/RT 2、Here below are the PROGRAMMABLE buttons (the ones you can setup): L-wing (□/1/LT), R-wing (X/2/RT), Accelerator pedal (X/2/RT), Brake pedal (□... - Page 6 · PROGRAM L-WING AND R-WING AS Y-AXIS 1、 Press & hold “SHARE/9/View” + “Option/10/Menu” for 3 seconds until the green LED turns on 2、Press D-PAD RIGHT until the green LED is off. L-Wing and R-Wing are programmed as Y-AXIS · CLEARANCE THE L/R-WING OR PEDAL AS Y-AXIS 1、...
- Page 7 PLATFORMS PS3® GUIDE 1、 Connect the wheel to PS3® console and connect the pedal to the wheel 2、During PS3® gameplay, press the HOME button once to enter the XBM window 3、Press & hold the MODE button to enter in the MENU setup window PS4®...
- Page 8 PC GUIDE · X-INPUT 1、 The wheel is set on X-INPUT as default. 2、Press & hold HOME for 3 seconds to switch to D-input then the LED will switch off and switch on again after 0.5 seconds · TEST 1、 Enter Test interface to test buttons and axis functions 2、Enter Calibration interface to calibrate the axis ·...
-
Page 9: Troubleshooting
TROUBLE SHOOTING 1、 If the connection LED is not on, please re-connect to the controller again and retry 2、If the wheel do not give any response, turn off and on again the console and procees the wheel setup once again PRECAUTIONS 1、Read carefully the user manual before using the wheel 2、Do not disassemble or modify... - Page 10 SERVICE & SUPPORT For any question and support request, contact us on support@nitho.com or visit our website www.nitho.com NiTHO GmbH – Victoriastrasse 3b – 86150 Augsburg – Germany SUPPORT@NITHO.COM WWW.NITHO.COM NITHOGAMES NITHOGAMES...
- Page 11 Model: MLT-DP16-K QUICK START GUIDE...
- Page 12 SPECIFICATIONS GRAZIE PER AVER ACQUISTATO IL VOLANTE DRIVE PRO PERMETTICI DI INTRODURTI LE SPECIFICHE TECNICHE : A、Compatibile con Windows® VISTA®/7/8/10, PS3®, PS4®, XBOX ONE®, SWITCH® e le versioni US, EU, Japponesi B、Il tasto HOME permette di entrare nelle opzioni su PS3®, PS4®, XBOX ONE® C、Il volante é...
- Page 13 DISPOSIZIONE DEI PULSANTI Pulsanti programmabili Home/Options /Share Selettore di sensibilitá LED : Indicatore di modalitá Pagaia destra Pagaia sinistra Porta dei pedali Porta di sincronizzazione del controller Acceleratore (X/Y+/RT) Freno (□/Y-/LT)
- Page 14 FUNCTION KEYS XBOX Mode PS3® PS4® SWITCH® (X-INPUT) (D-INPUT) ONE® ○ ○ □ □ △ △ Action Key DOWN DOWN DOWN DOWN DOWN DOWN D-pad LEFT LEFT LEFT LEFT LEFT LEFT RIGHT RIGHT RIGHT RIGHT RIGHT RIGHT START OPTIONS Menu Menu Function Key SELECT...
- Page 15 INTRODUZIONE ALLE FUNZIONI PROGRAMMAZIONE · INTRODUZIONE Puoi assegnare ai pulsanti programmabili funzioni dei pulsanti di base. 1、Pulsanti di base (non riassegnabili) : □//1/X, ○/3/B, △/4/Y, X/2/A, L1/5/LB, L2/7/LT, R1/6/RB, R2/8/RT 2、Pulsanti programmabili (liberamente assegnabili a qualsiasi funzione dei pulsanti di base): Pagaia sinistra (□/1/LT), Pagaia destra (X/2/RT), Acceleratore (X/2/RT), Freno (□...
- Page 16 · PROGRAMMA LE PAGAIE COME ASSE Y 1、 Tieni premuto “SHARE/9/View” + “OPTIONS/10/Menu” per 3 secondi fino a che il LED verde si accende 2、Premi D-PAD destro fino a che il LED verde si spegne. Pagaia sinistra e pagaia destra sono ora programmate come Asse Y ·...
- Page 17 PIATTAFORME GUIDA PS3® 1、 Connetti il volante alla PS3® ,successivamente connetti il pedali al volante 2、Durante la sessione di gioco, premi il tasto HOME una volta per entrare nella schermata XBM 3、Tieni premuto il tasto MODE per entrare nel MENU GUIDA PS4®...
- Page 18 GUIDA PC · X-INPUT 1、 Il volante ha la funzione X-input di base 2、Tieni premuto il pulsante HOME per 3 secondi per cambiare a D-input. Il LED si spegnierá e riaccenderá dopo pochi secondi · TEST 1、 Entra nell’interfaccia di test per verificare gli assi del volante 2、Entra nell’interfaccia di calibrazione per calibrare il volante ·...
- Page 19 PROBLEMI RISCONTRATI 1、 Se su console il LED non si accende, scollegare e ricollegare il controller 2、Se il volante non si accende provare a scollegare e ricollegare il cavo PRECAUZIONI 1、Read carefully the user manual before using the wheel 2、Do not disassemble or modify 3、Avoid to store in a smoky, humid or dusty place ·...
- Page 20 SERVIZI & SUPPORTO Per qualunque domanda e supporto necessario, contattaci per E-mail a support@nitho.com o visita il nostro sito web : www.nitho.com NiTHO GmbH – Victoriastrasse 3b – 86150 Augsburg – Germany SUPPORT@NITHO.COM WWW.NITHO.COM NITHOGAMES NITHOGAMES...
- Page 21 型号: MLT-DP16-K 快速使用指南...
- Page 22 性能规格 感谢您购买NITHO DRIVE PRO WHEEL 该方向盘规格性能如下 : A、兼容Windows® VISTA®/7/8/10, PS3®, PS4®, XBOX ONE®, SWITCH® 并支持美国, 欧洲, 日本版本的主机 B、Home键进入PS3®, PS4®, XBOX ONE®主机设置 C、有两个轴, 2个方向键和12个动作按钮 D、8个可编程按钮: 右翼, 左翼, 制动踏板 (□/Y-/LT), 油门踏板 (X/Y+/RT), L3, (L3/11/SL), R3 (R3/12/SR), 变速杆(-/+/R) E、6个吸盘,保持方向盘稳定 F、方向盘可270度旋转(向左135度, 向右135度) G、三种灵敏度选择 H、弹簧踏板...
- Page 23 按钮布局 可编程按钮 Home/Options /Share 按钮 灵敏度选择 模式选择 指示灯 右翼 左翼 换档拨片 换档拨片 踏板接口 手柄接口 油门踏板 制动踏板 (X/Y+/RT) (□/Y-/LT)
- Page 24 功能键 XBOX PS3® PS4® SWITCH® 模式 (X-INPUT) (D-INPUT) ONE® ○ ○ □ □ △ △ 动作键 DOWN DOWN DOWN DOWN DOWN DOWN LEFT LEFT LEFT LEFT LEFT LEFT 方向键 RIGHT RIGHT RIGHT RIGHT RIGHT RIGHT START OPTIONS Menu Menu 功能键 SELECT SHARE View...
- Page 25 功能介绍 程序功能 · 介绍 您可以指定一些默认按钮的功能转变为编程按钮功能 1、下面是默认按钮 (可以分配其他功能): □//1/X, ○/3/B, △/4/Y, X/2/A, L1/5/LB, L2/7/LT, R1/6/RB, R2/8/RT 2、下面是可编程按钮 (可以设置): 左翼 (□/1/LT), 右翼 (X/2/RT), 油门踏板 (X/2/RT), 制动踏板 (□ /1/LT), L3/11/SL, R3/12/SR, Gear-shift (L2/7/LB,R2/8/RB) · 编程设置 1、 按住 “SHARE/9/View” + “OPTIONS/10/Menu” 键 秒直到绿灯亮起 2、按下可编程按钮直到绿灯闪烁 3、按下默认按钮直到绿灯关闭...
- Page 26 · 编缉左翼和右翼为Y轴 1、 按住 “SHARE/9/View” + “Option/10/Menu” 键 秒直到绿灯亮起 2、按下方向左键, 绿灯将关闭 左翼和右翼已编辑为 轴 · 清除左翼和右翼或者踏板y轴编程 1、 按住 “SHARE/9/View” + “OPTIONS/10/Menu” 键 秒直到绿灯亮起 2、按下左翼和右翼或者踏板, 绿灯将会闪烁 3、按下左翼和右翼或者踏板直到绿灯关闭 注意: 当方向盘断电时,所有设置都不会被清除 · 方向盘灵敏度调整 3 种等级 方向盘敏度可从灵敏度选择器(LO MID HI)调整...
- Page 27 主机操作说明 PS3® 1、 连接方向盘到 PS3® 主机,然后连接踏板到方向盘 2、在 PS3® HOME 游戏中, 按一次 键进入 窗口 3、按住 HOME 键进入菜单设置窗口 PS4® 1、 连接方向盘到 PS4® 主机,然后连接踏板到方向盘 2、使用原装数据线连接 PS4® 原装手柄到方向盘(或者带数据功能的第三方数据线) 3、在连接建立之后, 方向盘上的红色 灯就会亮起来,然后按下方向盘 HOME 上的 键开始游戏 4、在 PS4® HOME 游戏中,按一次 键进入 窗口 XBOX ONE® 1、 连接方向盘到XBOX ONE®主机,然后连接踏板到方向盘 2、使用原装数据线连接XBOX ONE®原装手柄到方向盘...
- Page 28 · X-INPUT 1、 方向盘默认设置为 X-INPUT 2、按住 HOME 键3秒,切换到D-input时, 就会关闭并在 秒后重新打开 · 测试 1、 进入测试界面,检查按钮和轴功能 2、进入校准界面,对轴进行校准 · 驱动程序卸载 1、 启动→ 控制面板→ 应用程序 2、在界面中找到要删除的驱动程序,点击卸载并按照提示操作完成卸载...
- Page 29 简单故障排除 1、 如果连接指示灯不亮, 请重新连接手柄并重新操作 2、如果方向盘没有任何反应, 关闭并再次打开控制台再次进行方向盘设置 注意事项 1、使用前请仔细阅读使用手册 2、不要拆卸或修改产品 3、避免存放在烟雾弥漫、潮湿或多尘的地方 · 吸盘 拉起吸盘一侧的带子 以便将方向盘从工作台上拆下...
- Page 30 服务和帮助 如有任何问题,请联系我们 support@nitho.com www.nitho.com NiTHO GmbH – Victoriastrasse 3b – 86150 Augsburg – Germany SUPPORT@NITHO.COM WWW.NITHO.COM NITHOGAMES NITHOGAMES...
Need help?
Do you have a question about the DRIVE PRO V16 and is the answer not in the manual?
Questions and answers