
Subscribe to Our Youtube Channel
Related Manuals for Et system LAB-HP


Summary of Contents for Et system LAB-HP
- Page 1 L A B‐ H P ET System electronic GmbH Telefon 06205 3948‐0 Fax 06205 37560 Hauptstraße 119‐121 info@et‐system.de 68804 Altlußheim www.et‐system.de ...
- Page 2 Software version: V178 May 2021 ...
-
Page 3: Table Of Contents
Table of Contents Info & Contact Addresses ............................ 1 Technical Specifications ............................ 1 Ambient Conditions ................................ 1 Input Specifications ................................ 2 Output Specifications .............................. 2 AI Interface .................................. 3 RS 232 ..................................... 3 RS 485 ..................................... 3 Technical Drawing ................................ 4 Important Safety Instructions .......................... 5 Initial Operation ................................ ... - Page 4 Set Point U (U ) .............................. 27 Set Point I (I ) ................................ 27 Set Point OVP (U ) ............................... 28 Analog Output ................................ 28 Monitor Set Point U (U ) ............................. 28 Monitor Set Point I (I ) ............................ 28 Monitor Actual Value P (P ) .......................... 28 Analog Output OVP (U ) .......................... 28 OVPmon Monitor Output Voltage (U ) .......................... 29 Istmon Monitor Output Current (I ).......................... 29 Istmon Digital Input ................................. 29 Activation (Ext. Control) ............................ 29 ...
-
Page 5: Info & Contact Addresses
Info & Contact Addresses INFO & CONTACT ADDRESSES ET System electronic GmbH was founded in 1986 in the heart of the Rhine‐Neckar‐Triangle. As a subsidiary of a leading electricity utility group, the company quickly took on a leading role in the area of laboratory power electronics and associated electrical measurement. The existing know‐how in power technologies in the 90s gave rise to the “Power Solutions” product division as a strong extension of the historical “Test & Measurement” range. Since 1997, we have been working successfully as an independent, privately held company with customers in all lines of business from industry, medical care, railway technology and automotive electronics. By means of our high vertical range of manufacture and our ever expanding development division we can fast and flexibly adjust to our customers’ requirements. Necessary approvals such as CSA, UL, VDE, TÜV etc. are flexibly carried out by qualified personnel. The approval procedures are performed within the scope of development planning and thus do not negatively impact the start of manufacturing. Permanent manufacturing control through accredited laboratories and an ISO 9001 compliant quality management system guarantee a constant high‐level series‐production quality. We offer repairs and adjustment for units outside of our warranty period. Please contact your local distributor for further information: ... -
Page 6: Input Specifications
Technical Specifications Operating temperature 0 ‐ 50 °C Storage temperature ‐20 ‐ 70 °C Humidity < 80 % Operating altitude < 2000 m Vibration 10 ‐ 55 Hz/1 min/2G XYZ Shock < 20 G Weight 5 kW 19 kg, 10 kW 26 kg, 15 kW 33 kg NPUT PECIFICATIONS Version 5 kW 10 kW 15 kW 20 kW 30 kW 45 kW 60 kW Connection 5 wire (3P+N+E) Input 3P/208 3 x 208 V (187‐229 V 47‐63 Hz) Input 3P/400 3 x 400 V (360‐440 V 47‐63 Hz) Input 3P/440 3 x 440 V (396‐484 V 47‐63 Hz) Input 3P/480 ... -
Page 7: Ai Interface
Technical Specifications Programming accuracy (I ) ± 0.05 % +2 mA Display accuracy (V ) < ± 0.5% Display accuracy (I ) < ± 0.5% Isolation 3,000 V Over voltage protection 0 ‐ 120 % V Circuit protection OC/OV/OT/OP Line Regulation < ± 0.1 % + 2 mV NTERFACE Digital outputs Output type: Open collector with pull‐up resistor 10 k after + 5 V : 50 mA (CV, Standby, Error) sinkmax Input resistance: 47 kΩ Digital inputs Maximum input voltage: 50 V High level: U > 2 V (Ext. Control, Standby) Low level: U < 0.8 V Output resistance: 100 Ω Minimum permissible load resistance: 2 kΩ Analog outputs (X ) Imax: 5 mA Minimum load resistance for 0.1 % accuracy: 100 kΩ ... -
Page 8: Technical Drawing
Technical Specifications ECHNICAL RAWING 4 ET System electronic GmbH ... -
Page 9: Important Safety Instructions
Important Safety Instructions IMPORTANT SAFETY INSTRUCTIONS Please read this manual thoroughly before putting the device into operation. Pay regard to the following safety instructions and keep this manual nearby for future purpose. This operating manual is based on the state of technology at the time of printing. However, it is possible that despite regular control and correction, the present document contains printing errors or deficiencies. ET System electronic GmbH assumes no liability for any technical, printing or translational errors within this manual. ... -
Page 10: Functional Description
Functional Description FUNCTIONAL DESCRIPTION The following block diagram gives information about the various adjustment options. Basically, four different operation modes are available: UI mode Unit is operated with current and voltage limitation. UIP mode Unit is operated with current, voltage and power limitation. Unit is operated with current, voltage and power limitation. Additionally, the set value for UIR mode voltage is calculated by means of the present output current to simulate an internal resistance.. Set values for current and voltage are saved in a table. Therefore, UI characteristics can be Table mode easily adjusted. There are three different ways to program the table: The UI characteristic of a solar generator is calculated with the Uo, Ik, Umpp and Impp mode parameters and then written to the table. The table can be programmed using a script from a memory card. Memory card A script is a simple text file ( Script Control). The table can be programmed using the digital interface ( Universal Interface, WAVE Digital interface Command bzw. DAT Command). 6 ET System electronic GmbH ... - Page 11 Functional Description ATE‐Unit An ATE unit has no front panel. It can be controlled via analog interface (page 26 ff) or via universal interface (page 11 ff). Example to control the LAB/HP over the universal interface: Connect the device to the RS232 port (Page 25 ff, default parameter 9600Baud, 8 Data bits, 1 Stop bit, no parity, no handshake). Start a terminal program (for example TerraTermPro). Type follow commands: *IDN? (The LAB/HP will response his Id string) OVP,100 (Set over voltage protection to 100V, no response) UA,10 (Set output voltage to 10V, no response) IA,1 (Set output current to 1A, no response) SB,R (Enable the output, no response) MU (Read the actual output voltage) Configuration of the AI interface via digital interface: Syntax: AI[,{5|10}[,{UI|UIP}[,<Filterlevel>]]] Parameter: 5, 10 5V‐ or 10V‐Mode IP, UIP UI‐mode or UIP‐Mode Filterlevel range of values 0..10 ...
-
Page 12: General Settings
General Settings GENERAL SETTINGS ONFIGURATION Display The configuration menu can be accessed by holding the button (lower button) for at least 1 second. This opens a menu where general settings of the unit can be changed. These settings are U , I , OVP and Remember last setting. Provided the unit is equipped with these options, AI Type limit limit and M/S mode can also be selected. Pushing the rotary pulse encoder selects individual parameters. Turning the rotary pulse encoder selects the desired Display value. Pushing the button a second time, opens the configuration menu for digital interface parameters. ONTRAST After the unit has been switched on, the display shows the ET System logo. The contrast of the display can be adjusted by using the rotary pulse encoder. Afterwards, the contrast will be saved automatically. VOLTAGE SETTINGS AND LIMIT LIMIT limits the maximum output voltage. The output voltage is limited to the selected value, irrespective of the values limit that have been set at the front panel or at one of the interfaces. The adjustment range is 0 V up to the maximum rated voltage of the device. limits the maximum output current. The output current is limited to the selected value, irrespective of the values limit that have been set at the front panel or at one of the interfaces. The adjustment range is 0 A up to the maximum rated current of the device. ... -
Page 13: Remember Last Setting
Front Panel Operation EMEMBER AST ETTING If this option is activated (‚On‘), selected parameters will be kept after a blackout. If this option is deactivated (‚Off’), standard setting (0V/0A/UI‐Mode) will be loaded after supply voltage is enabled. The following adjustments can be made if M/S‐Mode is activated ( Master/Slave‐Mode): Off no master/slave Parallel parallel connected outputs Serial serial connected outputs Independent Independent outputs, change of set values via bus only ) NTERFACE PARAMETER PTION The display shows all available digital interfaces and their changeable parameters. These parameters can be selected by pushing the rotary pulse encoder and changed by turning the rotary pulse encoder (function of the parameters Universal Interface). ... -
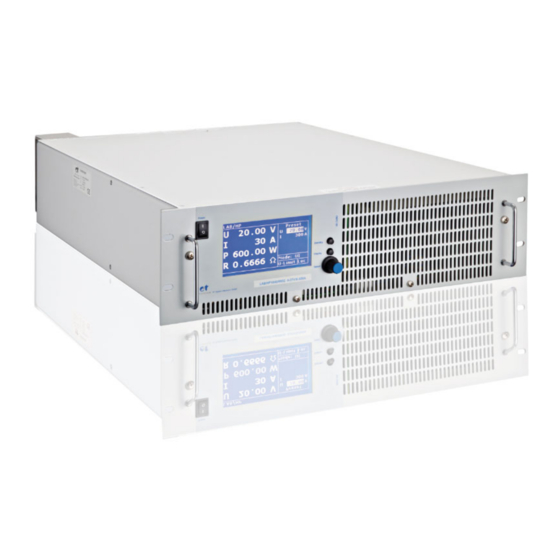
Page 14: Main Display
Front Panel Operation Main display The main display shows current measure and set values. On the left side of this screen, present voltage and current values are displayed as well as the resulting power (P = U I) and resistance (R = U ÷ I). The set values are displayed on the right side of the screen (‚Preset‘) and vary according to the operation mode of the unit. U Output voltage I Output current P Output power (UIP mode only UIP mode) Internal resistance (UIR mode only UIR mode) MPP voltage (PV mode only PV mode) MPP current (PV mode only PV mode) The lower right section of the screen shows the current Control Mode of the unit: Loc Front panel operation Scr Memory card operation AI Analog interface operation Rem Interface operation LLO Interface operation, Front panel operation locked Dis Unit locked via interlock input (Option) The section to the left of the control mode display shows the current Operating Status of the unit: ... -
Page 15: Preselectable Fixed Settings
Universal interface (Option) Preselectable fixed settings Fixed settings can be saved and selected which means that front panel operation is inactive. For activation or Standby deactivation the button must be pressed and held when the device is switched on until the ET‐System logo fades out. To activate the fixed settings, the device must be switched on and the option ‚Remember Last Setting‘ must be activated. Standby The desired set values can be adjusted and the device must be switched off. The button must be pressed and held while the device is switched on until the ET‐System logo fades out. The device will load the last set values directly on power up. Front panel operation is inactive. This status is signalized by the word ‚Dis‘ in the lower right corner of the Standby display. To deactivate this mode, the button must be pressed when switching on the device. Operating Mode description UI Mode In UI mode, the set values for voltage and current are transferred directly to the switch mode regulator. There is no additional digital control. UIP Mode In UIP mode, the set values for voltage and current are transferred directly to the switch mode regulator. If the output current exceeds the previously adjusted limit value, the current set point will be regulated. ... -
Page 16: Commands
Universal interface (Option) Character ASCII Dec value Hex value Carriage Return <CR> 13 0d Line Fee <LF> 10 0a If the command contains a <DEL> or <ESC> character, it will not be processed. Therefore, a command can be cancelled <CR> <LF> while entering. Though, a terminator ( or ) is necessary. Character ASCII Dec value Hex value Escape <ESC> 27 1b Delete <DEL> 127 7f Commands are not case sensitive and may be mixed up. Therefore, the effect of the following commands is the same: GTL, Gtl, gTL. Decimal places are optional and separated by a full stop ‘.‘ . The number of decimal places is not limited. Therefore, the effect of the following commands is the same: UA,10, UA,10.0, UA,10.000000000, UA,0010, UA,010.0000 The number of decimal places to be analyzed depends on parameter and unit type. It corresponds to the number of decimal places, a command without a parameter would return. As a rule, decimal places are analyzed until a resolution of 0.1% is reached. ... -
Page 17: Detailed Description Of Commands
Universal interface (Option) CLS* or CLS Clear Status Deletes the status byte DAT,<U>,<I> DIP Data for user‐defined characteristic DCL Device Clear Initialization data reset GTL Go To Local Activates front panel operation GTR[,{0|1|2}] Go To Remote Activates digital interface operation IA[,<imax>] Set I Adjusts current limiting ID or *IDN? Identification Displays identification string IMPP[,<impp>] Set I Adjusts MPP current during PVsim mode. LLO Local Lockout Deactivates LOCAL button LIMI Limit I Reads maximum adjustable current limitation a LIMP Limit P Reads maximum unit output. a LIMR Limit R Reads adjustable range for R within UIR mode. ... - Page 18 Universal interface (Option) GTR[,{0|1|2}] ‐ Go To Remote This command activates digital interface operation. The optional parameter affects the future behavior of the unit after switch on. Setting is saved permanently. No return value. Optional parameter 0 = Deactivates automatic remote operation The command GTR must be entered to activate the unit’s remote operation mode. This mode is useful if the unit shall be operated manually and at the same time, measurement values shall be read out via the digital interface. ...
- Page 19 Universal interface (Option) LIMI ‐ Limit I a With this command the user can read the maximum adjustable current limiting. Example: 300A unit, I was adjusted to 200 A via configuration menu limit LIMI Query of maximum adjustable current LIMI,200.0A Unit answers: I = 200 A limit LIMP ‐ Limit P With this command the user can read the unit’s maximum output. Example: 10 kW unit LIMP Query of units output LIMP,10000...
- Page 20 Universal interface (Option) Measures present output current MI,0.567A Unit answers: 567 mA In master/slave mode with parallel connection the total current of all connected devices is displayed. Using the parameter <Nr> will show the value of each connected device. Numbering starts with 0. Example: MI,2 displays the measured output current at the bus of device number 3. MODE[,{UI|UIP|UIR|PVSIM|USER|Skript|0|1|2|3|4|5}] ‐ Set Mode ...
- Page 21 Universal interface (Option) *OPT? Query of version number 08.06.2012 V42 Unit answers: Version 42 vom 08.06.2012 OVP[,<U >] ‐ Over Voltage Protection This command adjusts the over voltage protection. Entering the command without parameter displays the present set point. If the set point is higher than a maximum of 1.2 x voltage of the unit, the range error bit within the ESR register of the interface is set. The present set point remains unchanged. Example: Remote operation mode OVP,200 Over voltage protection 200 V UA,100 Output voltage 100 V IA,10 Output current 10 A SB,R Output open PA[,<P...
- Page 22 Universal interface (Option) Allowed parameters for RS232 interface: PCx,<baud>,<parity>,<data bits>,<stop bits>,<handshake>,<echo> Parameter Function Baud: 1200, 2400, 4800, 9600, 14400, 19200, 38400, 57600, 62500, 115200 Parity: O, E, N Data bits: 7, 8 Stop bits 1, 2 Handshake: H, S, N Echo: E, N Allowed parameters for USB interface: PCx,<baud>,<parity>,<data bits>,<stop bits>,<handshake>,<echo> Parameter Function Baud: 1200, 2400, 4800, 9600, 14400, 19200, 38400, 57600, 62500, 115200 Parity: O, E, N Data bits: 7, 8 Stop bits 1, 2 Handshake: H, S, N Echo: E, N Note: The USB interface of the PC is controlled like a virtual COM port and therefore the parameters correspond to those of the RS232 interface.
- Page 23 Universal interface (Option) UA,100 Output voltage 100 V IA,10 Output current 10 A RA,0.1 Internal resistance 0,1 Ohm SB,R Output open REGLER[,<Nr>,<Kp>,<Ki>,<Kd>] – Controller Parameter Settings for controller parameters in UIP, UIR and PV mode. Entering the command without parameters displays the present settings as a table. The number of the parameter determines the parameter set which is to be adjusted. 0 Controller for UIP 1 Controller for UIR 2 Controller for PV The range of values for controller parameters is 0 ‐ 30000. New settings can permanently be saved with the command . For a detailed description of the controller parameters see Controller. Example: REGLER Read present settings Type P I D Unit answers: P 10 20 5...
- Page 24 Universal interface (Option) SCR,I,15 2. script command: I = 15 A SCR,UI 3. script command: mode UI SCR,RUN 4. script command: activate output SCR,LOOPCNT,10 5. start address loop SCR,U,12 6. script command: U = 12 V SCR,DELAY,8 7. script command: wait 8 ms SCR,U,1 8.
-
Page 25: Response String
Universal interface (Option) 3 devices are connected in series while in M/S mode. With UA,10 an output voltage of 10V is programmed. Therefore all connected devices are adjusted to 10V. Since three devices are connected in series, the total voltage is 3 x 10 V = 30 V. UMPP[,<Umpp>] ‐ Set U ... -
Page 26: Ext. Control: Computer
Ext. Control: Computer LIMI LIMI,30.00A RA RA,0.015R LIMP LIMP,15000W UA UA,100.0V LIMRMIN LIMRMIN,0.015R UMPP UMPP,90.2V LIMRMAX LIMRMAX,0.110R IMPP IMPP,10.01A LIMR LIMR,0.015R,0.110R OVP OVP,600.0V Example: Command as ASCII and HEX protocol The digits after the decimal point correspond to the resolution of the unit. ... -
Page 27: Status Word
Ext. Control: Computer 18 ‐ 23 GND Ground 24 SGND Signal Ground Table: Device address S1 S2 S3 S4 S5 Address S1 S2 S3 S4 S5 Address Off Off Off Off Off 0 Off Off Off Off On 16 On Off Off Off Off 1 ... -
Page 28: Esr-Register - Event-Status-Register
Ext. Control: Computer 0 0 0 1 Syntax 0 0 1 0 Command 0 0 1 1 Range 0 1 0 0 Unit 0 1 0 1 Hardware 0 1 1 0 Read ESR‐Register ‐ Event‐Status‐Register <*ESR?> The ESR register can be read using the command . Return value: ESR,xxxxxxxx. After the query, the ESR register is deleted. Bit Function D7 Power on ... -
Page 29: Interface Reconfiguration
Ext. Control: Computer Number of stop bits: 1 or 2 Handshake: H = Hardware S = Software N = None (no handshake) The defined character for XON is 0 x 11 and for XOFF it is 0 x 13. Interface parameters in delivery state are 9600 baud, no parity, 8 data bits, 1 stop bit, echo on. The status word can be <STB> <*STB?> read with the command or . The following functions are assigned to the bits: Bit Function D15 Parity error D14 Over run error D13 Framing error D12 Timeout error D11 Echo on D10 used internally, can be 1 or 0 D9 Hardware handshake (RTS/CTS) D8 Software handshake (XON/XOFF) D7 Parity enable D6 Parity mode (1 = odd, 0 = even) D5 Stop bit (1 = 2 stop bits; 0 = 1 stop bit) D4 ... -
Page 30: Interface Reconfiguration
Ext. Control: AI Interface (Option) Timeout: 0‐100 ms A timeout is the time between receipt and sending of a message. The connected device is selected by entering the command and placing the number of the device and ‘#’ before it. When using the word ‚ALL‘ instead of a number, the following command will be executed by all connected devices (e. g. #1,ID; #22,GTR, #ALL,GTL). Example: #1,ID #22,GTR #ALL,GTL <STB> <*STB?> The status word can be read with the command or . The following functions are assigned to the bits: Bit Function D15 Parity error D14 Over run error D13 Framing error D12 Timeout error D11 n/a D10 n/a D9 n/a D8 n/a D7 Parity enable D6 Parity mode (1 = odd, 0 = even) D5 Stop bit (1 = 2 Stop bits; 0 = 1 Stop bit) ... -
Page 31: Analog Input
Ext. Control: AI Interface (Option) 5 digital in Soft‐Interlock Interlock function (Caution: Interlock does not correspond to the machinery directives) 6 ‐nc‐ ‐ ‐ 7 digital out CV Signals „Const. Voltage“ mode 8 analog out Monitor output voltage istmon 9 gnd GND ‐ 10 digital out Standby Signals standby 11 gnd GND ‐ 12 ‐nc‐ ‐ ‐ 13 REF10 10 V‐V Output 10 V reference voltage 14 analog in ... -
Page 32: Analog Output
Ext. Control: AI Interface (Option) LAB/HP at 100 A output voltage, AI is adjusted to 10 V, desired output current = 2 A. = 10 V 2 A ÷ 100 A = 0.200 V Set Point OVP (U ) The output is deactivated immediately if the output voltage exceeds the adjusted value. This error is indicated on the display with the word „Error“. To reset this error, standby mode must be activated. Adjustment range is 0 V up to the maximum rated voltage of the device + 20%. Example: LAB/HP with 600 V output voltage, AI is adjusted to 10 V, desired OVP voltage = 650 V. Adjustment range: 600 V + 20% = 720 V = 10 V 650 V ÷... -
Page 33: Monitor Output Voltage (U Istmon )
Ext. Control: AI Interface (Option) Monitor Output Voltage (U ) Istmon Present measure value point value for output voltage. Measurement value refers to the rated voltage of the device. Example: LAB/HP at 600 V output voltage, AI adjusted to 10 V, voltage at output U = 6 V. istmon Present output voltage U = 6 V 600 V ÷ 10 V = 360 V Monitor Output Current (I ) ... -
Page 34: Error
Ext. Control: Ethernet (LAN) RROR An error is set, if the unit has been shut down by OVP. To reset this error, the standby mode must be activated. EXT. CONTROL: ETHERNET (LAN) To communicate with the LAB/HP via network, it is necessary to find the IP device first. In delivery status, the device automatically draws an IP from the network. In its practical operation, this behavior is unfavorable, because after each activation the device has a new IP address. Therefore, to each device an individual, permanent IP address should be assigned. The easiest way to check the IP of the device is by starting latronix device installer software. Click “search”. Now your network gets scanned for devices. You can see the device and its IP address. You can also find the IP by typing “arp ‐a” in the command prompt in windows. Check the MAC address of the device (label on the device or in calibration protocol). The IP on the left side of the MAC address is the current IP of the device. <STB> <*STB?> The status word can be read with the command or . Only bits from D0 up to D2 are in use. All other bits can be 1 or 0. Table: Error messages D2 D1 D0 Error 0 0 1 Syntax 0 ... -
Page 35: Monitoring The Device Via Browser
Ext. Control: Ethernet (LAN) ANUAL SSIGNMENT OF AN VIA WEB INTERFACE You can enter the web page by typing the IP in your browser http://xxx.xxx.xxx.xxx Username: admin Password: PASSWORD To set a static IP for the device you have to click “Webconfig”. There you can set the new IP of the device. (Uncheck dynamic IP). ONITORING THE DEVICE VIA BROWSER The user interface opens via direct request of the IP address: http://xxx.xxx.xxx.xxx. Username: admin Password: PASSWORD The item menu ‚Display‘ opens the Monitoring section of the unit. Displayed are all present measurement values, which are updated every 2 seconds. ET System electronic GmbH 31 ... -
Page 36: Controlling The Device Via Browser
Ext. Control: Ethernet (LAN) When controlling the device via browser, another control via telnet must not be active! ONTROLLING THE DEVICE VIA ELNET The device can be controlled directly via port 10001. After the console has been opened, a click on ‚Start‘ and cmd command ... -
Page 37: Ext. Control: Usb
EXT. CONTROL: USB The USB interface provides a virtual COM port for the PC. Via this port, the unit can be controlled as with a normal RS232 interface, e. g. with a terminal program. Corresponding drivers for all current operating systems are available as download: http://www.ftdichip.com/Drivers/VCP.htm. <STB> <*STB?> The status word can be read with the command or . Bit Function D15 Parity error D14 Over run error D13 Framing error D12 Timeout error D11 ... -
Page 38: Interface Reconfiguration
Data Log Function (Option) Interface Reconfiguration In case, the user has forgotten the active setup, there are two ways of reconfiguring the interface: <PCx> sending the command from one of the other interfaces using the display to configure the interface Interface Parameters DATA LOG FUNCTION (OPTION) The device has a data log function. A memory card may be used as data logger. All measurement values will be saved, separated by tabulators, in a text file. The time interval may be adjusted from 1‐4294967 s (= 71 minutes). To activate the data log function, a memory card must be inserted. The root directory of the memory card must contain a text file named “LABLOG.txt“. The new data will be written into this file. The memory card must be inserted or removed in standby mode only! In case, that the first entry of the first line of the file is "interval=xxxx" (xxxx = time in seconds), the memory interval is adjusted accordingly. The entry must be written in lower case letters and without space characters. If the interval remains unspecified, the memory interval is 60 seconds. ... -
Page 39: Script Mode
Script Mode SCRIPT MODE Operation sequences may be programmed in a script which can be read in from a memory card. A script is a text file, which includes a sequence of commands. Alternatively, the script memory can be programmed via digital interface using . For more information about the use of this command see Commands. The device is able to the command process up to 1000 commands. XECUTING OADING A CRIPT The script must be saved on a MMC or SD card as text file with .txt or .scr ending. The mode ‚Scr‘ must be selected from the main display. Pushing the rotary pulse encoder will open the file selection menu. The script file can be selected. An error message appears if, the file could not be read correctly or, if the read in setup is invalid (e. g. IA 40 at a 10 A unit). To return to the file selection menu, the rotary pulse encoder or the button Display Standby must be pushed again. The script has been loaded and can be started by pushing the button . The last five commands of the script are displayed in the field ‚Preset’. The actual command is placed on top. The script Standby ends when button is pushed and device is toggled to standby mode. OMMANDS Syntax ... -
Page 40: Detailed Description Of Commands
Script Mode Detailed description of commands ; or # ‐ Comment Comment on text. All characters from ; or # up to end of line will be ignored. This function is not available when programming via digital interface Example: # This is a comment UIP # This command activates the UIP mode ;... - Page 41 Script Mode LOOPCNT 10 # Start address # Activate output DELAYS 10 # Wait 10s STANDBY # Deactivate output DELAYS 10 # Wait 2s PMAX ‐ maximum output in UIP mode Maximum output for the UIP mode. PV ‐ Pv mode Activates the PV mode. Example: PVSIM #Activate PV simulation RI ‐ Internal resistance UIR mode This command adjusts the set point for the internal resistance in UIR mode. RUN ‐ Activate output The command resets the standby mode and activates the output. ...
- Page 42 Script Mode USER ‐ Set points current and voltage This command generates the set points for current and voltage by using the internal table. Thereby, different UI WAVE characteristics can be created. The tables can be created beforehand by using the command . ...
- Page 43 Script Mode WAVE <U1> <I1> <U2> <I2> <U3> <I3> ... <Un> <In> ‐WAVE WAVELIN WAVE The command equals the command . WAVELIN <U1> <I1> <U2> <I2> <U3> <I3> ... <Un> <In> ‐WAVELIN WAVELIN WAVELIN WAVE With the command, the interim values between the fulcrums are linear interpolated, with the ...
-
Page 44: Controller
Controller # This script generates a blue characteristic # After a 10 second delay it switches to the green characteristic: WAVE # Start of the table 100 10 # 100 V 10 A 50 50 # 50 V 50 A 10 100 # 10 V 100 A -WAVE... -
Page 45: Control Structure Pv Sim Mode And User Mode
Controller Improper adjustment of the controller can lead to controller oscillations which may damage connected devices! ONTROL TRUCTURE SIM ODE AND SER The current set point is calculated from the output voltage and a table. This set point stands for the input signal of the PID controller after it was subtracted from the actual value. The PID controller releases the current set point for the power supply. The current set point is limited to the short circuit current, as a maximum. The voltage set point of the power supply is permanently set to the open circuit voltage of the table. In PVsim mode the current is regulated while the voltage is fixed. ONTROL TRUCTURE The output voltage is multiplied with the output current. The result is subtracted from the power set point. This signal is the input signal of the PID controller, which releases the current set point for the power supply. The current set point is limited to the current set point, as a maximum. The voltage set point of the power supply is permanently set to the voltage set point. In UIP mode the current is regulated, while the voltage is fixed. ONTROL ... -
Page 46: Controller Parameters
Sense Mode = U ‐ I R soll The output signal is limited to the voltage set point. The current set point of the power supply is permanently set to I . soll In UIR mode the voltage is regulated while the current is fixed. ONTROLLER PARAMETERS common differential equation of a PID controller: E Controller deviation Kp Proportional coefficient Tn Reset time Tv Derivative time Since the digital controller is a discrete‐time system, the integral is replaced by a summation and the differential by a difference: Ts ... - Page 47 Sense Mode directly to the output connectors. By no means, current may flow over the sense connectors. In case of multiple loads, the user has to provide a central load distribution point. To reduce peak loads and for an HF impedance terminator, a 1‐10 µF capacitor should be connected to the output. OAD ONNECTION WITH ENSOR CONDUCTOR The following points must be considered, when existing sense cables are connected directly to the load or to the central load distribution point: remove existing sense cable bridges from the power supply directly connect + sense and ‐ sense with correct polarity to the load distribution point connect + sense and ‐ sense conductors to a 1‐47 µF capacitor protect sense cable or at least twist + sense and ‐ sense select load line cross section, so that voltage drop is < 0.4 V avoid overload of power supplies (voltage drop per line x current) If thus you paid attention to the points stated above, oscillation occurs through load or power induction and complex load situations, please contact our company ET System. WARNING INSTRUCTIONS USING RELAYS LOAD DRAFT ...
-
Page 48: Load Distribution Without Sensor Conductor
Master/Slave Mode (M/S Mode) The circuit breaker (S_power) must be closed when starting before the Sens (S_sens). When switching off, the Sens must first be opened and then the circuit breaker can be opened. Otherwise, a current flow may occur across the sensing line, and this may be particularly critical when disconnecting. OAD ISTRIBUTION WITHOUT ENSOR ONDUCTOR To ensure a proper use, a central load distribution situation is essential. Illustration 2 shows a correct load distribution. Illustration 1 shows an insufficient supply of load 2, load 3 etc. via parallel load conductors. In practice, it may occur that an optimal distribution is not possible. Illustration 3 shows a mixed distribution, where at least the largest consumers are supplied centrally. MASTER/SLAVE MODE (M/S MODE) In master/slave mode, multiple LAB/HP units are connected via the ETS‐Bus. To establish the connection, any commercially available USB cables Type A are used. However, the interface is not an USB interface. ... -
Page 49: Operation Modes In Master /Slave Mode
Master/Slave Mode (M/S Mode) the front panel or via interface. The command LLO on a digital interface deactivates front panel operation at all connected units. Example: 2 units connected to the bus, unit 1 with front panel operation and digital interface, unit 2 with front panel operation only Remote operation mode, set points can be adjusted via digital interface or via front panel of unit 2. -
Page 50: M/S Mode Serial
Master/Slave Mode (M/S Mode) M/S mode Serial The control assumes that outputs are connected in series. Set points are respectively converted. Displays will show the total voltage as measure point. Voltage distribution between the individual units is not necessarily symmetrical. Thus, the total voltage will be limited to the adjusted value. M/S mode Independent The control assumes that the outputs are independent. ... - Page 51 Master/Slave Mode (M/S Mode) Example: 3 devices on the bus Remote operation mode active OVP,30 Adjust over voltage protection to 30 V IA,10 Adjust output current to 10 A UA,15 Adjust output voltage to 15 V SB,R Output open All devices connected to the bus are adjusted to 15 V/10 A. When these devices are parallel connected, the resulting output voltage is 15 V and 30 A ( = 3 x 10 A).
-
Page 52: Appendix
Appendix APPENDIX 0701 QUIVALENT LEAKAGE CURRENT MEASUREMENT ACCORDING TO The equivalent leakage current measuring according to DIN VDE 0701‐1 may deliver results beyond the norm. Cause: Measurements are primarily performed on so‐called EMC‐filters at the AC input of the units. These filters are built symmetrical, that means capacitors are installed between L1/2/3 and PE. While measuring, L1, L2 and L3 are connected together and the current flow to PE is measured. Therefore up to 3 capacitors are connected parallel which doubles or triples the measured leakage current. This is permissible according to the norm. Quotation from the norm of 2008, appendix D: „When measuring protection conductor currents with the equivalent leakage current measuring method, it is important to note that devices with protective grounds and symmetrical circuits may have results, due to the wiring, that are up to three or four times higher than the leakage current of one phase.“... - Page 53 Appendix ET‐System Rippel Measurment Specification Theoretical Analysis The component of the output ripple is built by the output current and the equivalent series resistor of the output capacitor. Picture 1 show a basic circuit which was used to simulate the ripple. Picture 2 show the ripple without spikes. Picture 2 shows also the different between the used measurement bandwidth. At this example the switching frequency of the converter was 80kHz (this is also the switching frequency of the LAB/HP and LAB/SMS series).The red line shows the measured ripple by using a bandwidth of 20MHz and the blue line shows the measured ripple by using a measure bandwidth of 300kHz. This example shows that the measurement bandwidth have a strong influence of the measurement result. The spike or noise of the ripple will generate by the switching noise of the power supply. The spikes which will be measured strongly depend on the used measurement method. One point is the using measurement bandwidth the other point is the test setup. The influence of the measurement method is show at picture 4. Picture 3 show the previous know circuit and also the same circuit with some ...
- Page 54 Pratical Rippel Measurment. ET‐System measured the ripple with the test setup how is show at picture 5. Tow high voltage capacitor in serie with a 10k Ohm resistor is use to measured only the AC‐Component of the output voltage of the power supply. The circuit have tow output. Output 1 have a measurment bandwith of 20MHz and output 2 have a bandwith of 300kHz. This rippel circuit was build at the labortory and was tuned by using a frequency analyser (Bode 100). Also the used 1:1 Oscilloscope probe was during the tuning procedure connectet to the rippel measurment setup to elemenate the influence of the probe to the measurment bandwith. Picture 6 show the result of frequency analyses of the tuning measurement. Point 1 shows the 3dB point of the 300kHz output. Point 2 show the 20MHz point. -100 f/Hz TR1: Mag(Gain) Memory 1 : Mag(Gain) Memory 2 : Mag(Gain) 50 ET System electronic GmbH ...
-
Page 55: Notes
NOTES ... - Page 56 Notes ...
- Page 57 Notes ET System electronic GmbH 53 ...
Need help?
Do you have a question about the LAB-HP and is the answer not in the manual?
Questions and answers