Table of Contents
Advertisement
Quick Links
Advertisement
Chapters
Table of Contents

Subscribe to Our Youtube Channel
Related Manuals for Aristo MAT Series

Summary of Contents for Aristo MAT Series
- Page 1 Chapter 1 General ARISTOMAT SL 131O / 1317 / 1617 / 1625...
- Page 2 Copyright ARISTO Graphic Systeme reserves the right to make any alterations or improvements in the hardware, software and the manual at any time and without any notice. All rights reserved. This manual and no part of it may be reproduced...
-
Page 3: Table Of Contents
Contents Contents 1. Introduction ..................5 2. Safety Instructions ................6 3. Safety Devices ................... 9 4. Caution Areas ................. 10 ARISTOMAT SL without Conveyor ................10 ARISTOMAT SL with Conveyor ................11 DECLARATION OF CONFORMITY ............. 13 MANUFACTURER’S DECLARATION ..........15 ARISTOMAT SL Series... - Page 4 Contents ARISTOMAT SL Series...
-
Page 5: Introduction
Please do not remove single documents from this user’s manual. ARISTO reserves the right to make any alterations or improvements in the manual without any notice. The complete documentation is partitioned into chapters. Following parts... -
Page 6: Safety Instructions
With malfunctions the plotter shall not be taken in operation. • Covers are part of safety. Do not remove any covers from the ARISTO- MAT, tool heads and accessories. • Unauthorized modification which might impair the safety of the machine are not permitted. - Page 7 Safety Instructions • Always remove tools from tool heads before assembly (disassembly) - danger of injury. • Carry out a blade changeover thoroughly. Handle with care, you might hurt yourself with the sharp knife. Worn down and broken blades can also cause injuries.
- Page 8 Ordinance on Hazardous Substances (§ 35 u. § 15a GefStoffV). Warning off inadequate use • only use original ARISTO tool heads • only use material which is permitted to the ARISTOMAT • do not run the ARISTOMAT in wet rooms •...
-
Page 9: Safety Devices
Safety Devices 3. Safety Devices Main power ON/OFF (1) (1a) is connected with mains electricity supply. Machines with a pump system up to 3 kW: main power switch (1). Machines with a pump system starting from 3 kW: main power switch (1a). -
Page 10: Caution Areas
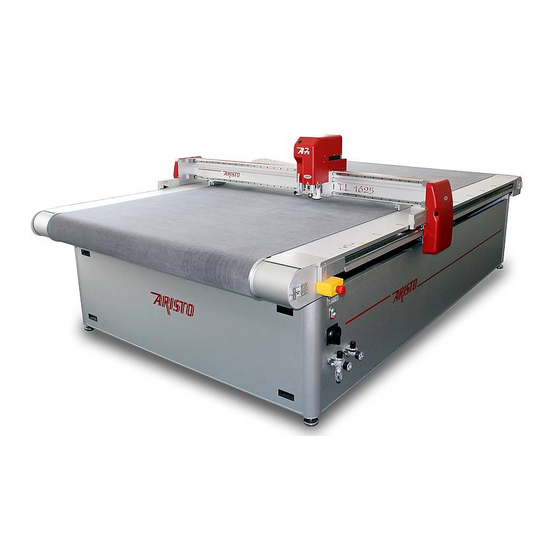
Caution Areas 4. Caution Areas ARISTOMAT SL without Conveyor 1 Total work area on the table top 2 Traversing bridge 3 Slide 4 Tool carriage 5 Tool head 6 Passage between traversing bridge and table top Area between tool head and table top 7 Axis of material transport system 8 Bearing pocket 1-10... -
Page 11: Aristomat Sl With Conveyor
Caution Areas ARISTOMAT SL with Conveyor 1 Total work area on the table top 2 Traversing bridge 3 Slide 4 Tool carriage 5 Tool head 6 Passage between traversing bridge and table top Area between tool head and table top 7 Conveyor clamp 8 Conveyor return 9 Axis of material transport system... - Page 12 Caution Areas 1-12 ARISTOMAT SL Series...
-
Page 13: Declaration Of Conformity
DECLARATION OF CONFORMITY ARISTO Graphic Systeme GmbH & Co. KG Schnackenburgallee 117, 22525 Hamburg/Germany declare under our sole responsibility that the products ARISTOMAT SL 131O / ARISTOMAT SL 1317 ARISTOMAT SL 1617 / ARISTOMAT SL 1625 Article-No.: 0000 07160 / 0000 07161 / 0000 07162 / 0000 07163... -
Page 15: Manufacturer's Declaration
MANUFACTURER’S DECLARATION ARISTO Graphic Systeme GmbH & Co. KG Schnackenburgallee 117, 22525 Hamburg/Germany declare under our sole responsibility that the products Vacuum Pump Systems 1K1W Article No.: 0000 07204 0000 07202 or 0000 07618 3K5W 0000 07203 5K5W 0000 07205 or 0000 07351... - Page 17 Chapter 2 Basic Elements of the ARISTOMAT SL 131O / 1317 / 1617 / 1625 User's Manual...
- Page 18 © 2004 by ARISTO Graphic Systeme GmbH & Co. KG. Issue Januar 2004 Article No. 00001 8898 E...
- Page 19 Contents Contents 1. Introduction ..................7 2. Installation ..................8 Overview ........................8 ARISTOMAT SL without Conveyor ................8 ARISTOMAT SL with Conveyor ................9 Connecting the computer ..................10 Connecting compressed air ..................10 Connecting the power supply ................. 10 Installing tool heads ....................
- Page 20 Contents 5. Menu Settings ................. 22 Main Menu ......................22 PLOT BUFFER ....................22 DELETE ......................22 REPEAT ......................22 LOAD TEST ....................22 ORIGIN ........................ 23 SET ORIGIN ....................23 MOVE TO ORIGIN ..................23 Origin display ....................23 Select the POSITION POINTER ................
- Page 21 Contents Menu Level 3 ......................33 MATERIAL WIDTH ....................33 LOWER OPTION ....................33 ORIGIN SWING ....................33 ON/OFF ......................33 WIDTH ......................33 STEP ......................33 ROT. OPTION ...................... 34 6. Periodic maintenance ..............35 7. Data interface .................. 37 Connector and pin assignment ................
- Page 22 Contents Basic Elements of the ARISTOMAT SL...
-
Page 23: Introduction
Everywhere there are special requirements for flexibility and precision. In the meantime ARISTO presents an abundant offer of cutters with var- ious tool heads, material transport systems and accessories. In this chapter only the Basic Elements of the ARISTOMAT SL machines are described. -
Page 24: Installation
Installation 2. Installation The plotter will be installed and adjusted by a service technician at an assigned location. For operator and service access there must be no less than 2 ft clear- ance around the entire machine. Overview ARISTOMAT SL without Conveyor 1 Table top 2 Tool carriage 3 Main power ON/OFF... -
Page 25: Aristomat Sl With Conveyor
Installation ARISTOMAT SL with Conveyor 1 Table top with conveyor 2 Operator console 3 Main power ON/OFF 4 Tool carriage 5 Traversing bridge 6 Conveyor clamps 7 Maintenance unit compressed air 8 Pressure reducer (option) 9 Connector coupler plug 10 Machine control 11 2th Main power ON/OFF with Electrical Transition Point (only maschines with a pump system starting from 3 kW) 12 Foot switch vacuum pump... -
Page 26: Connecting The Computer
Installation Connecting the computer The ARISTOMAT connects to a serial port of a PC. The interface cable comes with the machine (Informations see "Data interface"). Connecting compressed air If necessary the maintenance unit will be connected to an air supply line or a compressor with the following requirements: Regulated pressure: 6 bar (87.08 psi) pulse free Air flow:... -
Page 27: System Start Up
System Start Up 3. System Start Up Elements of operation 1 Vacuum valve slide Main power ON/OFF 2 Foot switch vacuum pump * 2th main power ON/OFF with 3 Maintenance unit compressed air Electrical Transition Point 4 EMERGENCY OFF button Monitor (option) 5 Drives OFF switch Joystick... -
Page 28: Main Power On/Off
System Start Up Main power ON/OFF The power ON/OFF switches the mains electricity supply. EMERGENCY OFF button The drives of the ARISTOMAT are switched off immediately. The plotter remains in its current position. Cutting jobs and unsaved settings are lost. CAUTION: To continue plotting eliminate the source of danger and turn the button to unlock it. -
Page 29: Control Panel
System Start Up Control panel with push-buttons and double-spaced display. The operation of the ARIS- TOMAT is mainly via the control panel. Display (1) displays menu functions, actual status, prompts for entries, also displays operator errors / error messages. Function keys (2) are used for menu control. -
Page 30: Direction Keys
System Start Up Direction keys (3) to move the tool head in x- (∧ ∧ ∧ ∧ ∧ and ∨ ∨ ∨ ∨ ∨ ) and y-direction (< and >), and to the input of numerical values (e.g. adjusting the speed). •... - Page 31 System Start Up F3 resets the machine to the current customer configuration. The display responds with: KEEP ORIGIN DEL. ORIGIN - F3 (KEEP ORIGIN): maintain the origin already set. - F4 (DEL. ORIGIN ): deletes the origin already set and takes over the machine origin.
-
Page 32: Switching On The Aristomat
System Start Up Switching on the ARISTOMAT • Turn on the main power switch to start the ARISTOMAT. The ARISTOMAT performs a self test and displays information about the installed software version and plot buffer size on the control panel. NOTE: At machines which needed air pressure check the air pressure settings on the maintenance unit. -
Page 33: Menu Overview
Menu Overview 4. Menu Overview All ARISTOMAT settings which are necessary for optimum operation can be reached in four menu levels. By repeated pressing of the key MENU successively the four levels in the display are represented and by pressures of the appropriate function keys (F1- F4) one arrives into the appropriate submenus The tables attached under point "Menu Tables"... -
Page 34: Main Menu
Menu Overview Main Menu 2-18 Basic Elements of the ARISTOMAT SL... -
Page 35: Menu Level 1
Menu Overview Menu Level 1 Basic Elements of the ARISTOMAT SL 2-19... -
Page 36: Menu Level 2
Menu Overview Menu Level 2 2-20 Basic Elements of the ARISTOMAT SL... -
Page 37: Menu Level 3
Menu Overview Menu Level 3 Basic Elements of the ARISTOMAT SL 2-21... -
Page 38: Menu Settings
Menu Settings: Main Menu 5. Menu Settings Main Menu PLOT BUFFER When plotting from PC entry the plot data is stored in the ARISTOMAT plot buffer and available to be reused. It is advisable to clear the buffer every time before starting a job. DELETE clears the buffer. -
Page 39: Origin
Menu Settings: Main Menu ORIGIN SET ORIGIN • place material on the table. • press F3 to select the submenu ORIGIN. Note: a previously set origin can be altered respectively a new origin can be set. • move the tool head to the desired starting position by using the direction keys. -
Page 40: Menu Level 1
Menu Settings: Menu Level 1 Menu Level 1 Parameter settings: Example SPEED For numerical entries a cursor (^) is set under the relevant digit to change by using the direction keys < and >. The number can then be updated by using the direction keys ∧... - Page 41 Menu Settings: Menu Level 1 The setting UPPER ANGLE defines the minimum angle before stopping and lifting the tool in front of a turn. The upper angle can be set from 10 to 90 degrees (factory setting=20°). rotate STOP lift rotate lower The setting LOWER ANGLE defines the minimum angle to halt and up-...
-
Page 42: Smoothing
Menu Settings: Menu Level 1 SMOOTHING Arcs can be altered via settings for CIRCLE RESOLUTION, SMOOTH- ING and SPEEDBOOSTER. CIRC.RESOL. (Arc Resolution) The HPGL arc instructions can be defined by the chord height. ARISTO- MAT selections are: HPGL CHORD TOL. EXCELLENT 0.0050 mm FINE 0.0100 mm... -
Page 43: Switching On Speedbooster
Menu Settings: Menu Level 1 Setting soothing level − level 1 to 6 Selection: − switch off smoothing − switch on cordal height Prior to processing the vectors the controller adds such vectors until a minimum vector length is established. LEVEL 6 smoothest most (factory settings: LEVEL 2). -
Page 44: Acceleration
Menu Settings: Menu Level 1 ACCELERATION Acceleration defines how quick the final machine velocity is reached when travelling on a vector. This effects the plot time. Settings are from 50 to 150 (factory setting 100%). SPEED The maximum velocity at which the tool shall travel is set in increments of 0.1% in the range from 1 through 1200 (factory setting 1000 (=100%)). -
Page 45: Scale
Menu Settings: Menu Level 1 SCALE A scale factor can be set in increments of 0.01%. The value 10000 = 100% is scale 1. ROTATION Rotation is in increments of 90º ccw pivoting over the actual origin. Select the angle of rotation by toggling with keys F3 and F4. An origin must be set and verified to warrant the plot fits on the table and the mate- rial. -
Page 46: Menu Level 2
• with the function keys F3 and F4 get to the following submenus: SAVE CUSTOMER CONFIGURATION Press F3 to save the current plotter settings. When turning the ARISTO- MAT off 0and restarting it, the saved parameters stay valid until they are replaced with new values. -
Page 47: Host
EMULATION The plotter type and plotter format are to be adjusted for correct plot out- puts. PLOTTER TYPE • choose with F3 or F4 type ARISTO, HP 7475 A and HP 7580 B. Basic Elements of the ARISTOMAT SL 2-31... -
Page 48: Format
HP 7475 A A, B, DIN A4 and DIN A3 HP 7580 A, B, C, D, E, DIN A4, A3, A2, A1, A0 ARISTO A, B, C, D, E, DIN A4, A3, A2, A1, A0 INTERFACE BAUD RATE Parameter for data transmission. -
Page 49: Material Width
Menu Settings: Menu Level 3 Menu Level 3 MATERIAL WIDTH The Material width setting avoids plotting outside the material. The ma- chine origin serves as reference and the accessible work area is restrict- ed to the set material width entry. Entries can be set from 1 mm to full work area width. -
Page 50: Rot. Option
Menu Settings: Menu Level 3 ROT. OPTION Machine moves in the blade up mode are performed with the blade cut- ting edge pointing in the direction of table motion. This is to avoid damage to or destruction of the blade when running over obstacles on the table. When it is assured that during the cut process there are no obstacles on the table, the setting OPTIMIZE ROTATION can be selected. -
Page 51: Periodic Maintenance
Periodic maintenance 6. Periodic maintenance For one-shift workload ARISTO recommends an annual maintenance for the ARISTOMAT, performed by ARISTO service personnel or factory ap- pointed service centres. Multiple shift workload shortens the service in- terval. CAUTION: The following cleaning procedures are to be performed, under observation of all safety instructions, by trained operators/ personnel only. - Page 52 Periodic maintenance Monthly Machine control inside take off dust with a vacuum cleaner Toothed rack underside the guide rail take off materi- al dirt with a soft plastic brush Twice a year Dust collector placed at the bridge replace by new one Yearly Clean filter in piping system of the vacuum pump 2-36...
-
Page 53: Data Interface
Data Interface 7. Data interface The ARISTOMAT interface conforms to and supports the RS 232-C/CCITT standard. Connector and pin assignment The ARISTOMAT is delivered with a interface cable for computer sys- tems (25 pins D-sub). The ARISTOMAT has following pin assignment: I/O* Name / Level Transmit Data (TD) (‘0’... - Page 54 Data Interface The ARISTOMAT connects to the Modem port on an Apple Mcintosh (con- necting cable is optional). Pin assignment: D-Sub 25 D-Sub 25 ARISTOMAT 8 pin, round male female 25 pin, male 1 ------------------ 6 6 --------------------------- 4 2 ------------------ 5 5 ------------------------- 20 3 ------------------ 2 2 --------------------------- 3...
-
Page 55: Specifications
Specifications 8. Specifications ARISTOMAT SL 131O 1317 1617 1625 Outer dimensions* mm/inch (width/length/height) 1950 /1640/1250 1950 / 2540/1250 2250 / 2540/1250 2250/3260/1250 without Conveyor** 77"/ 65"/ 49" 77"/ 100"/ 49" 89"/ 100"/ 49" 89"/ 128"/ 49" with Conveyor 1950 /2030/1250 1950 / 2890/1250 2250 / 2890/1250 2250/3570/1250 77"/ 80"/ 49"... -
Page 56: Technical Hints
Technical Hints 9. Technical Hints NOTE: When fault messages occur repeatedly call ARISTO service and report the oper- ating sequence and the resulting fault/error message. Fault Cause Remedy HPGL fault IGNORED INSTRUCTION 1. The data from the comput- 1. These messages are for UNRECOGN. - Page 57 Technical Hints Fault Cause Remedy Tool fault FAULT C-AXIS PRESS 1. Defective or jammed tool 1. Call a service technician ENTER TO CONTINUE head FAULT Z-AXIS PRESS ENTER TO CONTINUE TOOL ERROR HIGH 1. The tool axis are locked 1. Switch drives off and POSITION PRESS check the tool for reasons to ESC TO CONTINUE...
- Page 58 Technical Hints Fault Cause Remedy ERROR IO-BOARD SWITCH 1. Defective machine 1. Call a service technician ON PLOTTER AGAIN controller ERROR Y-BOARD SWITCH ON PLOTTER AGAIN Data fault PLOT BUFFER OVERFLOW 1. Interface parameters of 1. Match the interface set- PRESS ESC KEY ARISTOMAT and computer tings of ARISTOMAT and...
- Page 59 Chapter 3 Material transport systems for ARISTOMAT SL User's Manual...
- Page 60 © 2004 by ARISTO Graphic Systeme GmbH & Co. KG. Issue Januar 2004 Article No. 00001 8897 E...
- Page 61 Contents Contents Introduction....................5 1. Material winding systems ..............6 Preparation of the material roll ................. 6 Unwind systems ......................7 Roll holder - RA 13xx, RA 16xx ................7 Unroll device - RA2 13xx, RA2 16xx ..............9 Motorized unwinding device - MAb 13xx, MAb 16xx ........11 Motorized unroll device - MRA2 13xx, MRA2 16xx ..........
- Page 62 Contents 4. Menu overview ................46 5. Menu settings ................. 47 Switching on the VACUUM ..................47 BLOW ON ......................47 VACUUM ......................47 FEED ........................47 PARAMETER ....................47 DYNAMIC ....................47 LENGTH ....................48 VACUUM DELAY ..................48 MORE .......................
-
Page 63: Introduction
Vacuum systems For film / material hold down on the cutter table ARISTO offers vacuum systems with various selectable vacuum zone layouts. Selective zone activation provides optimal vacuum hold down for any application. -
Page 64: Material Winding Systems
Material winding systems 1. Material winding systems CAUTION: The drives must be switched OFF when loading up new material and/or lining up material. Please read first the ”Safety Instructions” in chapter 1 "General". The safety regulations listed there are completed by special safety and danger notes in this chapter. -
Page 65: Unwind Systems
Material winding systems Unwind systems Roll holder - RA 13xx, RA 16xx Overview This roll holder does NOT feature automatic film winding. Properties of suitable rolls: - core diameter: 30 mm (1.2 in) - outer roll diameter: max. 200 mm (7.9 in) - max. - Page 66 Material winding systems Operation CAUTION: The drives must be switched OFF • feed the unwind / wind shaft through the material roll. • place the unwind / wind shaft with roll in the roll holder brackets. • pick the film end up, feed it under the bridge and pull forward towards the front of the cutter table (machine origin).
-
Page 67: Unroll Device - Ra2 13Xx, Ra2 16Xx
Material winding systems Unroll device - RA2 13xx, RA2 16xx Overview This roll holder does NOT feature automatic film winding. Properties of suitable rolls: - core diameter: from 65 - 90 mm (2.55 to 3.5 in) - outer roll diameter: max. - Page 68 Material winding systems Operation CAUTION: The drives must be switched OFF • place the material roll onto the unwind / wind shafts. • pick the film end up, feed it under the bridge and pull forward towards the front of the cutter table (machine origin). •...
-
Page 69: Motorized Unwinding Device - Mab 13Xx, Mab 16Xx
Material winding systems Motorized unwinding device - MAb 13xx, MAb 16xx Overview Properties of suitable rolls: - core diameter: 76 mm (3 in) - outer roll diameter: max. 170 mm (6 1/2 in) - max. roll width with: ARISTOMAT 13xx is 1400 mm (55 in) ARISTOMAT 16xx is 1700 mm (67 in) - max. - Page 70 Material winding systems Operation CAUTION: The drives must be switched off. The switch on the mate- rial advance electronic control must be set to OFF • slide the roll onto the drive chuck so that the film unwinds towards the cutter table.
- Page 71 Material winding systems • set the switch on the electronic control to AUTO the film unwinds automatically until the loop sensor detects the film. Note: with every manual or automatic material advance the film un- winds automatically until the loop sensor detects the film. •...
-
Page 72: Motorized Unroll Device - Mra2 13Xx, Mra2 16Xx
Material winding systems Motorized unroll device - MRA2 13xx, MRA2 16xx Overview Properties of suitable rolls: - core diameters: from 65 - 90 mm (2.55 to 3.5 in) - outer roll diameter: max. 300 mm (11 3/4 in) - max. roll width with: ARISTOMAT 13xx is 1400 mm (55 in) ARISTOMAT 16xx is 1700 mm (67 in) ARISTOMAT 13xx Conveyor is 1250 mm (49 in) ARISTOMAT 16xx Conveyor is 1550 mm (61 in) -
Page 73: Motorized Unwinding Device (Up To 70 Kg /154 Ibs) - Mabg 13Xx, Mabg 16Xx, Mabg-C 13Xx, Mabg-C 16Xx
Material winding systems Motorized unwinding device (up to 70 Kg /154 Ibs) - MAbG 13xx, MAbG 16xx, MAbG-C 13xx, MAbG-C 16xx Overview Properties of suitable rolls: - core diameters from 65 - 90 mm (2.55 to 3.5 in) - outer roll diameter max. 300 mm (11 3/4 in) - max. -
Page 74: Motorized Unwinding Device (Up To 120 Kg /264 Lbs) - Mabhd 13Xx, Mabhd 16Xx
Material winding systems Motorized unwinding device (up to 120 kg /264 lbs) - MAbHD 13xx, MAbHD 16xx Overview Properties of suitable rolls: - core diameters from 65 - 90 mm (2.55 to 3.5 in) - outer roll diameter max. 500 mm (19 1/2 in) - max. -
Page 75: Lifting The Shaft From Its Bearings
Material winding systems Opertation of MRA2, MAbG, MAbG-C and MAbHD Normally the support cone at the drive side has to be adjusted only once, so that the unwind material covers the vacuum holes of the zone 1 (see illustration). When changing the material roll, only the right support cone (storage side) must be adjusted to the new material roll width. -
Page 76: Loading Material Roll
Material winding systems • loosen the right support cone (bearing side) using a 4 mm hex key and pull it from the shaft. Loading material roll Light to medium weight rolls • feed the wind / unwind shaft through the material roll. Load the roll so that the material unwinds towards the cutter table. - Page 77 Material winding systems Heavy weight rolls CAUTION: To load very heavy material rolls it is advisable to use a lift or hoist! Use caution when placing the roll in the brackets - danger of bruising! • place the material roll in a sling or belts and feed the roll feed shaft through the roll core.
- Page 78 Material winding systems • with light weight rolls - locate the shaft first in the right side bearing bracket and than, on the left side, insert the drive flat vertical in the drive slot. medium weight rolls should be handled by two persons each holding one end of the shaft and carefully lowering it into its bracket.
-
Page 79: Reversing The Wind Direction
Material winding systems Reversing the wind direction The material unwind device MAbHD features an additional switch to control the wind direction. figure 1 figure 2 Figure 1 shows the material loop when the process coat faces roll out- side. Setting the direction control switch to the according pictogram (left) activates the feed in that direction. -
Page 80: Wind - Take Up - Systems
Material winding systems Wind - take up - systems Motorized wind device - MAuf-R 13xx, MAuf-R 16xx Overview Properties of suitable rolls - core diameters from 65 - 90 mm (2.55 to 3.5 in) - outer roll diameter max. 300 mm (11 3/4 in) - max. -
Page 81: Lifting The Shaft From Its Bearings
Material winding systems Operation Lifting the shaft from its bearings CAUTION: The drives must be switched OFF • depress the mode select switch “manual” until the drive slot reaches its vertical position. • lift the unwind / wind shaft vertically up. •... -
Page 82: Insert The Core Of A Roll
Material winding systems Insert the core of a roll • feed the wind / unwind shaft through the core of a material roll • slide the left support cone back onto the shaft, locate tightly in the roll core and tighten the screw. •... -
Page 83: Material Take Up Device - Mauf 13Xx, Mauf 16Xx
Material winding systems • set the mode select switch on the electronic control to AUTO. • press green Drives ON switch The material windsup automatically until the light barrier detects the loop. Material take up device - MAuf 13xx, MAuf 16xx This material take up device catches and winds the film core-less as the material advance feeds it off the cutter table top. -
Page 84: Vacuum Systems
Vacuum systems 2. Vacuum systems Material down holding on the ARISTOMAT is via vacuum. There are small holes in the table top that connect via air channels to the vacuum pump(s). The table top is divided into individual areas (vacuum zones). In accor- dance with the actual application and the material advance system the zones can selectively be activated using the valve slides. -
Page 85: Strip Vacuum Zones
Vacuum systems Strip vacuum zones The strip vacuum zone layout divides the table top, dependent on the machine model, into 5 resp. 6 evenly wide longitudinal zones. The ARIS- TOMAT 1625 SL features 2 x 6 evenly wide longitudinal zones. To the orientation there are markers and numbers on the traversing bridge. -
Page 86: Aristomat Sl 131O
Vacuum systems ARISTOMAT SL 131O 3-28 Material transport systems... -
Page 87: Aristomat Sl 1317
Vacuum systems ARISTOMAT SL 1317 Material transport systems 3-29... -
Page 88: Aristomat Sl 1617
Vacuum systems ARISTOMAT SL 1617 3-30 Material transport systems... -
Page 89: Aristomat Sl 1625
Vacuum systems ARISTOMAT SL 1625 The ARISTOMAT SL 1625 has 2 x 6 vacuum zones. Zones 1 through 6 can be opened independent from zones 7 through 12. Zones 1 and 7 are always open. Material transport systems 3-31... -
Page 90: Formatted Vacuum Zones
Vacuum systems Formatted vacuum zones These vacuum plates are available for the ARISTOMATs 131O and 1317 without conveyor only. The vacuum zones are opened or closed using a vacuum slide valve. Zone 1 is always open, the zones 2 through 5 are consecutively opened. -
Page 91: Aristomat Sl 1317
Vacuum systems ARISTOMAT SL 1317 Material transport systems 3-33... -
Page 92: Matrix Vacuum Zones
Vacuum systems Matrix vacuum zones The division of the vacuum table tops into matrix zones adds, in combi- nation with the strip zones, control to optimally utilize the vacuum i.e. for sheet processing where only a small portion of the vacuum area is required. - Page 93 Vacuum systems Example: • open strip zones 1, 2, and 3. On machines with two slides (front and rear) both slides must be open alike. • open matrix zones (the figure below shows 3) using slides 2. The vacuum is only active in the area represented here graily now. The following layouts show the division and numbers of matrix zones for each machine model.
-
Page 94: Aristomat Sl 131O
Vacuum systems ARISTOMAT SL 131O 5 strip zones and 4 matrix zones 3-36 Material transport systems... -
Page 95: Aristomat Sl 1317
Vacuum systems ARISTOMAT SL 1317 5 strip zones and 7 matrix zones Material transport systems 3-37... -
Page 96: Aristomat Sl 1617
Vacuum systems ARISTOMAT SL 1617 6 strip zones and 7 matrix zones 3-38 Material transport systems... -
Page 97: Aristomat Sl 1625
Vacuum systems ARISTOMAT SL 1625 2 x 6 strip zones and 9 matrix zones Material transport systems 3-39... -
Page 98: Material Advance Systems
Material advance systems 3. Material advance systems Suction cups For the material advance function the bridge features an extrusion bar equipped with suction cups that hold the material by vacuum during the advance cycle. The vacuum cups are adjustable in their relative distance to each other and their clearance above the material. - Page 99 Material advance systems 1. turn the drives on with the green key on the operator panel. 2. drive the bridge to the end of the cutter table. 3. a) with NON conveyor machines the drives must be switched OFF when adjusting the suction cups! continue with para.
-
Page 100: Clamping Bar (For Conveyor Machines Only)
Material advance systems Clamping bar (for conveyor machines only) Note: The clamping bar is only applicable with materials, which could not or shall not suck in. For the material advance of this materials there is a clamping bar mounted to the bridge. During the advance cycle the bar lowers and squeezes the material lightly against the conveyor belt. - Page 101 Material advance systems Boardlifter (for conveyor machines only) This device is suitable for the automatic loading of the machine with stiff sheeted materials up to 10 mm thickness (~3/8 in). Sheet width and length depend on the machine model: ARISTOMAT SL 13xx: (W x L) max. 1200 mm x 1200 mm (47 1/4 in.
- Page 102 Material advance systems The board lifter operates with a vacuum system. The material pick up is by suction panel. For the optimal vacuum utilization in reference to the material width, the suction panel is divided into 6 evenly wide vacuum zones. Opening and closing the vacuum zones is with the vacuum slide.
- Page 103 Material advance systems • On the operator panel press the MENU key until the menu INFRACR.-X / BOARDLIFTER appears, then call the submenu BOARDLIFTER with the F4 key. • With F3 PUT ON a sheet delivery cycle is carried out: First a material advance with the conveyor belt is executed to clear the table top from any possible material remnants.
- Page 104 Menu Overview 4. Menu overview Only for the Boardlifter: in MAIN MENU press MENU to call the following submenue: 3-46 Material transport systems...
- Page 105 Menu Settings 5. Menu settings Switching on the VACUUM • In the main menu depress F2 VACUUM BLOW ON The vacuum pump switches to operating mode BLOW (F1), the material detaches from the table top and can easily be moved. Note: Hold on to the material to prevent it from sliding off the table.
- Page 106 Menu Settings LENGTH FEED LENGTH can be set from 0 mm up to full working area length. The feed is starting from the current position of the traversing bridge. It can also be started from the end of the table (see MORE, STARTPOINT). VACUUM DELAY Controls the delay time after turning off the blow and before starting the vacuum following the completion of the feed cycle.
- Page 107 Menu Settings PICK UP SUCTION ON F3 switches SUCTION ON and OFF. The suction cups pick up the material. PICK UP choose from PICK UP and LAY DOWN This function is used for a manual material advance. The vacuum switches to BLOW and the suction cups attach to the mate- rial.
- Page 108 6. Malfunctions When experiencing malfunctions with the material unwind device you may check the fol- lowing possible causes. If the error cannot be diagnosed and remedied please call your ARISTO service center. Unwinding device The motor runs continuously or not...
-
Page 109: Boardlifter (For Conveyor Machines Only)
Malfunctions Boardlifter Does not lift a sheet error message: ERROR BOARDLIFTER MOTOR PRESS ESC KEY TO CONTINUE • vacuum zones are not open - check whether vacuum zones are open • sensor does not feel a material sheet - the material stack is not properly set up - the sheets lay skewed Material transport systems... - Page 110 Malfunctions 3-52 Material transport systems...
- Page 111 Chapter 12 ARISTOMAT SL Safety Devices User's Manual...
- Page 112 © 2005 by ARISTO Graphic Systeme GmbH & Co. KG. Issue August 2005 Article number 0000 18857 E...
- Page 113 Contents Contents 1. Introduction ..................4 2. Overview ..................... 5 3. During operation ................6 4. Check Functions ................7 Light barrier ....................... 7 Collision shut-off ....................... 8 5. Adjustment of the light beam ............9 6. Maintenance ..................11 Safety Devices for ARISTOMAT SL 12-3...
-
Page 114: Introduction
Introduction 1. Introduction The ARISTOMATs are equipped with Standard light barriers or optionally with Safety light barriers (Category 2, EN 954-1) on both sides of the traversing bridge, for optical monitoring and recognition of obstacles (persons or objects) within the working area. If the light beam is interrupted by an obstacle, an EMERGENCY STOP is activated. -
Page 115: Overview
Overview 2. Overview Standard light barrier Safety light barrier, Category 2 (EN 954-1) (optional) Standard light barrier 1 Light barrier transmitter 2 Light barrier receiver 3 Collision Shut-off 4 Drives ON-switch Safety light barrier 1 Light barrier receiver 2 Light barrier transmitter 3 Collision Shut-off 4 Drives ON-switch Safety Devices for ARISTOMAT SL... -
Page 116: During Operation
During operation 3. During operation If the light beam is interrupted by an obstacle or the Collision Shut-off is pushed, an EMERGENCY STOP is activated. The drives of the ARISTOMAT are switched off immediately, the display shows the error message: EMERGENCY-STOP FAULT X-AXIS / AIR PRESSURE CAUTION: Before switching ON the drives again, first eliminate... -
Page 117: Check Functions
Check Function 4. Check Functions The correct function of the light barriers and the Collision Shut-off must be checked before each operation. Light barrier • For safety reasons, the drives must be switched OFF before loading material! • Place your material on the table. •... -
Page 118: Collision Shut-Off
Check Function Collision Shut-off The Collision Shut-off is mechanically connected to the light barriers. On contact with an obstacle, the crash pad (1) slides in front of the light beam (2). The light beam is interrupted and activate an EMERGENCY STOP. -
Page 119: Adjustment Of The Light Beam
Adjustment of the light beam 5. Adjustment of the light beam LED's are placed on top of the transmitters and receivers. If the light barriers are adjusted correctly, the LED's are ON. The red transmitter beam must hit the receiver. With optimum light reception, signal indicator is ON (see figure). - Page 120 Adjustment of the light beam The light barrier was adjusted correctly: Standard light barrier: The red LED on the receiver is ON and the drives can be switched ON. Safety light barrier: The green LEDs on the receiver and the transmitter are ON and the drives can be switched ON.
-
Page 121: Maintenance
Maintenance 6. Maintenance The light barrier and the Collision Shut-off do not require any maintenance. Possible wear is recognisable by a regular check of the safety device. Standard light barrier Before every operation: • check functions (see 4. Check functions) •... - Page 122 Maintenance 12-12 Safety Devices for ARISTOMAT SL...
Need help?
Do you have a question about the MAT Series and is the answer not in the manual?
Questions and answers
we are having difficulities with our Aristo Cutting Maschine....the online funtion is not working out because of the uv licht schranke