Table of Contents
Advertisement
Quick Links
Advertisement
Chapters
Table of Contents

Related Manuals for Philips VoiceTracer VTR5110


Summary of Contents for Philips VoiceTracer VTR5110
- Page 1 使用手册 User manual...
-
Page 3: Table Of Contents
目录 2.17 操作警告 3 您的对讲录音设备 1 欢迎 1.1 产品特点 4 开始使用 4.1 开 / 关机 2 重要须知 4.2 充电方法 2.1 安全 4.3 连接电脑 2.2 听力保护 2.3 有关安全与有效操作的重要警告 5 对讲设置 2.4 RF 射频操作特性 2.5 无线电辐射的安全性 2.6 天线使用注意 6 对讲录音 2.7 对讲机操作 2.8 电磁干扰... - Page 4 10 常见问题 无法启动本机: 本机无法录音: 本机无法播放录音: 11 技术参数 技术指标 尺寸和重量 系统要求 录音...
-
Page 5: 产品特点
1 欢迎 欢迎来到飞利浦世界!您能选择和购买飞利浦的产品,我们非 常高兴。您可在我们的官方网站上获得飞利浦公司的全方位技 术支持,如:使用手册、软件下载、保修信息等。 1.1 产品特点 • 使用高速 USB 2.0 快速存取录音文件和数据。 • 对讲功能 • 对讲录音 • 支持快速充电(5V1A)... -
Page 6: 重要须知
2 重要须知 • 特别需要注意,切勿将音量调至耳朵所能承受的范围之外。 • 切勿将音量调至盖过周边环境的声音。 • 在危险情况下请小心或暂停使用耳机。 2.1 安全 • 在驾驶汽车、骑自行车、玩滑板时,切勿使用耳机。否则会 导致交通意外,且违反相关法律法规。 • 为了避免短路,切勿将产品放置在触水受潮处。 • 不要将产品放在加热设备附近或阳光直射的地方。 • 请注意,切勿挤压电缆,特别是插头处。 2.3 有关安全与有效操作的重要警告 • 支持快速充电(5V1A) 在使用您的无线对讲机前,先阅读这些警告。 注意 关于危险环境中的使用,请参阅相关操作注意事项。 • 请使用厂家指定的充电器进行充电;若采用不合格或超 过 5V1A 参 数 规 格 的 充 电 器 进 行 充 电 将 会 对 机 器 造 成 损 2.4 RF 射频操作特性... -
Page 7: 天线使用注意
一旦发现有害干扰,应立即停止使用,并采取措施消除干扰 2.6 天线使用注意 后方可继续使用。 • 不得擅自更改发射频率,加大发射功率(包括额外加装射频 只能使用由飞利浦原配的或经认可的天线部件。 功率放大器),不得擅自外接天线或改用其它发射天线。 未经认可的天线,经改装或增添了附件的天线可能会损坏对讲 机或违反信息产业部无线电管理局的规定。 在使用时,不要用手去拿天线,握住天线会影响无限对讲机的 2.9 设备 有效通话范围。 为了避免电磁干扰 / 兼容性的冲突,在某些场所贴有通知要求 您关闭对讲机时,请遵守。在医院或医疗场所所使用的仪器对 2.7 对讲机操作 外来无线电的射频信号非常敏感,请关闭对讲机。 禁止在机场或飞行器上使用。 使用无线对讲机通话时,该无线对讲机维持垂直位置,麦克风 距离嘴部 5~7 厘米。 2.10 医学设备 2.8 电磁干扰 / 兼容性 心脏起搏器 建议对讲机与心脏起搏器之间的最小距离为 15 厘米。 备注:绝大部分现代化的电子设备是能屏蔽射频信号的,但是 带有心脏起搏器的人应该遵循以下规定: 可能会有某些电子设备不能够屏蔽您所使用的对讲机发出的射 • 当无线对讲机开机时应该时刻保持无线对讲机与心脏起搏器 频信号。... -
Page 8: 助听器
不要把对讲机或其它物品放在气囊上方或气囊展开范围内,气 2.11 助听器 囊充气时会带来很大的力量。 若放在气囊展开后能触及的区域, 当气囊展开时,对讲机或其它物品可能受很大的力量而抛出, 无线对讲机可能会干扰一些助听器。在这种情况下,您可以与 会造成汽车内乘客严重受伤。 您的助听器生产商协商讨论替代物。 2.15 爆炸危险区 2.12 其他医疗设备 除非是危险地区专用的对讲机 , 否则在潜在爆炸危险区内务必 如果您还使用其它个人医疗,请与制造商咨询决定它是否有足 关机。不要在该地区将对讲机中电池取出、安装或更换。在这 够的射频屏蔽。您的医生可以帮助您得到这些信息。 种地区即使您的电池发出微小的火花也可能会引起爆炸或火灾, 造成意外的伤害或甚至死亡。 2.13 安全驾驶 注意 查看您开车所在地使用对讲机的法律与规定并遵循。 • 以上所指的潜在爆炸危险区包括:燃料,船舶甲板下方, 当驾驶时使用对讲机,请遵循以下规定: 燃料,或化学制品运输或储存设施,能够闻到燃料气味的 • 全神贯注地驾驶与注意路况。 地方(例如,汽车或房间里发生了汽油 / 丙烷泄露),空 • 如果可能,尽量使用免持功能进行发话和收话。 气中含化学物质或其它颗粒(如含有颗粒,灰尘、金属粉 • 若有规定禁止驾驶时使用对讲机,请先将车开至路边停下, 末等)的地区,以及建议您关闭汽车引擎的任何其它地区。 再进行通话。... -
Page 9: 雷管区
2.16 雷管区 为避免干扰爆破作业, 在电动雷管附近或 “爆破区” 、 或标示 “请 关闭无线对讲机”的地区,务必关闭您的对讲机。如有其它类 似的标语或指示,也请您遵守。 2.17 操作警告 • 天线 : 不可使用任何天线损坏的无线对讲机。损坏的天线与 皮肤接触时,可能会造成轻微的灼伤。 • 防止磁化 : 对讲机扬声器的外磁性很弱,但请保持您的对讲 机与电视机,电脑显示器等屏幕之间的距离大于 10 厘米, 以免被磁化。... -
Page 10: 您的对讲录音设备
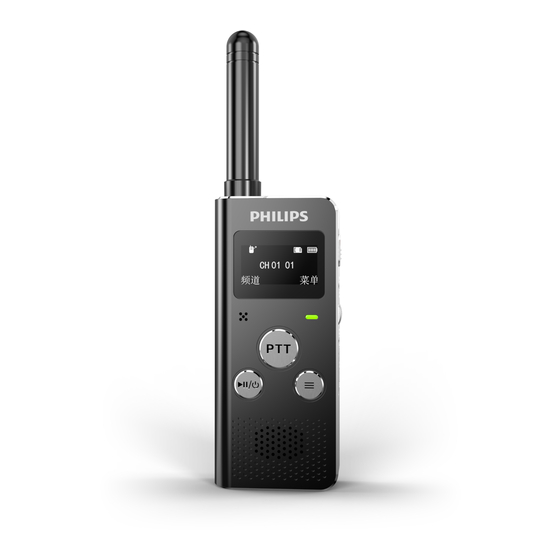
3 您的对讲录音设备 天线 背夹 屏幕 概览: 麦克风 PTT(通话)键 播放 / 暂停 / 电源键 喇叭 耳机孔 录音键 指示灯 音量键 菜单键 TF 卡槽... -
Page 11: 开始使用
4 开始使用 注意 • 此后,本机的开机 / 关机由“播放”键控制,具体如下。 4.1 开 / 关机 • 关机:在开机状态下,长按“播放”键直到显示“PHILIPS” 关机。 • 开机:在关机状态下,长按“播放”键开机,直至屏幕上 注意 显示开机画面“PHILIPS”。 第一次使用机器时,请对该机器充电三小时以确保机器有电工 作! (1) 长 按 “ ” 键, 对 讲 本 机 自 动 开 机。 显 示 “PHILIPS”,如下图所示。 然后进入对讲机界面,如下图所示。 提示 • 本机使用内置锂电池供电,如果长时间不使用本机,请关... -
Page 12: 充电方法
提示 4.2 充电方法 • 使用专用充电器充电,机器还可正常工作。 (1) 使用 USB 数据线将本机与 PC 相连接,如下图所示。 4.3 连接电脑 当插入 TF 卡时,本机可作为大容量的 USB 存储设备,并可方 便地对文件进行存储、备份和移动。可使用 USB 数据线将本机 与电脑相连,且无须安装软件,本机会自动显示为可移动设备, 连接电脑图标如下图所示。 (2) 使用专用充电器充电。当采用以上方法连接后,本机进入充 电状态。电量指示标志由空到满循环变化,表示本机现正处 于充电状态, 一般情况下, 充满电需要 2 小时左右。 充满电时, 在文件移入或移出本机时,请不要断开本机与电脑的连接。 电池符号显示满格,机器显示已充满,如下右图所示。... -
Page 13: 对讲设置
5 对讲设置 当您初次使用对讲机时,请注意本节中的内容说明。 (1) 按住 PTT 键,与麦克风保持 5 到 7 公分距离,以正常语速 开机状态下同频道的对讲机才可以进行对讲。 通话。当显示屏的图标 出现时,可以发送信息,如下左图。 使用前请预先将要通信的 2 台机器设置为同样的频道以及相同 为了避免切断了您的通话内容,按下 PTT 按钮稍微停顿后,然 的亚音码。如下图。 后再开始说话。当你完成通话时,松开 PTT 键。你可以接收到 来自其他人的呼叫,当接收到信号时,图标 会在屏幕上显 示,如下右图。 注意 • 在对讲机界面,请不要使用其他耳机,务必使用随机配送 的专用耳机,防止损坏对讲机。... - Page 14 音码。如下图。 设置界面说明: (2) 你可以通过机器侧面的上下滚动键调节对讲机音量。首先 把音量键往里按压一下,则会弹出音量调节界面,然后通过上 下拨动音量键来加减音量,参考界面如下图: 频道 (3) 在对讲机界面,短按 PLAY 键,可进行频道设置。向上或向 亚音码 (00 即为关闭亚音码 ) 下拨动音量键选择你需要的频道及亚音码即可。一共 20 组 在对讲机界面,短按菜单键可以进入系统菜单。菜单选项如下: 频道,99 个亚音码可选择。当亚音码数字为 00 时,关闭亚...
- Page 15 功能设置,时间设置,语言选择,对比度,固件版本,恢复出 录音回放:播放您的录音文件。 厂设置。参考界面如下: (2) 时间设置 如上图选中“时间设置”菜单,再按菜单键,将会进入到时 间设置选择菜单,参考界面如下图所示: 向上或向下拨动音量键调整日期,短按播放键选择下一个设置 (1) 功能设置 项,短按菜单键确定设置。 如上图选中“功能设置”菜单,再按菜单键,将会进入到功 能设置选择菜单,你可以选择你需要的功能,参考界面如 下图所示: 对讲机:进入对讲机模式。 MP3:播放您 TF 卡上的音乐文件...
- Page 16 (3)语言选择 (5) 固件版本 选中“语言选择”菜单,再按菜单键,将会进入语言选择菜单, 固件版本选中“固件版本”菜单,再按菜单键,将会进入到 参考界面如下图所示: 固件版本,参考界面如下图所示: (4) 对比度 (6) 恢复出厂设置 选中“对比度”菜单,再按菜单键,将会进入到对比度设置 菜单,参考界面如下图所示:: 选中“恢复出厂设置”菜单,再按菜单键,将会进入恢复出 厂设置界面,参考界面如下图所示: 向上或向下拨动音量键调整适合的对比度,短按播放键或菜单 键确定设置。 短按播放键取消恢复出厂设置,短按菜单键后,机器的参数将...
- Page 17 恢复到机器出厂设置值,您的设置数据将被重置。...
-
Page 18: 对讲录音
6 对讲录音 录音文件名 录音时间 录音状态 (1) 在对讲机界面把录音键拨到录音状态开始录音,请将内置 电量指示 麦克风对准音源。 TF 卡存储器 (2) 在录音状态下, 当您按下 PTT 按键或接收到其他人的信号时, 对讲状态指示 机器会自动开始录音, 否则会暂停录音。 若要保存录音文件, 只需向下推动录音键即可,并回到对讲机界面 注意 录音参考界面如下如所示: • 电池标记符显示空格时, 表明低电。 低电时系统会自动关机。 如果正在录音,系统自动保存录音文件后再关机。电量不 足时,请及时充电。低电关机时提示的图标如下所示。 录音界面说明... - Page 19 提示 • 当一个录音文件夹存满 200 个后,要再进行录音,请先删 除一些不必要的文件再录。 • 当录音时间超过本机用容量或达到最大 200 个文件数量的 上限时,录音停止。请删除部分录音或将其移至电脑。 • 录音时请勿断电,否则这会导致本机故障,录音文件丢失 或录音文件损坏等问题。 • 如果需要长时间录音,请在录音前充电。...
-
Page 20: Mp3 模式
7 MP3 模式 在对讲机界面下,你可以短按菜单键,选择“功能设置”,然 后选择“MP3”,短按菜单键确认进入。MP3 停止界面参考图片 如下图所示: 短按播放键进入音乐播放界面,音乐播放参考界面如下图所示: 文件播放界面说明: 当前文件数 对讲 / 播放状态指示 电量指示 文件名 当前文件总时间 当前播放时间 文件总数... -
Page 21: 音乐播放
在音乐暂停 / 停止界面,短按播放键播放,短按菜单键弹出如 音乐播放 下播放菜单列表:功能设置、删除文件、删除全部。参考界面 如下: (1) 按“播放”键开始播放。 (2) 先把音量键往里按压一下,则会弹出音量调节界面,然后 通过上下拨动音量键来加减音量。 (3) 长按“播放”键结束播放。在停止播放状态下,短按“菜单” 键可进入音乐菜单设置界面。 (4) 播放过程中,按“播放”键暂停播放,再次按下“播放”键, 将继续先前位置的播放。 ” (5) 播放时长按“ ”或“ 键,可快退或快进当前正在 (1) 功能设置 播放的文件。 如上图选中“功能设置”菜单,再按菜单键,将会进入到功能 (6) 在音乐播放界面, 您仍可使用对讲机功能, 但不能设置频道。 选择菜单,你可以选择你需要的功能,参考界面如下图所示: 当您需要对讲时,按下机器的”PTT”按键即可进行对话。 当音乐播放时,如果收到呼叫,机器会自动暂停播放音乐。 对讲结束后,若您需要继续播放音乐,需再次按下“播放” 键来继续播放音乐。 提示 • 当耳机插入插孔内,本机扬声器被关闭。 • 当您插入的不是随机所附赠的耳机时,将不能使用对讲功 能。... - Page 22 短按播放键取消删除文件,按菜单键删除全部文件。 (2) 删除文件 长时间不设置,删除界面也会自动退出 在音乐菜单列表中选择“删除文件”菜单,再按菜单键删除 当前文件。参考界面如下图: 短按播放键取消删除文件, 按菜单键删除当前文件。 长时间不设置,删除界面也会自动退出。 (3) 删除全部 在音乐菜单列表中选择“删除全部”菜单,再按菜单键删除 全部文件。参考界面如下图:...
-
Page 23: 录音回放模式
8 录音回放模式 在对讲机界面下,你可以短按菜单键,选择“功能设置”,然 后选择“录音回放”,短按菜单键确认进入。录音回放停止界 面参考图片如下图所示: 短按播放键进入录音回放界面,音乐播放参考界面如下图所示: 当前文件数 对讲 / 播放状态指示 电量指示 文件名 当前文件总时间 当前播放时间 文件总数... - Page 24 在录音回放 / 停止界面,短按播放键播放,在播放暂停过程中, (2) 删除文件 短按菜单键,弹出如下播放菜单列表:功能设置、删除文件、 删除全部。参考界面如下: 在音乐菜单列表中选择“删除文件”菜单,再按菜单键删除 当前文件。参考界面如下图: (1) 功能设置 短按播放键取消删除文件,短按菜单键删除当前文件。 如上图选中“功能设置”菜单,再按菜单键,将会进入到功 能选择菜单,你可以选择你需要的功能,参考界面如下图 (3) 删除全部 所示 在音乐菜单列表中选择“删除全部”菜单,再按菜单键删除 全部文件。参考界面如下图: 短按播放键取消删除,短按菜单键删除当前文件夹全部文件。...
-
Page 25: 普通录音模式
9 普通录音模式 (1) 在 MP3 界面或者语音回放界面,把录音键拨到录音状态开 始录音 (2) 把录音键拨到停止状态结束录音,并回到当前录音文件的 停止播放界面。 录音参考界面如下如所示: 录音文件名 录音时间 录音状态 电量指示 录音界面说明: TF 卡存储器... - Page 26 10 常见问题 此处列举了常见问题的解答, 可帮助解决本机出现的简单问题。 如果故障仍无法排除,请咨询经销商或访问我们的官方网站: www.philips.com/support 无法启动本机: 电池电量已耗尽请及时充电。 本机无法录音: 超出本机允许的最大文件数量或本机存储空间已满。请删除部 分录音或将其移至外部存储设备。 本机无法播放录音: (1) 电池电量已耗尽,请充电。...
- Page 27 11 技术参数 接口:USB 接口 技术指标 录音 频率范围:409 – 410MHZ 比特率为 352kbps,格式为 WAV 发射功率:0.5W 运行条件 额定电压:DC 3.7V 温度:5° –45° C 频率组合:锁相环频率合成 空气湿度:10% – 90%, 不凝结 记忆频道:20 个频道 工作方式:同频单工 发射电流:400MA 灵敏度:≤ -123 dBm (14dB SINAD) CTCSS/DCS:99 组 尺寸和重量 长 × 宽 × 高:130×33.5×21 (mm) 重量...
- Page 28 Content 4.Start to Use 4.1 Power On/Off 4.2 Battery Charging 1.Welcome 4.3 Connect to Computer 1.1 Product Features 5.WALKIE TALKIE Setting 2.Important 2.1 Safety 2.2 Hearing Protection 6.WALKIE TALKIE Recording 2.3 Hearing Protection 2.4 Operating characteristics of RF (radio frequency) 2.5 Safety of wireless radiation 7.MP3 Mode 2.6 Notice for use of antenna...
-
Page 29: Welcome
1.Welcome Welcome to Philips World! We are very pleased that you can choose and buy Philips products. You can get Philips’ full-scale technical support on our official website, such as manuals, software downloads, warranty information, and more. www.philips.com 1.1 Product Features •... -
Page 30: Important
2.Important 2.2 Hearing Protection Observe the following guidelines when using your 2.1 Safety headphones: • Adjust to suitable volume; do not use the earphones for a • To avoid a short circuit, do not expose the product to rain long time. or water. -
Page 31: Operating Characteristics Of Rf (Radio Frequency)
2.6 Notice for use of antenna normally operating. Only use the original Philips antenna component . • It is prohibited to interconnect with public telephone network, public mobile communication network and other Unapproved antenna, refitted antenna or antenna added with telecommunication networks. -
Page 32: Equipment
the transmitting power (including equipping the additional intercom and the cardiac pacemaker, turn off the intercom radiofrequency power amplifier) without authorization; do immediately. not use external antenna or other transmitting antennas. 2.11 Hearing-aid 2.9 Equipment The intercom may interfere some hearing-aids. Under this To avoid conflict of electromagnetic interference/ compatibil- condition, you may negotiate a substitute with your hearing- ity, if you receive an announcement of requiring you to turn... -
Page 33: Operation Cautions
if possible. Note • If it is prohibited to use intercom during driving, please drive to the side of the road prior to communication. • The above-mentioned potential explosive dangerous zone includes: fuel, below ships’ deck, fuel, or a facility for transporting or storing chemical products, a place where 2.14 Operation cautions you smell fuel (e.g. - Page 34 When a broken antenna touches the skin, it may cause slight burn. • Prevent magnetization: although the external magnetism of the intercom loudspeaker is weak, please keep your intercom at least 10cm away from sensitive devices like debit/credit cards to avoid magnetization.
-
Page 35: Your Voice Tracer
3.Your Voice Tracer Antenna Mounting Clip Display Microphone Overview: PTT button (call) Play / Pause / Power Speaker Headset Jack Record Indicator Volume up/down Menu button TF card... -
Page 36: Start To Use
2.At this moment, the device’s On/Off is controlled by the Play button as follows: Switch Off: When in the power-on state, press down the Play button until the “PHILIPS” is displayed, then the device is 4.2 Battery Charging switched off. -
Page 37: Connect To Computer
enters the charging status. The battery indicator shows a battery icon turning from empty to full repeatedly, indicating that the device is recharging. Under normal circumstance, the device can be fully recharged in around 2 hours. When the device is fully charged, the battery icon is full which indicates that it is fully recharged, as shown below. -
Page 38: Walkie Talkie Setting
5.WALKIE TALKIE Setting Please note the instructions in this chapter for the first use of the intercom. Note • Please use the original earphones to avoid damaging the intercom. 1. Press the PTT button, keep 5~7cm distance away from the microphone, and speak normally. The icon indicates that you are transmitting, as shown below. - Page 39 below. and CTCSS you need. There are 20 frequency channels and 99 CTCSSs you can choose. When the figure of CTCSS is 00, the CTCSS will be turned off. Setting interface information: 2.You can adjust the walkie talkie volume through the up-and- down scroll button on the side of the device, as shown below.
- Page 40 firmware version, and restore factory setting. The referencing Record Replay: play your recording files. interface is as follows: (2) Time Setting Choose “Time Setting” menu and pressing Menu button will enter the Time Setting option menu. Move the volume button upward or downward to adjust the (1) Function Setting date, short press PLAY button to choose the next setting item and short press Menu button to confirm the setting.
- Page 41 (4) Contrast Ratio Choosing “Contrast Ratio” button and pressing Menu button will enter the Contract Ratio Setting menu. (6) Restore Factory Setting Move the volume button upward or downward to adjust Choose “Restore Factory Setting” menu and pressing Menu the proper contrast ratio, short press PLAY button or Menu button will enter the restore factory setting interface.
-
Page 42: Walkie Talkie Recording
6.WALKIE TALKIE Recording 1.In walkie talkie interface, move the Record button to recording status to start recording. Please direct the built- in microphone to the audio source. 2.In recording status, when you press the PTT button or receive messages from others, the device will start to record automatically, otherwise the recording will be paused. - Page 43 Hint: • If the recording time exceeds the usable capacity of the device or the number of files reaches the limit of 200, the recording stops. Please delete part of recording or delete files from the device’s memory • When the device is in the recording mode, please do not turn off the power, otherwise it will cause the device failure, recording file loss or recording file damage.
-
Page 44: Mp3 Mode
7.MP3 Mode Current file number Intercom/play mode indicator Battery indicator Under the intercom interface, you can short press the Menu File name button, choose “Function Setting” and choose “MP3”, short Total time of current file press the Menu button to confirm . Current played time Total number of files 7.1 Play Mode... - Page 45 communication, if you need to continue playing music, press the “PLAY” button again to continue playing music. (1) Delete File Hint: • When the earphone plug is inserted into the jack, the Choosing “Delete File” menu in music menu list and pressing loudspeaker of the device will be turned off.
- Page 46 (2) Delete All Choose “Delete All” menu in music menu list and pressing the Menu button to delete all files. Short press PLAY button to cancel deleting files and press Menu button to delete all files. If you do not set anything for a long time, it will automatically exit the delete interface.
-
Page 47: Audio Recording Mode
8.Audio Recording Mode 1.In MP3 interface or recording replay interface, move the Record button to recording status to start recording. 2.Move the Record button to stop status to stop recording and return to the stop playing interface of current recording file. The referencing recording interface is as follows: Recording file name Recording length... -
Page 48: Frequently Asked Questions (Faq)
If the problem cannot be solved, please contact the dealer or visit our official website: www.philips.com/support 9.1 The device cannot be switched on: The battery is empty, please recharge promptly. 9.2 Recording cannot be started: The maximum storage capacity of the device is exceeded. -
Page 49: Technical Parameter
10.Technical Parameter 10.4 Recording Bit rate: 352kbps 10.1 Technical index Recording Format: WAV Operational Condition Range of frequency: 409.000-410.000MHZ Temperature: 5° - 45°C Nominal voltage: DC 3.7V Air Humidity: 10% - 90%, Non-condensing Frequency synthesis: Phase-locked loop frequency synthesis Number of Communication channels: 20 channels Communication: same-frequency simplex or different-fre- quency simplex Sensitivity: ≤-123 dBm (14dB SINAD) - Page 50 VTR5110...
- Page 52 Register your product and get support at © 2018 Speech Processing Solutions GmbH. 版权所有文档版本 1.0, 2018/06/05 www.philips.com/welcome...
Need help?
Do you have a question about the VoiceTracer VTR5110 and is the answer not in the manual?
Questions and answers