Table of Contents
Advertisement
Advertisement
Table of Contents

Related Manuals for embrace TALK


Summary of Contents for embrace TALK
- Page 1 User’s Manual Manual De Usuario...
-
Page 2: Understanding Your New Blood Glucose Monitor
Dear Embrace TALK Owner Thank you for choosing the Embrace TALK Blood Glucose Monitor to help you manage your diabetes. We designed the Embrace TALK Blood Glucose Monitor to be accurate and easy to use. The added convenience of the bi-lingual talking feature can be used as a verbal aid for using the monitor. -
Page 3: Table Of Contents
Blood Glucose Monitoring System Table of Contents Understanding Your New Blood Glucose Monitor ......1 The Embrace TALK Monitor .............5 The Embrace TALK Blood Glucose Test Strip ........7 Monitor Display Screen ..............8 Setting Up Your New System The Set Up Screen .................10 Setting the Clock ................ - Page 4 Blood Glucose Monitoring System Understanding Your Blood Glucose Test Results .......36 Viewing Stored Readings and 7, 14, 30 Days Average ....39 Caring For The Monitor Changing the Battery ..............41 Cleaning the Monitor ..............43 Storage and Precautions ..............43 Solving Problems ................44 Product Warranty ................47 Specifications .................47...
- Page 5 Blood Glucose Monitoring System Understanding Your New Blood Glucose Monitor Embrace TALK Blood Glucose Monitor may be sold individually or as part of a complete Monitoring System (starter kit). Package contents are described in the table below. CONTENTS PACKAGE CONFIGURATION...
-
Page 6: The Embrace Talk Monitor
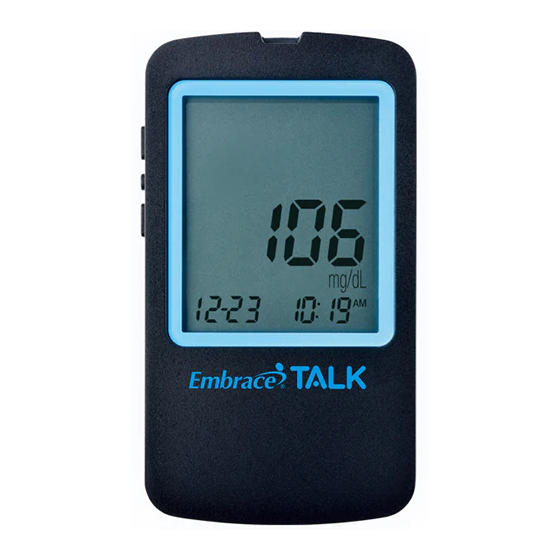
Blood Glucose Monitoring System Front of the Embrace TALK Monitor Test Strip Port Insert test strip to turn on the Monitor. Monitor Display Monitor Buttons Show your blood Press and hold the glucose test results, middle button located memory values,... - Page 7 Blood Glucose Monitoring System Back of the Embrace TALK Monitor Data Port This function is not yet available. BATTERY COVER TABS USED FOR REMOVING BATTERY COVER. Battery Compartment Holds two AAA batteries battery cover.
-
Page 8: The Embrace Talk Blood Glucose Test Strip
The Embrace TALK are glucose specific, biosensor-based test strips that requires very little blood sample to quickly test glucose in fresh capillary whole blood. The test results are plasma-calibrated for an easy comparison to lab results, but may be 10 to 15% higher than results obtained from whole blood referenced blood glucose analysis. -
Page 9: Monitor Display Screen
Blood Glucose Monitoring System Monitor Display Screen HORN CABLE BATTERY TEMPERATURE CLOCK ALARM LANGUAGE SELECTION UNITS TEST STRIP BLOOD DROP and ARROW Display of the date, time, am/pm of past and present blooding readings. As well as the day averages 7, 14, or 30 (see page 38). - Page 10 Blood Glucose Monitoring System CABLE ....Indicates the Monitor is in data transfer mode to PC*. *This function is not available yet. MEM ....Blood glucose readings are stored (see page 38). ALARM ....To set Alarm or indicates Alarm has been set (see page 14).
-
Page 11: The Setup Screen
Setting Up Your New Monitor The Setup Screen The Setup Screen of the Embrace TALK Monitor allows you take advantage of the advance functions of this Monitor. Simply press and release the middle button for setup screen. Use the ▲▼ buttons to navigate to the desired function icon. -
Page 12: Setting The Clock
You will need: Your Embrace TALK Monitor NOTE: If the date and time on the Embrace TALK Monitor has not been set, test or control result will not be stored in memory. Step 1: Press and hold the middle button to turn on the monitor. - Page 13 Blood Glucose Monitoring System Step 4: Set Month: The current month will flash. If the talking feature is on, the monitor will say, “Set Month.” Press the up or down button to reach the desired month. Once the desired month is reach press and release the middle button.
- Page 14 After date and time have been set, the monitor will announce the year, date and time if the talking feature is on. Begin testing by inserting an Embrace TALK Blood Glucose Test Strip (see page 29, Testing Your Blood Glucose), or press and hold the middle button to turn off the monitor, or see the next section on how to set up the alarm feature on your monitor.
-
Page 15: Setting The Alarm
Blood Glucose Monitoring System Setting the Alarms You can set up to three alarms on the Embrace TALK Monitor. You must set the clock before you can set the alarms. When an alarm sounds, the Monitor will turn on, and a melody will sound for 30 seconds. - Page 16 Blood Glucose Monitoring System (AM or PM) will be determined by setting the hour. By pressing and releasing the top or bottom and passing the 12 will change (AM to PM) or (PM to AM). Press and release the middle button to set the hour.
-
Page 17: Talking And Horn Function
Blood Glucose Monitoring System Begin testing by inserting an Embrace TALK Blood Glucose Test Strip (see page 29, Testing Your Blood Glucose) or press and hold the middle button to turn off the monitor, or see the next section on how to turn on or off the talking feature on your monitor. - Page 18 Blood Glucose Monitoring System Press and release the top or bottom button to turn UP or DOWN the volume. (1 being lowest volume and 5 being loudest volume) Once the desired volume is reached press and release the middle button to set the desired volume.
- Page 19 Language and exit the Language Selection Option. NOTE: • Anytime during set up you can insert an Embrace TALK Test Strip and begin testing. Any changes made so far are stored. • Your choice of language and volume settings will not be erased when changing batteries.
-
Page 20: Talking Function Table
Blood Glucose Monitoring System Talking Function Table The talking function can be used as an aid for you to hear the test results and use of the monitor. The following table lists WHEN the monitor will speak and WHAT the monitor will say. Testing Blood and Control Solutions (see page 24, Control Solution Testing, and page 29, Testing Your Blood Glucose). - Page 21 Blood Glucose Monitoring System WHEN the Monitor will speak... WHAT the Monitor will say... Performing a Control solution test. L1/L2 Control Solution Test please apply Control Solution onto the test strips. Temperature is outside of testing “Temperature is out of range” range( 50°F~104°F) When monitor is turned on or Melody...
- Page 22 Blood Glucose Monitoring System Setting Monitor Functions via the Setup Screen (see page 10, “Setting Up Your New System”) Press and release the middle button to enter the Monitor Set Up Screen. WHEN the Monitor will speak... WHAT the Monitor will say... “Memory Recall”...
- Page 23 Blood Glucose Monitoring System WHEN the Monitor will speak... WHAT the Monitor will say... During date and time setup, “Set Year” setting up the year During date and time setup, “Set Month” setting up the month During date and time setup, “Set Date”...
- Page 24 Blood Glucose Monitoring System OTHER WARNING MESSAGES (see page 44, Solving Problems) WHEN the Monitor will speak... WHAT the Monitor will say... Monitor Failure “Error 1 Monitor Failure” Used Test Strip “Error 3 Used Test Strip” Not Enough Blood or Control “Error 4 Not Enough Sample”...
-
Page 25: Control Solution Testing
Control Solution Testing when: • Using the monitor for the first time • Using a new bottle of Embrace TALK Blood Glucose Test Strips • You left the test strip bottle cap open for a while • You dropped the monitor •... -
Page 26: Performing A Control Solution Test
Place 2 drops of control solution on the clean glass/plastic plate. Replace the cap on the control solution bottle IMMEDIATELY. Step 2: Take out an Embrace TALK Test Strip and close the lid IMMEDIATELY. IMPORTANT: • Check the expiration date printed on the test strip bottle and its package. - Page 27 Blood Glucose Monitoring System a dry, cool place. • Record the “date opened” on the bottle label. Discard the bottle and any remaining test strip after 6 months from date of opening. • Make sure you are testing in an environment between 50°F~104°F and relative humidity less than 85%.
- Page 28 Blood Glucose Monitoring System After 6 seconds the control solution reading will be displayed on the display screen. Step 5: Compare the reading on the screen to the control solution range on the bottle of test strips. If the number displayed on the monitor is within the Level 1: 53~79 L1 number range printed on the test strip Bottle, the Level 2: 135~203...
-
Page 29: Control Solution Trouble Shooting
Possible Causes What you can do • Wrong brand of Control • Make sure you are using Embrace Solution being used TALK Control Solution. • Control Solution not at room • Make sure the testing environment temperature is between 50°F to 104°F, <85%... -
Page 30: Testing Your Blood Glucose
Testing Your Blood Glucose Materials you will need: Your Embrace TALK Monitor A new Embrace TALK Test Strip Lancing device with a clean, unused lancet (or safety lancets) Clear cap for Alternate Site Testing (AST) on palm and forearm (optional) Before you begin, make sure: •... -
Page 31: Preparing Your Lancing Device
Blood Glucose Monitoring System Preparing Your Lancing Device Embrace Lancing Device included in Starter Kit only (see page 4). Step 1: Twist off the adjustable cap counter clock wise and insert a clean unused lancet as shown. Step 2: Twist the protective cover off the lancet exposing the needle. -
Page 32: Performing A Blood Glucose Test
Wash hands with soap and warm water. Rinse and dry hands thoroughly. Step 3: Take out an Embrace TALK Strip from the test strip bottle and close the lid IMMEDIATELY. Step 4: Insert test strip. A flashing blood drop and arrow icon will appear on the Monitor display screen. - Page 33 Blood Glucose Monitoring System Step 5: Set the lancing device to the desired puncture depth (1 being less deep-5 being deepest). Pull blue end of lancing device until you hear a click. Hold the lancing device against the side of your finger and press the small blue button located in the middle of the lancing device to create the puncture.
- Page 34 Blood Glucose Monitoring System Step 7: Remove the used test strip and lancet and discard according to your local disposal regulations where applicable. The monitor will automatically shut off in 2 minutes. TIP: • Gently massage your hand and finger toward the puncture site to form a blood drop.
-
Page 35: Important Information On Alternate Site Testing (Ast)
Blood Glucose Monitoring System Important Information on Alternate Site Testing (AST) The Embrace TALK Blood Glucose Monitor can test for blood glucose other than your fingertip such as palm and forearm (alternate site testing, or AST). Alternate site testing can be less... - Page 36 Blood Glucose Monitoring System NOTE: • Rubbing forearm until warm before lancing will help minimize the difference with fingertip test results. The palm (at the base of the thumb) does not require rubbing before testing. • If results from alternate site testing do not agree with how you feel, use fingertip testing instead.
-
Page 37: Understanding Your Blood Glucose Test Results
Blood Glucose Monitoring System When blood is present lift the lancing device straight up not to smear the blood. Palm testing (at the base of the thumb) does not require the suction method. 1. Jungheim K., Koschinsky T.: “Risky delay of hypoglycemia detection by glucose monitoring at the arm.”... - Page 38 Blood Glucose Monitoring System What to do if you get a high or low reading If the monitor displays results that are “HI” or “LO,” or you get a result that is more than 250 mg/dL or below 50 mg/dL AND you feel ill: •...
- Page 39 Blood Glucose Monitoring System Viewing Your Monitor's Memory Your Embrace TALK monitor automatically stores up to 300 test and control results with date and time. The monitor also provides 7, 14, and 30 days averaging to help track your blood glucose trend. You must set up your monitor to use the memory and day averaging function, see “Setting Up Your New System”...
-
Page 40: Viewing Stored Readings And 7, 14, 30 Days Average
Blood Glucose Monitoring System Viewing Stored Readings and 7, 14, 30 Days Average from Memory You will need: Your Embrace TALK Monitor Step 1: Press and hold the middle button to turn on the monitor. Step 2: Press and release the middle button to enter the set up screen. - Page 41 Blood Glucose Monitoring System The number of results included in the averages is shown right next to icon. Press and release the middle button to exit the Memory Recall Screen. nil will appear on the display screen after the last recorded test result if less then 300 readings are stored.
-
Page 42: Caring For The Monitor
• You can begin testing anytime by inserting a test strip Caring for the Monitor Caring for your Embrace TALK monitor is easy. Follow these simple guidelines to keep your monitor working properly. Changing the Battery Batteries need to be changed when the icon appears on the monitor display. - Page 43 Blood Glucose Monitoring System Step 1. Pull back and up at the same time on the tabs at the top of the battery cover to remove the battery cover. Step 2. To insert the new batteries. The top battery, The positive (+) end will face to the left.
-
Page 44: Cleaning The Monitor
Blood Glucose Monitoring System Cleaning the Monitor • If the monitor gets dirty, use a moist (NOT WET) lint-free cloth dampened with a mild detergent • Do not get water inside the monitor or hold it under running water • Do not use glass or household cleaners on the monitor •... -
Page 45: Solving Problems
Blood Glucose Monitoring System Solving Problems This section details the significant display screen messages and error codes you will encounter when using your Embrace TALK Monitor and test strips. All warranty claims must be directed to Omnis Health, LLC. The warranty applies only to the original purchaser of the system. - Page 46 Blood Glucose Monitoring System What What the What it What you you see Monitor says means should do “Error 1 The monitor Remove and put back in Monitor electronics are the batteries and turn the Failure” damaged monitor back on. If problems persists, call us at 1-877-979-5454 “Error 3 used...
- Page 47 Blood Glucose Monitoring System What What the What it What you you see Monitor says means should do HI “Your Test result is Wash and dry your hands blood glucose higher than and repeat the test on your reading is 600 mg/dL fingertip with a new test above 600...
-
Page 48: Product Warranty
1000 tests of continuous use or 1 year Automatic Power-off: After 2 minutes of non-use Operating Temperature: 50°F~104°F Relative Humidity: Less than 85% Storage Condition: Monitor at 39°F~122°F Test Strips at 39°F~86°F For additional information, refer to the Embrace TALK Test Strip insert. - Page 49 1-877-979-5454 www.EmbraceTalk.com /embracemeter @embracemeter Manufactured for: Fabricado para: 1309 Elm Hill Pike, Nashville, TN 37210 www.EmbraceTalk.com P/N 65070000489 Rev.1/20...
Need help?
Do you have a question about the TALK and is the answer not in the manual?
Questions and answers
Can venous blood be used for testing?