Advertisement
Owner's Manual &
Safety Instructions
20d
Model
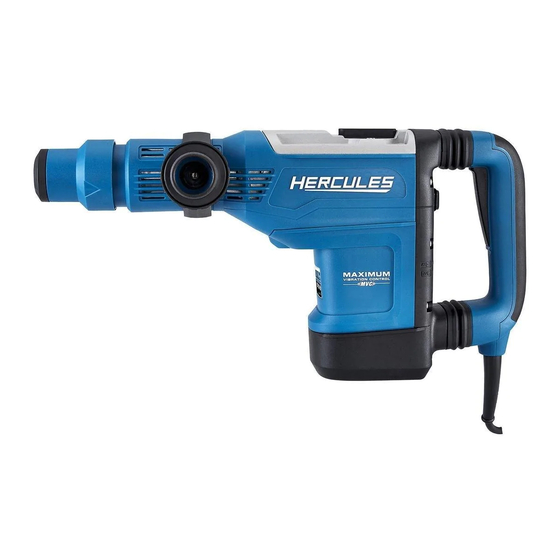
HE35
1-7/8" SDS Max-Type Rotary Hammer
WARNING:
To prevent serious injury,
User must read and
understand Owner's Manual. SAVE THIS MANUAL.
When unpacking, make sure that the product is intact and undamaged.
If any parts are missing or broken, please call 1-888-866-5797 as
soon as possible. Reference 56845. Bit sold separately.
Advertisement
Table of Contents

Related Manuals for Hercules HE35


Summary of Contents for Hercules HE35
- Page 1 Owner’s Manual & Safety Instructions Model HE35 1-7/8" SDS Max-Type Rotary Hammer WARNING: To prevent serious injury, User must read and understand Owner’s Manual. SAVE THIS MANUAL. When unpacking, make sure that the product is intact and undamaged. If any parts are missing or broken, please call 1-888-866-5797 as...
-
Page 2: Important Safety Information
IMPORTANT SAFETY INFORMATION GENERAL POWER TOOL SAFETY WARNINGS Personal safety 1. Stay alert, watch what you are doing and use Read all safety warnings and all instructions. common sense when operating a power tool. Failure to follow the warnings and instructions may result Do not use a power tool while you are tired in electric shock, fire and/or serious injury. - Page 3 3. Disconnect the plug from the power source 11. Do not lay the tool down until it has come to before making any adjustments, changing a complete stop. Moving parts can grab the accessories, or storing power tools. surface and pull the tool out of your control. Such preventive safety measures reduce the 12.
-
Page 4: Grounding Instructions
Extension Cords GROUNDING INSTRUCTIONS 1. Grounded tools require a three wire extension cord. Double Insulated tools can use either a two or three wire extension cord. TO PREVENT ELECTRIC SHOCK AND 2. As the distance from the supply outlet increases, DEATH FROM INCORRECT you must use a heavier gauge extension cord. -
Page 5: Specifications
Warning Symbols and Definitions SPECIFICATIONS This is the safety alert symbol. It is used to Electrical Rating 120VAC / 60Hz / 14A alert you to potential personal injury hazards. Obey all safety messages that follow this symbol to Rotational Speed 150-320 RPM avoid possible injury or death. - Page 6 Adjust the Mode Selector to the desired function before OPERATING INSTRUCTIONS using the Rotary Hammer. Rotate the Mode Selector until it clicks in place with the desired function at the Indicator. Read the ENTIRE IMPORTANT SAFETY NOTICE: Move the Mode Selector only when the INFORMATION section at the beginning of Motor is stopped.
- Page 7 Masonry Drilling Chiseling Changing Drill Bits Changing Chisel Bits CAUTION! Wear heavy-duty work gloves to provide 1. Check Bit for dullness, cracks, or other damage. protection when inserting and removing drill bits. Drill bits become very hot during use. Do not remove drill bits until the bit has cooled.
-
Page 8: Maintenance And Servicing
Cleaning, Maintenance, MAINTENANCE AND SERVICING and Lubrication Procedures not specifically explained in this manual must be performed only by a 1. bEFORE EACH USE, inspect the general condition qualified technician. of the tool. Check for loose hardware, misalignment or binding of moving parts, cracked or broken parts, damaged electrical wiring, and any other condition that may affect its safe operation. -
Page 9: Troubleshooting
Troubleshooting Problem Possible Causes Likely Solutions Tool will not start. 1. Cord not connected. 1. Check that cord is plugged in. 2. No power at outlet. 2. Check power at outlet. If outlet is unpowered, turn off tool and check circuit breaker. If breaker is tripped, make sure circuit is right capacity for tool and circuit has no other loads. -
Page 10: Parts List And Diagram
PARTS LIST AND DIAGRAM Parts List Part Description Part Description Hammer Rod Protector Torsion Spring Chuck Lifting Jack Ø28 Steel Wire Block Ring Eccentric Gear Asm. Support Washer Needle Bearing Ø12×Ø19×12 Rubber Ring Screw Bracket Lock Bead Sheath A Needle Bearing Ø20×Ø28×13 Insert Block Seal Ring Asm. -
Page 11: Assembly Diagram
Assembly Diagram Item 56845 For technical questions, please call 1-888-866-5797. Page 11... -
Page 12: Limited 90-Day Warranty
LIMITED 90 DAY WARRANTY Harbor Freight Tools Co. makes every effort to assure that its products meet high quality and durability standards, and warrants to the original purchaser that this product is free from defects in materials and workmanship for the period of 90 days from the date of purchase.
Need help?
Do you have a question about the HE35 and is the answer not in the manual?
Questions and answers
Need information on how to order part #8 spring rack in parts list