Table of Contents
Advertisement
Quick Links
Advertisement
Table of Contents

Subscribe to Our Youtube Channel
Related Manuals for AGRI TRONIX Brecknell SBI-100

Summary of Contents for AGRI TRONIX Brecknell SBI-100
- Page 1 SBI-100 User Instructions AWT 35-501281 Issue AA...
- Page 2 Brecknell is part of Avery Weigh-Tronix. Avery Weigh-Tronix is a trademark of the Illinois Tool Works group of companies whose ultimate parent company is Illinois Tool Works Inc (“Illinois Tool Works”). Copyright © 2013 Illinois Tool Works. All rights reserved. No part of this publication may be reproduced by making a facsimile copy, by the making of a copy in three dimensions of a two-dimensional work and the making of a copy in two dimensions of a three-dimensional work, stored in any medium by electronic means, or transmitted in any form or by any means, including electronic, mechanical, broadcasting, recording or otherwise without the prior written consent of the...
-
Page 3: Table Of Contents
Table of Contents Chapter 1 General Information and Warnings ..................3 About this Manual ......................3 Special Messages ....................... 3 Warnings ..........................4 Electrical Installation ....................4 Routine Maintenance ....................4 Safe Use ..........................5 Cleaning the Indicator / Weigh Head ................5 Training ........................ - Page 4 Chapter 7 Error Codes ..........................29 SBI 100 User Instructions Manual...
-
Page 5: Chapter 1 General Information And Warnings
General Information and Warnings 1.1 About this Manual This manual is divided into chapters by the chapter number and the large text at the top of a page. Subsections are labeled as shown by the 1 and 1.1 headings shown above. The names of the chapter and the next subsection level appear at the top of alternating pages of the manual to remind you of where you are in the manual. -
Page 6: Warnings
1.2 Warnings Avoid lengthy exposure to extreme heat or cold. Your scale works best when operated at normal room temperature. Always allow the scale to acclimate to a normal room temperature before use. CAUTION! THE EQUIPMENT CONTAINS NO USER SERVICEABLE COMPONENTS. Installation and maintenance of the equipment must only be carried out by trained and authorised personnel. -
Page 7: Safe Use
1.3 Safe Use Do not use sharp objects such as screwdrivers or long fingernails to operate the keys. 1.3.1 Cleaning the Indicator / Weigh Head Harsh abrasives, solvents, scouring cleaners and alkaline cleaning solutions, such as washing soda, should not be used especially on the display windows. Under no circumstances should you attempt to wipe the inside of the machine. -
Page 8: Declaration Of Compliance
1.4 Declaration of Compliance SBI 100 User Instructions Manual... -
Page 9: Chapter 2 Introduction
Introduction 2.1 Product Identification Part Number Capacity Region Power Supply (s) 816965001620 75 kg x 0.01kg / North America US Version, UL 150lb x 0.02lb 816965001637 150 kg x 0.02kg / North America US Version, UL 300lb x 0.05lb 816965001644 300 kg x 0.05kg / North America US Version, UL... - Page 10 Humidity: ≤95%RH (no condensation) Power Battery: 6V4AH lead acid battery, 30 hrs continuous use When the voltage of battery is below 5.7V, the "Low Bat" annunciator will be lighted, plug in AC adapter to charge the battery. When "Lo.bAt" and actual weight is displayed alternately, this indicates the voltage of battery is below 5.5V and the scale will be turned off in two minutes automatically.
-
Page 11: Setup The Indicator For Use
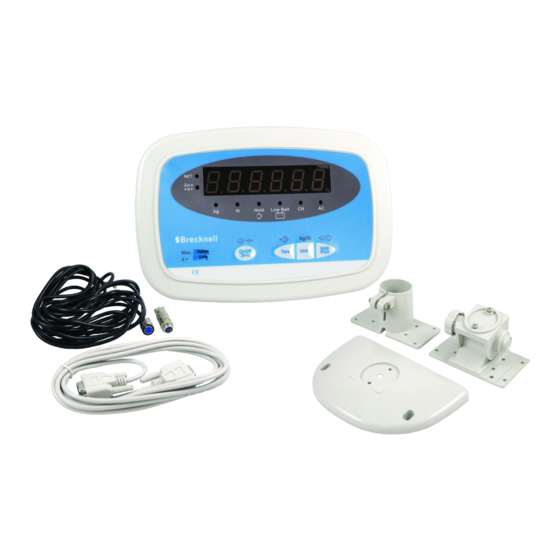
2.3 Setup the Indicator for Use Power/Adapter Socket Loadcell socket RS232 2.3.1 Connect the Indicator to the Platform Wire the cable attached to the base as shown (if necessary) 1. Red Excitation+ 1 RED 1 RED 2. Black Excitation- 2 RED 2 RED 3 RED 3 RED... -
Page 12: Power Supply
2.3.2 Power Supply 6V DC - 500mA 6V DC - 500mA 230V - 50Hz 230V - 50Hz 2.4 Display and Keypad Zero Hold Low Batt kg/lb H old On/Off Tare Units Print Zero SBI 100 SBI 100 User Instructions Manual... -
Page 13: Function Keys
2.4.1 Function Keys Function Tare a gross weight Tare Turn the indicator ON or OFF Zero an applied weight On/Off Zero Select between units: kg or lb kg/lb Units Hold a weight Print Hold Print 2.4.2 Annunciators Annunciator Description Weight is zero Zero Unit of measure (Flashing LED means that the weight reading is not stable.) - Page 14 Annunciator Description Tare is activated Battery is charging AC adapter is plugged in Hold is activated Hold Battery is low Low Batt SBI 100 User Instructions Manual...
-
Page 15: Chapter 3 Scale Operation
Scale Operation 3.1 Keypress Symbols short keypress multiple keypress long keypress 3.2 Turning on and Zeroing the Scale On/Off Zero ZERO 3.3 Turning off the Scale On/Off Zero 3.4 Select Unit of Measure Units kg - lb SBI 100 User Instructions Manual... -
Page 16: Using The Tare
3.5 Using the Tare Tare 3.6 Remove the Tare On/Off Zero ZERO 3.7 Hold Function with Automatic Zero on Next Weigh Hold Print H o ld SBI 100 User Instructions Manual... -
Page 17: Hold Function With Manual Release
H o ld 3.8 Hold Function with Manual Release Hold Print H o ld SBI 100 User Instructions Manual... -
Page 18: Removing Hold
3.9 Removing Hold Hold Print H o l d 3.10 Print Function For communications to a printer or PC, the indicator has to be setup in the following parameters P2, P4, P5 and P6. Refer to Chapter 4. Hold Print Print Gross: 45.00kg Tare:... -
Page 19: Chapter 4 User Configuration Settings
User Configuration Settings 4.1 Setup Controls On/Off Hold Tare Units Zero Print Moves flashing digit Change flashed digits Saves data and move down to next Exits setup mode parameter setting 4.2 Entering Setup On/Off Units Zero 4.2.1 Selecting a Parameter Tare 4.2.2 Changing Parameter Data Units... -
Page 20: Saving Data
4.2.3 Saving Data Tare 4.2.4 Exiting Setup On/Off Zero ZERO SBI 100 User Instructions Manual... -
Page 21: User Configuration Settings
4.3 User Configuration Settings Settings Parameter Description (default in bold) P1.xy Auto shutoff timer in minutes P1.00 Set up time for the auto off function. P1.01 - P1.15 (00 = 0ff, 01-15 = time in minutes) P1.5 = 15 minutes P2.x Hold and print key functionality P2.0= Hold... -
Page 22: Rs-232 Data Commands For Sbi Protocol
4.4 RS-232 Data Commands for SBI Protocol The RS232 can be set so a bidirectional connection can be established between the indicator and the host. To establish this connection, set parameter P4 to 7, and configure setting P5 (baud) and P6 (parity) to host device. Commands can then be sent from the host to the indicator using the following commands (ensure the letters entered are in CAPS) (<CR>... -
Page 23: Output Status Bit Meaning
4.4.1 Output Status Bit Meaning Byte 1 Byte 2 Byte 3 0=Stable 0=Not Under Capacity 00=Not defined 1=Unstable 1=Under Capacity 01=Normal working mode 0=Not at zero point 0=Not over capacity 10=Hold working mode 1=At zero point 1=Over capacity 11=Not defined Always 0 Always 0 0=Gross Weight... -
Page 24: Rs-232 Serial Interface Wiring
4.4.3 RS-232 Serial Interface Wiring DE-9 Female Scale DE-9 Male Host Name Direction Name Direction Ground Pins 1, 4, 6, 7, 8, 9 not used SBI 100 User Instructions Manual... -
Page 25: Chapter 5 Scale Calibration
Scale Calibration The scale is configured from the factory to match the specified settings for each unit, as defined by the product specifications and sales brochure. Modification of the settings can be accomplished by altering user configuration settings P7-P10. CAUTION! Calibration and/or configuration of calibration settings of your scale should be accomplished by a trained service technician using certified weights to ensure proper operation and accuracy. -
Page 26: Calibrate Scale
5.3 Calibrate Scale You may choose to configure your scale for a higher resolution. The factory does not recommend increasing the resolution above 7,500 divisions for a stable weight reading. Certain environments may cause the scale to be unstable at factory settings, reduce the # of division settings to increase your stability. - Page 27 Tare Tare ZERO SBI 100 User Instructions Manual...
-
Page 28: Chapter 6 Service Configuration
Service Configuration The scale is configured from the factory to match the specified settings for each unit, as defined by the product specifications and sales brochure. Modification of the setting can be accomplished by altering user configuration settings P11-P19. CAUTION! Calibration and/or configuration of calibration settings of your scale should be accomplished by a trained service technician using certified weights to ensure proper operation and accuracy. -
Page 29: Setup Controls
6.1 Setup Controls On/Off Hold Tare Units Zero Print Moves flashing digit Change flashed digits Saves data and move down to next Exits setup mode parameter setting 6.2 Parameters and Settings Config Menu Avail. Settings Default Definition Detailed Setting 0,1,2 Units key configuration 0 = kg only... - Page 30 Config Menu Avail. Settings Default Definition Detailed Setting 0,1,2 Signal not within power on 0 = current weight zero point 1 = calibration zero 2 = power off zero point 3 = continuously display “0-----” 0 - 8 Zero tracking 0 = 0d AZT off 1 = +/- 0.25d 2 = +/- 0.5d...
- Page 31 Error Codes Error Message Definition Required Solution/Troubleshooting 0¯ ¯ ¯ ¯: Weight above range for calibrated Remove load before zeroing Or Recalibrate the scale. zero point. 0_____: Weight below range for calibrated Remove load before zeroing Or Recalibrate the scale. zero point.
- Page 32 SBI 100 User Instructions Manual...
- Page 34 Brecknell USA 1000 Armstrong Dr. Fairmont MN 56031 Tel:507-238-8702 Fax:507-238-8271 Email: sales@brecknellscales.com http://www.brecknellscales.com Brecknell UK Foundry Lane, Smethwick, West Midlands, England B66 2LP Tel:+44 (0) 8452 46 6717 Fax:+44 (0) 8452 46 6718 Email: sales@brecknellscales.co.uk http://www.brecknellscales.com...
Need help?
Do you have a question about the Brecknell SBI-100 and is the answer not in the manual?
Questions and answers