
Related Manuals for Speidel Braumeister 200


Summary of Contents for Speidel Braumeister 200
- Page 1 » Speidels Braumeister 200, 500, 1000 litres Official Instruction Manual (English) ITEM NO. 45200-20, 46500-20, 41000-20...
- Page 3 PLEASE NOTICE! READ CAREFULLY BEFORE USE, KEEP FOR FUTURE REFERENCE This instruction manual is part of the device. Read and follow the instructions carefully to avoid possible damage and ac- cidents. Keep this manual in a safe place and give it to anyone who operates the appliance.
-
Page 4: Table Of Contents
» Table of contents General information Technical data Functions and application areas Components and scope of supply Information on special components Dimensions, power and energy consumption Disposal Safety General safety instructions Special safety instructions Preparation Safety instructions Setup Storage and transport Modification Before first use Control unit... - Page 5 Notes Symbols Troubleshooting Maintenance Cleaning Maintenance / updates Appendix Legal aspects of home brewing Warranty conditions and transaction processing Languages...
- Page 6 Item no. 46500-20: Braumeister 500 litres...
-
Page 7: General Information
Declaration of Conformity Speidel Tank- und Behälterbau GmbH confirms that the products “Braumeister 200 litres”, “Braumeister 500 litres” and “Braumeister 1,000 litres” (mentioned in this instruction manual) comply with the regulations of the relevant European Directives. -
Page 8: Technical Data
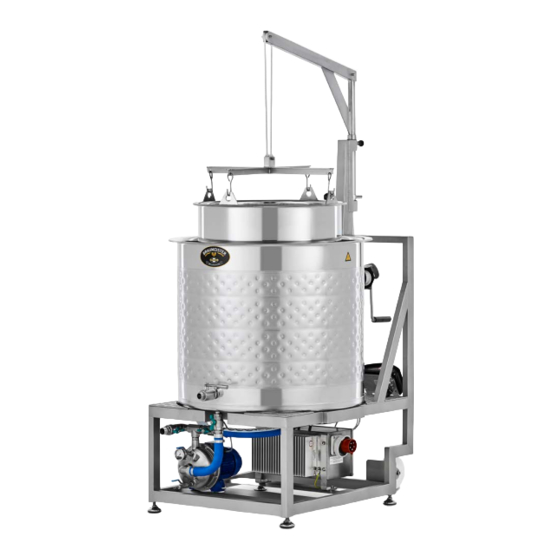
2. Technical data 2.1 Functions and application areas The Braumeister is designed and produced for brewing big quantities of beer. Before each brewing process, the Braumeister must be checked to ensure that it is in a safe and proper condition. 2.2 Components and scope of supply BM 200 litres The components and the scope of supply are shown in the following figure. - Page 9 Braumeister 200 litres during the brewing process Braumeister 200 litres during the brewing process during lautering...
- Page 10 2.3 Components and scope of supply BM 500 litres The components and the scope of supply are shown in the following figure. Malt pipe Lifting device Crane Malt pipe seal Brewing vessel Hold-down bar Tie rod / filling level indicator Screen plates (2 pieces) Electrical power unit incl.
- Page 11 Braumeister 500 litres during the brewing process Braumeister 500 litres during the brewing process during lautering...
- Page 12 2.4 Components and scope of supply BM 1,000 litres The components and the scope of supply are shown in the following figure. Malt pipe Lifting device Crane Malt pipe seal Brewing vessel Hold-down bar Tie rod / filling level indicator Screen plates (2 pieces) Electrical power unit incl.
- Page 13 Braumeister 1,000 litres during the brewing process Braumeister 1,000 litres during the brewing process during lautering...
-
Page 14: Information On Special Components
2.3 Information on special components Lifting device The lifting device consists of the lifting device, the rope cable winch, the rope and the cross with suspension hook. Check these parts for damage or proper condition before each brewing process. For further information and safety instructions, please refer to the enclosed manual for this cable winch. - Page 15 Circulation pump The circulation pump can also be switched on and off in manual ope- ration. It is important that the pump is vented after filling the liquid in manual operation so that it has full capacity and that it does not run dry and possibly become damaged.
- Page 16 Overview of the start screen. You find the pump speed under the tab marked P. The pump pressure control screen.
- Page 17 The pump speed control screen. Filling quantity via solenoid valve (Accessories: not included in the scope of delivery). Thanks to the solenoid valve, the desired filling quantity can be precisely determined during the brewing process. The solenoid valve then allows as much water to pass through until the previously determined value is reached.
- Page 18 The screen for filling water. Determination of the desired water level.
- Page 19 Information pertaining to the piping layout and the position of the valves By default, the Braumeister uses 3 feed-through and drain valves on the bottom as well as one valve on the vessel itself. Valves at the bottom must be positioned differently depending on the application and the section of the brewing process.
-
Page 22: Dimensions, Power And Energy Consumption
2.6 Dimensions, power and energy consumption BRAUMEISTER 200 LITRES Braumeister 200 litres DIMENSIONS Capacity Height Length Width POWER AND ENERGY CONSUMPTION Weight 150 kg including internal fittings and lifting equipment Heating coil Heating capacity 3 x 3,000 Watt Pump 370 Watt – with speed control... - Page 23 BRAUMEISTER 500 LITRES Braumeister 500 litres DIMENSIONS Capacity Height Length Width POWER AND ENERGY CONSUMPTION Weight 380 kg including internal fittings and lifting equipment Heating coil Heating capacity 6 x 3,000 Watt Pump 370 Watt – with speed control Power connection 400 V ~ Min.
- Page 24 BRAUMEISTER 1,000 LITRES Length Length Length Braumeister 1,000 litres DIMENSIONS Capacity Height Length Width 1,000 POWER AND ENERGY CONSUMPTION Weight 850 kg including internal fittings and lifting equipment Heating coil Heating capacity 12 x 3,000 Watt Pump 370 Watt – with speed control Power connection 400 V ~ Min.
-
Page 25: Disposal
2.7 Disposal Should it be necessary to dispose your Braumeister 200, 500 or 1,000 liters, please observe the following note: Protect our environment, electrical appliances do not belong in hou- sehold waste. Use the collection points designated for the disposal of electrical appliances and hand in your electrical appliances that you no longer use. -
Page 26: Safety
3. Safety instructions 3.1 General safety notes The Braumeister consists nearly completely of stainless steel (electrical- ly conductive). The equipment is categorised as protection class 1 (pro- tective earthing). In operation the connection of a protective conductor is imperative. The device and mains cable must be inspected regularly for any signs of damage. -
Page 27: Special Safety Instructions
3.2 Special safety instructions The temperature of the container, lid, and add-on parts can become ex- tremely high. Towards the end of the brewing process, the boiler contains boiling beer wort. Observe the installation instructions. Never attempt to move the Braumeister while it is hot. Always use pot holders or gloves when working on and with the Braumeister. -
Page 28: Preparation
4. Preparation 4.1 Safety instructions The Braumeister must be cleaned thoroughly with lukewarm water before first use (chapter “Cleaning 8.1”). Please also observe the safe setup of the Braumeister below. Ensure that the Braumeister is in proper condition. To do this, check the components listed in chapter “2. Technical Data”... -
Page 29: Modification
4.4 Modification A modification of the Braumeister is expressly not permitted, except by adding accessories tested by the manufacturer. Unauthorised modifi- cations to the unit can lead to serious safety risks and safe use cannot continue to be guaranteed. If improper changes are made to the unit, the warranty will become void. -
Page 30: Control Unit
5. Control unit 5.1 Setup The Braumeister is controlled via the touch display, which is mounted on the bottom of the Braumeister’s base. The following functions can be found on the start display: Start display Menu / Status Brewing of a recipe Time, temperature, recipe Edit recipes and instructions... -
Page 31: Starting Point
When you start up your Braumeister for the first time, you are automati- cally guided through the set-up process. Here you can also connect to My Speidel right at the start. To make subsequent changes to the settings from the setup process, please follow these steps: You can call up the Navigation via the menu display. - Page 32 In the Settings section you will find options for setting language, Wi-Fi, metrics, sound, etc. Settings...
- Page 33 To change settings, simply select the desired area with your finger. You can then make the desired change in the new window. Language settings...
-
Page 34: Functions
“6. Brewing”. In My Recipes, your recipes can be saved, created on the machine or synchronised via My Speidel. Recipe synchronization with MySpeidel can be controlled via the settings. We recommend the Auto-Sync setting, so that all recipes are always synchronized from MySpeidel to the device. - Page 35 In manual mode, the pump and the heating can be switched on or off. The P and the H in the menu bar show whether the pump or the heating is on. If the letter is yellow, the pump or heater is activated. If the symbol is only half yellow, the pump is activated but not on because the liquid is, for example, still too hot.
-
Page 36: Brewing
(this can be done handwritten on paper, but also digitally via My Speidel). One more piece of advice: When trying to brew for the first time, you should take a day and possibly brew with a second person, as it is simply more fun that way and you can use a little help. -
Page 37: Preparations
6.2 Preparations Getting the ingredients Obtain the necessary brewing ingredients (hops, malt and yeast) in advance. It is important that the malt is fresh. After grinding (breaking up the grains – not too fine, see “The right grinding pattern” on page 39), the malt should be used as quickly as possible. - Page 38 Cleaning the equipment Before brewing, the Braumeister is rinsed out with warm water and the pump is flushed by switching it on. The other equipment such as the beer spindle, cooking spoon and fermentation tank are ready and have also been cleaned.
- Page 39 The right grinding pattern Clearance of 1.2 mm; clearly too finely grinded. Clearance of 1.4 mm; not yet completely optimal. Ideally with a clearance of 1.6 mm; suitably grinded. If whole grains do not break when pressed on, the grain has been too coarsely grinded.
-
Page 40: Programming / Starting The Brewing Automation
6.3 Programming / starting the brewing automation Plug in the Braumeister. The control unit is in its basic state. Start display To program a recipe and its time and temperature values, press My Recipes.Then select the recipe you want to edit from the menu. New recipes can be created or deleted. - Page 41 Edit a recipe...
-
Page 42: Mashing
6.4 Mashing The mixing of malt grist and water is called mashing. The aim of the entire mashing process is to extract the malt starch stored in the malt and convert it into sugar with the help of enzymes in the malt. The different enzymes are effective at different temperatures, which is The process of mashing... - Page 43 (fully open). Caution: The pressure in the malt pipe/pressure line must not rise significantly above 0.2 bar for the Braumeister 200 l or 0.15 bar for the Braumeister 500 l/1,000 l to avoid solidification of the malt resulting in reduced circulation or possible damage to the screen plates.
- Page 44 Mashing process Pour in malt (measurements refer to a 20 litres Braumeister)
- Page 45 Inquiry whether malt has been poured in...
-
Page 46: Mashing Explained Step By Step
6.4.2 Mashing explained step by step Insert malt pipe Insert the malt pipe with the seal facing downwards. The seal and malt pipe must be centred and absolutely flat on the boiler bottom. Inserting the screen plate Insert the screen plate up to the lower edge with the sleeve facing upwards. - Page 47 Fill in malt Please fill in the malt carefully and make sure you do not spill anything. Otherwise the pump could clog. Experience has shown that it is better to pour in the entire amount and then gently stir in. Stir in the malt Stir the malt well with a wooden spoon and let it swell for a few...
- Page 48 Inserting the screen plate Insert the second screen plate up to the lower edge with the sleeve facing upwards. Fasten screen plate Fasten second screen plate with wing nut.
- Page 49 Put on the hold-down bar Please place the hold-down bar in the appropriate position. Fasten hold-down bar Fasten hold-down bar with wing nut.
- Page 50 Protein rest During the protein rest, the large protein molecules of the malt are split into small building blocks. The protein rest is important for the clarifi- cation and palatefulness, but especially for the foam stability and the carbonic acid binding capacity of the beer. The temperature is approx. 52 °...
- Page 51 Maltose branch During the second phase, the maltose branch, the starch molecules are converted into fermentable sugars with the help of other enzymes found in the malt. This phase is an important stage in the brewing process for the formation of alcohol, because this is where the largest quantities of sugar are produced.
- Page 52 Saccharification rest 1 In the third mash phase, further starch components are broken down with the aid of enzymes active at this temperature level and liquefied in the wort. The temperature stage is about 73 °C and is also maintained for about 35 minutes.
-
Page 53: Lautering
6.5 Lautering Once the programmed brewing phases have been completed, a signal tone sounds again. This is also acknowledged with Continue. The pump switches off and you are prompted to purge (“remove malt pipe”). 6.5.1 Information about lautering Lautering is the separation of the malt grist from the beer wort. Compared to many other home brewing methods, lautering with the Braumeister is a relatively simple, quick and clean process and repre- sents a central concept of the Braumeister. - Page 54 Now that the lautering process has been completed, the wort content should be checked. This is important to bring the wort to the desired ori- ginal gravity in order to be able to adjust the subsequent alcohol content of the beer. Remove a filling into a measuring cylinder (accessory) and determine the level of the wort at the time of removal.
- Page 55 End of resting Start of hop boiling...
-
Page 56: Lautering Explained Step By Step
6.5.1 Lautering explained step by step Remove hold-down bar First remove the wing screw and then the hold-down bar. Remove second wing screw Remove the second wing screw above the screen plate. - Page 57 Hook the lifting cross onto the malt pipe Hook all four hooks of the lifting cross onto the malt pipe. Lift out malt pipe Using the gallow, the cable winch and the lifting cross, carefully and slowly pull the malt pipe out of the kettle until the malt pipe hangs completely out of the wort.
-
Page 58: Hop Boiling
6.6 Hop boiling As described in the previous section, the automatic system is continued and hop cooking is started. The display shows the time and temperature of the phase again. The cooking time automatically starts to count down after a certain waiting time without any further temperature increase. With Edit the setpoint temperature and setpoint time can still be correc- ted or changed during automatic operation. - Page 59 The hopping of beer was originally also used to improve the preservation and conservation of beer. Depending on the type of hops and bitter content, add the first hops to the boiling wort 10 to 15 minutes after the start of boiling. The hops re- main in the wort until the end of the boiling time because its substances only take effect after a longer boiling time and release the intended hop bitterness into the beer.
- Page 60 Hop addition during the hop boiling process Formula for the hop quantity Bitter units (BE) × litres of beer × 10 Hop quantity in grams = % alpha acid × % bittering agent utilisation With a total cooking time of 80-90 minutes, a bitter substance utilization of 30 % can be assumed.
-
Page 61: Cooling Down
15 BE × 200 litres × 10 Grams of hops = = 330 g 3 % × 30 % End of hop cooking When the boiling time has expired, a signal tone is emitted again to indi- cate the end of the brewing process. This is confirmed with Okay. The heating is switched off. - Page 62 After connecting the cooling jacket to a cold water source (cold tap water), we recommend hot trub precipitation via „whirlpool effect“, which promotes the sinking of trub substances present in the wort, thus clari- fying the wort. To do this, connect the hose and posi- tion the taps according to the adjacent sketch.
- Page 63 Use a suitable and clean hose for filling. The hose connection and the tap position are shown in the adjacent sketch (Attention: The wort starts to flow off directly when the tap is open and there is a gradient!) Now you can switch on the pump in manual mode (to change to manual mode, press the first and second button from the left...
-
Page 64: Main Fermentation
6.8 Main fermentation After the cooled wort has been filled into a fermenting barrel (PE barrels with drain tap and stainless steel fermentation tanks can be found in our online shop), the yeast is added to the wort. For this purpose, dry ye- ast is recommended, which is simply added to the barrel. -
Page 65: Maturing
If the temperature is too high, the yeast cells may die. Fermentation should be active 6-12 hours after the yeast is added, which can be easily determi- ned by the escaping gas bubbles through the fermentation bung. The fer- mentation period is 2-4 days. During the fermentation process, dark yeast spots may appear on the fermentation foam, which are skimmed off with a sterile wooden spoon. - Page 66 process or even earlier, so that you are not unnecessarily hectic on the day of filling. The thawed wort is now carefully added to the young beer in the fer- mentation tank 1-2 hours before bottling. This allows stirred-up trub substances to settle again.
-
Page 68: Notes
7. Notes 7.1 Symbols VISUAL SYMBOLS Follow the instruction manual! Always remove the plug from the socket before carrying out any work on the appliance! Wear gloves or potholders! Attention / Warning! Attention, electrical voltage! Attention, hot surface! Danger of burns! Do not hose down electrical parts! No access for unauthorised persons General prohibition sign... - Page 69 ACOUSTIC SIGNALS At certain points in the brewing process, the Braumeister PLUS emits a signal tone at certain times. This signal tone is intended to inform you that the next step in the process is about to be taken (follow the corresponding instructions on the display).
-
Page 70: Troubleshooting
7.2 Troubleshooting Do not repair the appliance yourself, but consult an authorised technici- an. To avoid any hazards, a defective control unit / mains cable or other electrical components may only be replaced or repaired by the manufac- turer, our customer service or a similarly qualified person. BREWING MISTAKES Brewing problem Troubleshooting... - Page 71 BEER MISTAKES Beer mistakes Troubleshooting Beer smells Bacteria have settled down: Pouring beer and tastes sour away. Work more thoroughly in cold areas. Brewing times may be too short, resulting in too many starch residues in the beer. The sparge water is too hot (> 80 °C). Alcohol content too high Reduce original gravity by adding water during hop boiling.
- Page 72 BEER MISTAKES Beer mistakes Troubleshooting Poor foam retention Too little carbon dioxide. Shorten protein rest. Mash in at a higher temperature. Remove hot trub better. Ferment at lower temperatures. Yield too low Stir in malt better, malt quantity too high, an increase of the malt quantity above the indicated optimal quantities leads to strong pressing of the malt and to a...
-
Page 74: Maintenance
8. Maintenance 8.1 Cleaning It is best to move the Braumeister to the cleaning position immediately after the brewing process (see picture) and pump out all the trub diluted with water. Observe the correct tap position for this. Now use a brush and water hose to remove the brewing residues from the inside of the tank and the heating coils. - Page 75 During the recirculation process, ensure to open and close all valves several times. This will assure that all valves are being cleaned. This includes also all valves on the pump. After you have carried out this process for approx. 15-20 min, empty the container of the lye and rinse again several times with fresh water analogous to the previous...
-
Page 76: Maintenance / Updates
8.2 Maintenance and services With regular cleaning and care, the Braumeister has a long service life. Updates can be downloaded and installed automatically. If your device is defective, have it repaired by one of our approved repair services. With the return form you can return the device to us. You can find the form at: www.speidels-braumeister.de/en/service/downloads.html Please also observe the following maintenance and servicing instruc-... - Page 77 MAINTENANCE AND SERVICING BM 500 LITERS AND 1,000 LITERS Component Prior to any Every 12 months/ Every24 months/ brewing process 20 brewing 40 brewing processes processes Hoisting Visual inspection According to ho- equipment for damage isting equipment instructions Geared winch for Lubrication accor- ding to separate tilted position...
-
Page 78: Appendix
Appendix A Legal aspects of home brewing The following applies to brewing in Germany: Hobby brewers who prepare beer in their household for their own consumption may produce up to 200 l of beer per year tax-free. This beer may not be sold. The hobby brewer must notify the relevant main customs office before the first brewing process. -
Page 80: B Warranty Conditions And Transaction Processing
The fastest and most convenient option is to return the device or the notice of defect to the dealer / agent responsible or directly to us: Email: verkauf@speidel-behaelter.de Or fax to: 0049 7473 9462 99... - Page 81 Please provide us with your complete address and contact details. Furthermore, we need the type designation of the device under complaint, a short description of the fault with photos if necessary, the date of purchase (copy of the invoice) and the dealer from whom you purchased the new device.
-
Page 82: C Languages
C LANGUAGES de Sollte die beiliegende Gebrauchsanleitung nicht in der für Sie passenden Sprache vorliegen, kontaktieren Sie diesbezüglich bitte Ihren zuständigen Händler. en If the enclosed instruction manual is not available in the langua- ge you require, please contact your local dealer. Si le manuel d‘instructions ci-joint n‘est pas disponible dans la langue souhaitée, veuillez contacter votre revendeur local. - Page 83 LANGUAGES hu Ha a mellékelt használati utasítás nem érhető el az Ön számára megfelelő nyelven, forduljon a helyi kereskedőhöz. Neem contact op met uw plaatselijke dealer als de bijgevoegde gebruiksaanwijzing niet beschikbaar is in de taal die bij u past. Dacă...
- Page 84 TANKS MADE WITH PASSION Speidel Tank- und Behälterbau GmbH Krummenstraße 2 72131 Ofterdingen Telephone +49(0)7473 9462-0 +49(0)7473 9462-99 verkauf@speidel-behaelter.de www.speidels-braumeister.de Prices and technical design of the products are subject to change.
Need help?
Do you have a question about the Braumeister 200 and is the answer not in the manual?
Questions and answers