Table of Contents
Advertisement
Quick Links
Model GH-120
For surface mounting
on wall or cabinet
Warning!
This manual must be read and understood before installation, adjustment, service or
maintenance is performed. This unit should be installed by a qualified technician.
Modification of this product can be extremely hazardous and could result in
personal injury or property damage. Instructions must stay with the unit.
Complete registration online at
www.cvacregistration.com
NOTE: The Serial Number is located on a yellow
label on the outside of the box and on the
side or back of the unit.
Vroom Garage Vac, manufactured under exclusive license by
InterVac Design Corp., is distributed and warranted by:
H-P Products, Inc. 512 W. Gorgas Street
Louisville Ohio 44641
800-822-8356 www.VroomYourGarage.com
Installation and
Operating Instructions
Model GF-120
For recess/flush mounting
into a wall or cabinet
Record information for future reference
Serial #__________________________________
Model #__________________________________
Date of purchase___________________________
Advertisement
Table of Contents

Related Manuals for Vroom GH-120


Summary of Contents for Vroom GH-120
- Page 1 Model #__________________________________ Vroom Garage Vac, manufactured under exclusive license by InterVac Design Corp., is distributed and warranted by: Date of purchase___________________________ H-P Products, Inc. 512 W. Gorgas Street Louisville ...
-
Page 2: Important Safety Instructions
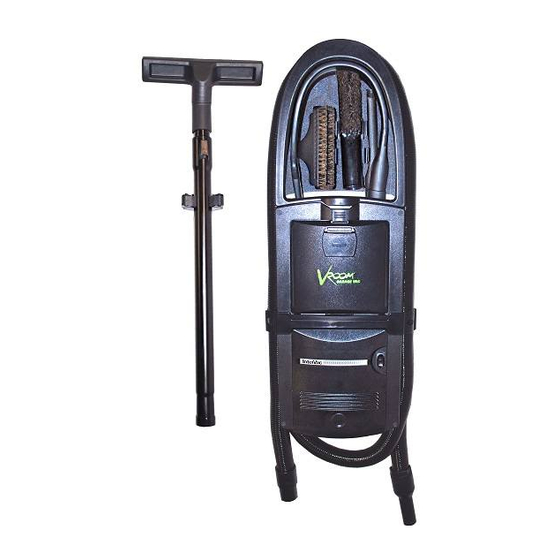
22. Do not attempt to service the vacuum cleaner. Unit is sealed and cannot be opened without damage to the unit. For service call your local authorized dealer. If you should have any questions or experience a problem with your Vroom Garage Vac, please contact your local authorized dealer. SAVE THESE INSTRUCTIONS... - Page 3 Items Included With Your Vroom Garage Vac (Surface/Wall Mount) Model GH-120 Crevice Dashboard/ Tool Caddy Flexible Tool Upholstery Tool Dusting #B051 #1141-B Crevice Tool #7031-B Brush #8690 #8689 Suggested Tool Placement in Caddy Upholstery Dashboard Tool /Dusting Brush Crevice 8’ to 40' Stretch...
- Page 4 1/8″ (3.2mm) from the surface of the wall or use concrete anchors. 4. To ensure the screws are in the proper place, install the Vroom Garage Vac (without the tool caddy attached) by aligning the keyholes on the back of the unit with the screw heads on the wall.
-
Page 5: Wand Holder Installation
2. Use the paper template from the back page of this instruction manual, and tape to the wall or surface. Vroom Garage Vac must be installed a minimum of 3″ (75mm) from the floor for the exhausting air. Align the template so that the 2 vertical center points of the template are aligned over the centerline of a 2x4 stud behind the drywall for additional stability. - Page 6 Items Included With Your Vroom Garage Vac (Recessed/Flush Mount) Model GF-120 Crevice Dashboard/ Tool Caddy Tool Upholstery Tool Flexible Crevice Dusting #B051 #1141-B #7031-B Tool #8689 Brush Suggested Tool Placement in Caddy Upholstery Dashboard Tool /Dusting Hose Hanger Brush #B055...
- Page 7 TIP: Find a place that is close to the garage door so that you can clean your car in the drive way as well as inside the garage. After you cut the hole for the Vroom Garage Vac you may prefer to paint the back wall inside the opening with a color matching the Vroom Garage Vac.
- Page 8 2 screws Hose Retainer will not fit upside down. for the 2 anchors. Do not over-tighten. 7. Attach the hose retainer to the front of Vroom Garage Vac Wand Holder by removing the protective paper from the double sided Installation tape and press-on firmly.
-
Page 9: On/Off Switch
Operating Your Vroom Garage Vac CONNECTING AND DISCONNECTING THE HOSE 1. Lift the inlet valve cover on the front of the door. 2. Insert the hose end (with the shorter hose cuff) into the valve with a twist and a firm push to secure (see photo at right). -
Page 10: Troubleshooting Tips
5. Hang the hose up, let drain and dry completely, this may take 24 hours. NOTE: The Vroom Garage Vac includes a 40′ Stretch Hose. However, a standard 30′ Central Vacuum hose can also be used. Please contact your local authorized dealer for more information. - Page 11 (3) years from original date of consumer purchase. In the event of a defect in a Vroom cleaning attachment, a repaired or replacement (at H-P Products, Inc.’s option) part will be provided to you for any items under warranty.
- Page 12 IH-137...
Need help?
Do you have a question about the GH-120 and is the answer not in the manual?
Questions and answers