Table of Contents
Advertisement
Available languages
Available languages
Quick Links
Advertisement
Table of Contents

Subscribe to Our Youtube Channel
Related Manuals for GeoMax ZeniusX Series


Summary of Contents for GeoMax ZeniusX Series
- Page 1 GeoMax ZeniusX Series Quick Guide Version 1.0...
- Page 3 Quick Guide Quick Guide Guía Rápida Guide abrégé Guida rapida pt-br Guia Rápido Краткое руководство...
- Page 5 GeoMax ZeniusX Series Quick Guide Version 1.0 English...
- Page 6 Read and follow the User Manual before using the product or the accesso- ries delivered with the product. ☞ Keep for future reference! Intended use Remote control of GeoMax instruments. • Data communication with external appliances. • The product must not be disposed with household waste.
- Page 7 ☞ To ensure safety when using accompanying battery charger, also observe the directions and instructions contained in the User Manual of the battery charger. For the AC/DC power supply and the battery charger: WARNING Electric shock due to use under wet and severe conditions If unit becomes wet it may cause you to receive an electric shock.
- Page 8 Using the product after incorrect attempts were made to carry out • repairs. Precautions: ▶ Do not open the product! ▶ Only GeoMax authorised service centres are entitled to repair these products. Conformity to For products without radio transmitter or receiver: national FCC Part 15 (applicable in US) •...
- Page 9 Hereby, GeoMax AG declares that the product/s is/are in • compliance with the essential requirements and other relevant provisions of the applicable European Direc- tives. The full text of the EU declaration of conformity is avail- able at the following Internet address: http://www.geomax-positioning.com/Downloads.htm.
- Page 10 Important Information about your Instrument The conformity for countries with other national regulations not • covered by the FCC part 15, 22 and 24 or European directive 2014/53/EU has to be approved prior to use and operation.
-
Page 11: Instrument Components
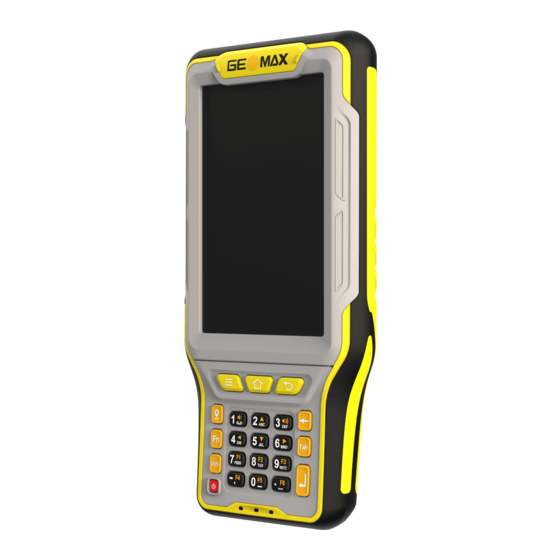
Instrument Components Front side of the ZeniusX Screen Keypad Power key LED indicators 18642_001 Instrument Components... - Page 12 Instrument Components Back side of the ZeniusX Camera flash Camera Holder for hand strap Speaker Release lever for battery compartment Compartment with slots for battery, SIM card and SD card Hand strap fixation 18643_001...
- Page 13 Battery compart- ment and bottom panel Battery connectors SIM card slot SD card slot Holder for hand strap USB port and power supply 18657_001 Instrument Components...
-
Page 14: Technical Data
Technical Data Technical Data Environmental Temperature specifications Operating temperature: -30°C to +60°C Storage temperature: -40°C to +80°C Protection against water, dust and sand IP67 (IEC60529) Dust and waterproof Humidity Protection: 5 % to 95 % non-condensing The effects of condensation are to be effectively coun- teracted by periodically drying out the device. - Page 15 Vibration Protection: Withstands strong vibration during operation, compli- ance with MIL‑STD-810G, method 514.6E-I ASAE EP455 Section 5.15.1 Random Drops Protection: Withstands 1.2 m drop Technical Data...
-
Page 16: Care And Transport
Care and Transport Care and Transport Care and trans- Protect the product against shock and vibration. • port Periodically carry out functional tests particularly after the product has • been dropped, stored for long periods or transported. -
Page 17: Operation
Operation ☞ The battery must be charged before using it for the first time. Charge battery ☞ Only use the charger delivered with the ZeniusX. step-by-step Connect the AC power adapter to the ZeniusX and to an A/C plug. Alternative: Connect the ZeniusX to a computer using the data transfer cable. - Page 18 Operation Turning on the ZeniusX step-by-step 18661_001 ☞ Place the ZeniusX on a flat and stable surface or hold the device in your hand. Ensure that either the device is connected with the AC power adapter or the batteries are charged up.
- Page 19 Press and hold Power key until the ZeniusX vibrates once and the GeoMax logo is shown. When the Home screen is displayed, the ZeniusX is ready to use. The operating system needs usually about 30-40 seconds for booting up. Turning off the...
- Page 20 Operation To turn off the device, select the option Power off. ☞ After turning off the ZeniusX, wait for at least 5 seconds before turning on the device again.
- Page 22 879580-1.0.1en Original text (879580-1.0.1en) © 2019 GeoMax AG, Widnau, Switzerland GeoMax AG www.geomax-positioning.com...
- Page 23 GeoMax ZeniusX Serie Quick Guide Version 1.0 Deutsch...
- Page 24 Wichtige Informationen über Ihr Instrument Lesen und befolgen Sie die Gebrauchsanweisung, bevor Sie das Produkt oder mitgeliefertes Zubehör verwenden. ☞ Sorgfältig aufbewahren! Bestimmungsge- Fernbedienung der GeoMax-Instrumente. • mäße Verwen- Datenübertragung mit externen Geräten. • dung Das Produkt darf nicht im Hausmüll entsorgt werden.
- Page 25 ☞ Beachten Sie für einen sicheren Gebrauch des mitgelieferten Akkuladege- räts die Vorschriften und Anweisungen in der Gebrauchsanweisung des Akkuladegeräts. Wichtige Informationen über Ihr Instrument...
- Page 26 Wichtige Informationen über Ihr Instrument Bei AC/DC-Netzteil und Akkuladegerät: WARNUNG Stromschlaggefahr bei Verwendung in feuchten und rauen Bedin- gungen Wenn das Produkt feucht wird, kann dies einen elektrischen Schlag verur- sachen. Gegenmaßnahmen: ▶ Wenn das Produkt feucht wird, darf es nicht verwendet werden! ▶...
- Page 27 Verwenden des Produkts nach unsachgemäßer Reparatur. • Gegenmaßnahmen: ▶ Das Produktgehäuse nicht öffnen! ▶ Diese Produkte dürfen nur von durch GeoMax autorisierte Servicezent- ren repariert werden. Konformität mit Produkte ohne Funksender oder -empfänger nationalen FCC Teil 15 (gültig in den USA) •...
- Page 28 FCC Teil 15, 22 und 24 (gültig in USA) • nationalen Vor- schriften Hiermit erklärt GeoMax AG, dass die Funkausrüstung des Typs • ZeniusX der Richtlinie 2014/53/EU und anderen anwendbaren Euro- päischen Richtlinien entspricht. Der vollständige Text der EU-Kon- formitätserklärung kann unter http://www.geomax-positioning.com/Downloads.htm eingesehen...
- Page 29 In Ländern mit nationalen Vorschriften, die nicht durch die Europä- • ische Richtlinie 2014/53/EU oder FCC Teil 15, 22 und 24 abgedeckt sind, sind die Bestimmungen und Zulassungen für den Betrieb zu prüfen. Wichtige Informationen über Ihr Instrument...
- Page 30 Komponenten des Produkts Komponenten des Produkts Vorderseite des ZeniusX Bildschirm Tastenfeld Ein-/Aus-Taste LED-Anzeigen 18642_001...
- Page 31 Rückseite des ZeniusX Kamerablitz Kamera Handriemenhalter Lautsprecher Hebel zum Lösen des Batteriefachs Batterie-, SIM-Karten- und SD-Kartenfach Handriemenhalter 18643_001 Komponenten des Produkts...
- Page 32 Komponenten des Produkts Akkufach und Bodenplatte Batterieanschlüsse SIM-Kartenschacht SD-Kartenschacht Handriemenhalter USB-Anschluss und Stromver- sorgung 18657_001...
-
Page 33: Technische Daten
Technische Daten Umweltspezifika- Temperatur tionen Betriebstemperatur: -30 °C bis +60 °C Lagertemperatur: -40 °C bis +80 °C Schutzart IP67 (IEC60529) Staub- und wasserdicht Technische Daten... - Page 34 Technische Daten Luftfeuchte Schutz: 5 % bis 95 % nicht kondensierend Den Auswirkungen von Kondensation sollte durch regelmäßiges Austrocknen des Geräts entgegenge- wirkt werden. Vibration Schutz: Widersteht starken Erschütterungen im Betrieb, gemäß MIL‑STD-810G, Methode 514.6E-I. ASAE EP455 Abschnitt 5.15.1 Random Stürze Schutz: Stoßfest aus 1,2 m Fallhöhe...
-
Page 35: Wartung Und Transport
Wartung und Transport Wartung und Produkt vor Erschütterung und Vibration schützen. • Transport Periodisch funktionale Tests durchführen, besonders wenn das Produkt • heruntergefallen ist, für eine lange Periode gelagert oder transportiert wurde. Wartung und Transport... -
Page 36: Bedienung
Bedienung Bedienung ☞ Die Batterie muss vor der Erstverwendung geladen werden. Laden der Batte- ☞ Es darf nur das mit dem ZeniusX mitgelieferte Ladegerät verwen- det werden. Schritt für Schritt Das AC-Netzteil an den ZeniusX und eine Wechselstromsteckdose anschließen. Alternative: Den ZeniusX mit dem Datenübertragungskabel an einen Compu- ter anschließen. - Page 37 Schritt für Schritt: Einschal- ten des ZeniusX 18661_001 ☞ Den ZeniusX auf eine flache und stabile Oberfläche legen oder das Gerät in der Hand halten. Sicherstellen, dass das Gerät entweder mit einem AC-Netzteil verbunden ist oder die Batterien geladen sind. Bedienung...
- Page 38 Bedienung Die Ein-/Aus-Taste drücken, bis der ZeniusX einmal vibriert und das GeoMax Logo angezeigt wird. Sobald der Home-Bildschirm angezeigt wird, ist der ZeniusX betriebsbereit. Das Hochfahren des Betriebssystems dauert nor- malerweise circa 30–40 Sekunden. Ausschalten des Die Ein-/Aus-Taste wenigstens 3 Sekunden lang gedrückt halten, ZeniusX Schritt um das Menü...
- Page 39 Zum Ausschalten des Geräts die Option Power Off auswählen. ☞ Nach dem Ausschalten des ZeniusX wenigstens 5 Sekunden war- ten, bevor das Gerät wieder eingeschaltet wird. Bedienung...
- Page 40 879580-1.0.1de Originaltext (879580-1.0.1en) © 2019 GeoMax AG, Widnau, Schweiz GeoMax AG www.geomax-positioning.com...
- Page 41 GeoMax ZeniusX Series Guía Rápida Versión 1.0 Español...
- Page 42 Manual de uso que se encuentra en el CD adjunto. ☞ ¡Conservar para futuras consultas! Utilización Control remoto de instrumentos GeoMax. • Comunicación de datos con equipos externos. • No deseche el producto con la basura doméstica.
- Page 43 ☞ Para utilizar el cargador de batería adjunto de modo seguro, siga también las indicaciones e instrucciones incluidas en el manual de empleo del carga- dor de batería. Para el suministro de energía de CA/CC y el cargador de batería: ADVERTENCIA Descarga eléctrica debida al uso en condiciones de humedad y con- diciones extremas...
- Page 44 Medidas preventivas: ▶ ¡No abrir el producto! ▶ Encargar la reparación de estos productos sólo a centros de servicio técnico autorizados por GeoMax. Conformidad con Para productos sin radiotransmisor ni receptor: regulaciones FCC Parte 15 (aplicable en los EE. UU.) •...
- Page 45 FCC Parte 15, 22 y 24 (válido en EE. UU.) • regulaciones nacionales Por la presente, GeoMax AG declara que el equipo de radio modelo • ZeniusX cumple la Directiva 2014/53/UE y otras Directivas comuni- tarias aplicables. El texto completo de la declaración de conformi- dad UE se puede consultar en http://www.geomax-positioning.com/Downloads.htm.
- Page 46 Información importante de su instrumento La conformidad para países con otras regulaciones nacionales que • no estén cubiertas por la FCC parte 15, 22 y 24 o la Directiva comunitaria 2014/53/UE debe ser aprobada antes del uso y funcio- namiento.
-
Page 47: Componentes Del Instrumento
Componentes del instrumento Parte frontal del ZeniusX Pantalla Teclado Tecla de encendido Indicadores LED 18642_001 Componentes del instrumento... - Page 48 Componentes del instrumento Parte trasera del ZeniusX Flash de la cámara Cámara Enganche para correa de mano Altavoz Palanca de desbloqueo para comparti- mento de batería Compartimento con ranuras para batería, tarjeta SIM y tarjeta SD Fijación para correa de mano 18643_001...
- Page 49 Compartimento de batería y panel inferior Conectores para la batería Ranura para tarjeta SIM Ranura para tarjeta SD Enganche para correa de mano Puerto USB y fuente de ali- mentación 18657_001 Componentes del instrumento...
-
Page 50: Datos Técnicos
Datos técnicos Datos técnicos Especificaciones Temperatura ambientales Temperatura de funcio- De -30 °C a +60 °C namiento: Temperatura de alma- De -40 °C a +80 °C cenamiento: Protección contra el agua, el polvo y la arena IP67 (IEC60529) Resistente al polvo y al agua... - Page 51 Humedad Protección: 5 % al 95 %, sin condensación Los efectos de la condensación se deben contrarrestar de forma efectiva secando periódicamente el disposi- tivo. Vibración Protección: Resiste vibraciones intensas durante el funciona- miento, cumple con las normativas MIL‑STD-810G, método 514.6E-I ASAE EP455 sección 5.15.1 aleatorio Caídas Protección:...
-
Page 52: Cuidados Y Transporte
Cuidados y transporte Cuidados y transporte Cuidados y Proteger el producto contra golpes y vibraciones. • transporte Realizar periódicamente pruebas de funcionamiento, especialmente • después de que el producto ha sufrido golpes o posterior a largos periodos de almacenamiento o transporte. - Page 53 Funcionamiento ☞ Cargue la batería antes de usarla por primera vez. Cargar la batería, ☞ Utilice únicamente el cargador proporcionado con el ZeniusX. paso a paso Conecte el adaptador de alimentación CA al ZeniusX y a un enchufe C/A. Alternativa: Conecte el ZeniusX a un ordenador con el cable de transferencia de datos.
- Page 54 Funcionamiento Encender el ZeniusX paso a paso 18661_001 ☞ Coloque el ZeniusX sobre una superficie estable y lisa o sostenga el dispositivo en sus manos. Asegúrese de que el dispositivo esté conectado al adaptador de alimentación CA o de que las baterías estén totalmente cargadas.
- Page 55 Pulse y mantenga pulsada la tecla de encendido hasta que el ZeniusX vibre una vez y hasta que se visualice el logotipo de GeoMax. Cuando aparezca la pantalla de inicio, el ZeniusX ya está listo para usarse. El sistema operativo necesita por lo general aprox.
- Page 56 Funcionamiento Para apagar el dispositivo, seleccione la opción Power Off (apagado). ☞ Después de apagar el ZeniusX, espere al menos 5 segundos antes de encenderlo de nuevo.
- Page 58 879580-1.0.1es Traducción de la versión original (879580-1.0.1en) © 2019 GeoMax AG, Widnau, Switzerland GeoMax AG www.geomax-positioning.com...
- Page 59 Série GeoMax ZeniusX Guide abrégé Version 1.0 Français...
- Page 60 Suivez les instructions qu’il contient. ☞ A conserver pour une consultation ultérieure ! Utilisation pré- Télécommande des instruments GeoMax. • Echange de données avec des appareils externes. • Ne jetez pas ce produit avec les ordures ménagères.
- Page 61 Pour l'alimentation CA/CC et le chargeur de batterie : AVERTISSEMENT Choc électrique dû à une utilisation dans des conditions d'humidité (forte) Si l'humidité pénètre dans l'unité, un risque de choc électrique en résulte pour vous. Mesures préventives : ▶ Le produit ne doit pas être utilisé s'il n'est pas sec ! ▶...
- Page 62 Mesures préventives : ▶ N'ouvrez pas le produit ! ▶ Seuls les centres SAV agréés par GeoMax sont autorisés à réparer ces produits. Conformité à la Pour les produits sans transmetteur ou récepteur radio : réglementation FCC partie 15, applicable aux États-Unis •...
- Page 63 FCC parties 15, 22 et 24 (applicable aux Etats-Unis) • les prescriptions nationales GeoMax AG, déclare par la présente que l’équipement radio de type • ZeniusX est conforme à la directive européenne 2014/53/UE et aux autres directives européennes applicables. Le texte complet de la déclaration UE de conformité...
- Page 64 Informations importantes sur l'instrument La conformité pour des pays dont la réglementation nationale n’est • couverte ni par les règles FCC partie 15, 22 et 24 ni par la directive européenne 2014/53/UE est à faire approuver préalablement à toute utilisation.
- Page 65 Éléments d'instrument Face avant du ZeniusX Écran Clavier Touche Marche/Arrêt Témoins LED 18642_001 Éléments d'instrument...
- Page 66 Éléments d'instrument Face arrière du ZeniusX Appareil photo avec flash Appareil photo Support pour sangle Haut-parleur Fermoir du compartiment de batterie Compartiment avec emplacements pour batterie, carte SIM et carte SD Fixation de la sangle 18643_001...
- Page 67 Compartiment de batterie et cache arrière Connecteurs de batterie Emplacement de carte SIM Emplacement de carte SD Support pour sangle Port USB et alimentation élec- trique 18657_001 Éléments d'instrument...
-
Page 68: Caractéristiques Techniques
Caractéristiques techniques Caractéristiques techniques Environnement Température Température d’utilisa- -30 °C à +60 °C tion : Température de stoc- -40 °C à +80 °C kage : Protection contre l’eau, la poussière et le sable IP67 (CEI60529) Étanche à l’eau et à la poussière... - Page 69 Humidité Protection : 5 % à 95 %, sans condensation Neutraliser les effets de la condensation en séchant régulièrement l’appareil. Vibration Protection : Supporte de fortes vibrations pendant le fonctionne- ment, conforme à MIL‑STD-810G, méthode 514.6E-I ASAE EP455 Section 5.15.1 Random Chutes Protection : Résistance à...
-
Page 70: Entretien Et Transport
Entretien et transport Entretien et transport Entretien et Protégez le produit contre les chocs et vibrations. • transport Effectuez régulièrement des tests de fonctionnement, notamment • après une chute du produit, un stockage ou un transport de longue durée. - Page 71 Utilisation ☞ Veillez à charger la batterie avant la première utilisation. Procédure de ☞ Utiliser seulement le chargeur livré avec le ZeniusX. chargement de la batterie Raccorder l’adaptateur CA au ZeniusX et à une prise de courant alternatif. Ou : Raccorder le ZeniusX à...
- Page 72 Utilisation Procédure pas à pas de mise en marche du ZeniusX 18661_001 ☞ Poser le ZeniusX sur une surface plane et stable ou tenir l’appa- reil à la main. S’assurer que l’appareil est raccordé à l’aide de l’adaptateur CA ou que les batteries sont chargées.
- Page 73 Maintenir la touche Marche/Arrêt enfoncée jusqu’à ce que le ZeniusX vibre une fois et que le logo GeoMax s’affiche. Quand l’écran d’accueil apparaît, le ZeniusX est prêt à fonction- ner. Le système d’exploitation nécessite en général entre 30 et 40 secondes pour démarrer.
- Page 74 Utilisation Pour mettre l’appareil hors tension, sélectionner l’option Éteindre. ☞ Après la mise hors tension du ZeniusX, attendre au moins 5 secondes avant de le remettre sous tension.
- Page 76 879580-1.0.1fr Traduction de la version originale (879580-1.0.1en) © 2019 GeoMax AG, Widnau, Suisse GeoMax AG www.geomax-positioning.com...
- Page 77 Serie GeoMax ZeniusX Guida rapida Versione 1.0 Italiano...
- Page 78 Prima di utilizzare il prodotto o gli accessori in dotazione, leggere e seguire le istruzioni del Manuale d'uso. ☞ Da conservare per futura consultazione. Uso previsto Controllo a distanza degli strumenti GeoMax. • Trasmissione dei dati con apparecchiature esterne. • Il prodotto non deve essere smaltito insieme ai rifiuti domestici.
- Page 79 Per l'alimentatore CA/CC e il caricabatterie: AVVERTENZA Scarica elettrica causata dall'utilizzo in ambienti ostili o bagnati Se l'unità si bagna può generare scariche elettriche. Precauzioni: ▶ Non utilizzare il prodotto se è umido! ▶ Utilizzare il prodotto solo in ambienti asciutti, ad esempio all'interno di edifici o veicoli.
- Page 80 Utilizzo del prodotto dopo tentativi errati di riparazione. • Precauzioni: ▶ Non aprire il prodotto! ▶ Solo i centri di assistenza autorizzati GeoMax possono riparare questi prodotti. Conformità alla Per i prodotti senza trasmettitore o ricevitore radio: legislazione FCC parte 15 (in vigore negli Stati Uniti) •...
- Page 81 FCC parte 15, 22 e 24 (in vigore negli Stati Uniti) • legislazione nazionale GeoMax AG dichiara che l'apparecchiatura radio di tipo ZeniusX è • conforme alla direttiva 2014/53/UE e alle altre direttive europee in vigore. Il testo completo della dichiarazione di conformità per l'UE è...
- Page 82 Importanti informazioni sullo strumento La conformità per i paesi in cui vigono altre disposizioni nazionali • non coperte dalla direttiva FCC, parte 15, 22 e 24 o dalla direttiva europea 2014/53/UE deve essere approvata prima della messa in esercizio.
-
Page 83: Componenti Dello Strumento
Componenti dello strumento Parte anteriore dello ZeniusX Schermo Tastierino Pulsante di alimentazione Indicatori LED 18642_001 Componenti dello strumento... - Page 84 Componenti dello strumento Parte posteriore dello ZeniusX Flash fotocamera Fotocamera Supporto per cinturino Altoparlanti Leva di apertura del vano batteria Vano con slot per batteria, scheda SIM e scheda SD Fissaggio cinturino 18643_001...
- Page 85 Vano batteria e pannello infe- riore Connettori batteria Slot per scheda SIM Slot per scheda SD Supporto per cinturino Porta USB e alimentazione 18657_001 Componenti dello strumento...
-
Page 86: Dati Tecnici
Dati tecnici Dati tecnici Specifiche Temperatura ambientali Temperatura di eserci- Da -30 °C a +60 °C zio: Temperatura di stoc- Da -40 °C a +80 °C caggio: Protezione dall'acqua, dalla polvere e dalla sabbia IP67 (IEC60529) Impermeabile alla pol- vere e all'acqua... - Page 87 Umidità Protezione: 5%-95% senza condensa Gli effetti della condensa si possono contrastare in modo efficace asciugando periodicamente il disposi- tivo. Vibrazioni Protezione: Resiste a vibrazioni intense durante il funzionamento, in conformità allo standard MIL‑STD-810G, metodo 514.6E-I ASAE EP455 Sezione 5.15.1 Cadute Protezione: Resiste a cadute da 1,2 m...
-
Page 88: Cura E Trasporto
Cura e trasporto Cura e trasporto Cura e trasporto Proteggere il prodotto dagli urti e dalle vibrazioni. • Eseguire periodicamente controlli funzionali in particolare se lo stru- • mento è caduto, è rimasto inutilizzato per molto tempo o è stato tra- sportato. -
Page 89: Funzionamento
Funzionamento ☞ Caricare la batteria prima di utilizzarla per la prima volta. Procedura detta- ☞ Utilizzare solo il caricabatterie fornito con lo ZeniusX. gliata per la rica- rica della Collegare l'alimentatore allo ZeniusX e a una presa di corrente. batteria In alternativa: Collegare lo ZeniusX a un computer utilizzando il cavo per il tra- sferimento dati. - Page 90 Funzionamento Procedura detta- gliata di avvio dello ZeniusX 18661_001 ☞ Posizionare lo ZeniusX su una superficie piana e stabile oppure tenerlo in mano. Verificare che il dispositivo sia collegato all'alimentazione o che le batterie siano cariche.
- Page 91 Tenere premuto il pulsante di alimentazione finché lo ZeniusX vibra una volta e viene visualizzato il logo GeoMax. Quando viene visualizzata la schermata iniziale, lo ZeniusX è pronto per l'uso. L'avvio del sistema operativo di solito richiede circa 30-40 secondi.
- Page 92 Funzionamento Per spegnere il dispositivo, selezionare l’opzione Power off. ☞ Dopo aver spento lo ZeniusX, attendere almeno 5 secondi prima di riaccenderlo.
- Page 94 879580-1.0.1it Traduzione dal testo originale (879580-1.0.1en) © 2019 GeoMax AG, Widnau, Switzerland GeoMax AG www.geomax-positioning.com...
- Page 95 GeoMax Série ZeniusX Guia Rápido Versão 1.0 Português - Brasil...
- Page 96 Leia e siga o Manual do Usuário antes de usar o produto ou os acessórios entregues com o produto. ☞ Manter para referência futura! Uso pretendido Controle remoto dos instrumentos GeoMax. • Comunicação de dados com dispositivos externos. • pt-br...
- Page 97 ☞ Para garantir a segurança ao utilizar o carregador de bateria que acompa- nha o produto, observe também as direções e instruções contidas no Manual do Usuário do carregador de bateria. Para a fonte de alimentação CA/CC e o carregador de bateria: ATENÇÃO pt-br Choque elétrico devido ao uso em condições úmidas e severas...
- Page 98 • efetuar reparos. Precauções: ▶ Não abra o produto! ▶ Somente centros de serviço autorizados GeoMax estão capacitados a reparar estes produtos. pt-br Conformidade Para produtos sem transmissor ou receptor de rádio: com os FCC Parte 15 (aplicável nos EUA) •...
- Page 99 • com regulamen- tos nacionais Pelo presente, a GeoMax AG, declara que o equipamento de rádio • tipo ZeniusX está em conformidade com a Diretiva 2014/53/UE e outras Diretivas europeias pertinentes. O texto completo da decla- ração de conformidade pode ser consultado em http://www.geomax-positioning.com/Downloads.htm.
- Page 100 Informações importantes sobre o instrumento conformidade para países com outras regulações nacionais não • cobertas pela FCC part 15, 22 e 24 ou pela Diretiva Europeia 2014/53/CE deve ser aprovada antes do uso e operação. pt-br...
-
Page 101: Componentes Do Instrumento
Componentes do instrumento Parte frontal do ZeniusX pt-br Tela Teclado Tecla liga/desliga Luzes indicadoras 18642_001 Componentes do instrumento... - Page 102 Componentes do instrumento Parte traseira do ZeniusX Flash da câmera Câmera Suporte para a alça de mão Alto-falante Levante a alavanca para o compartimento da bateria Compartimento com slots para bateria, cartão SIM e cartão SD pt-br Fixação da alça de mão 18643_001...
- Page 103 Compartimento da bateria e pai- nel inferior Conectores da bateria Slot do cartão SIM Slot do cartão SD Suporte para a alça de mão Porta USB e fonte de alimenta- ção pt-br 18657_001 Componentes do instrumento...
-
Page 104: Dados Técnicos
Dados técnicos Dados técnicos Especificações Temperatura ambientais Temperatura de opera- -30 °C a +60 °C ção: Temperatura de arma- -40 °C a +80 °C zenamento: Proteção contra água, poeira e areia pt-br IP67 (IEC60529) À prova de poeira e água... - Page 105 Umidade Proteção: 5 % a 95 % não condensado Os efeitos da condensação devem ser eliminados de forma eficiente através da secagem periódica do dis- positivo. pt-br Vibração Proteção: Resiste a forte vibração durante a operação, em con- formidade com MIL‑STD-810G, método 514.6E-I ASAE EP455 Seção 5.15.1 Random Quedas Proteção:...
-
Page 106: Cuidados E Transporte
Cuidados e Transporte Cuidados e Transporte Cuidados e Proteja o produto contra choques e vibrações. • transporte Execute testes funcionais periodicamente, especialmente depois que o • produto tiver sido derrubado, armazenado por longos períodos ou transportado. pt-br... - Page 107 Operação ☞ A bateria deve ser carregada antes de utilizá-la pela primeira vez. Passo a passo ☞ Use apenas o carregador fornecido com o ZeniusX. para Recarregar a Conecte o adaptador de energia AC ao ZeniusX e a um plugue bateria pt-br A/C.
- Page 108 Operação Passo a passo para Ligar o ZeniusX 18661_001 pt-br ☞ Coloque o ZeniusX em uma superfície plana e estável ou segure o dispositivo na sua mão. Certifique-se de que o dispositivo está conectado com o adapta- dor de energia AC ou que as baterias estão carregadas.
- Page 109 Pressione e segure a tecla liga/desliga até o ZeniusX vibrar uma vez e o logotipo GeoMax ser exibido. Quando a tela Home é exibida, o ZeniusX está pronto para uso. O sistema operacional normalmente precisa de aproximadamente 30-40 segundos para iniciar.
- Page 110 Operação Para desligar o dispositivo, selecione a opção Desligar. ☞ Após desligar o ZeniusX, espero, pelo menos, 5 segundos antes de ligar o dispositivo novamente. pt-br...
- Page 112 879580-1.0.1pt-br Traduzido do texto original (879580-1.0.1en) © 2019 GeoMax AG, Widnau, Suíça GeoMax AG www.geomax-positioning.com...
- Page 113 GeoMax ZeniusX Краткое руководство Версия 1.0 Русский...
- Page 114 Перед использованием продукта и сопутствующих аксессуаров, ознакомьтесь с требованиями Руководства пользователя, поставляемого вместе с продуктом. ☞ Сохраняйте документацию для использования в дальнейшем в качестве спра- вочника! Допустимое • Дистанционное управление приборами GeoMax. использование • Обмен данными с внешними устройствами. Устройство не должно утилизироваться вместе с бытовыми отходами.
- Page 115 ☞ Чтобы обеспечить безопасную эксплуатацию прилагаемого зарядного устрой- ства, соблюдайте инструкции и указания, приведенные в руководстве пользова- теля зарядного устройства. Важная информация о Вашем Инструменте...
- Page 116 Важная информация о Вашем Инструменте Для преобразователя переменного тока в постоянный и зарядного устрой- ства ПРЕДУПРЕЖДЕНИЕ Электрический шок из-за использования в условиях повышенной влажно- сти При намокании прибора возможен удар током. Меры предосторожности: ▶ Если прибор намокнет, его дальнейшее использование недопустимо! ▶...
- Page 117 Использование прибора после неквалифицированного устранения неис- правностей. Меры предосторожности: ▶ Не разбирайте устройство! ▶ Только авторизованные сервисные центры GeoMax имеют право на ремонт этих приборов. Соответствие Для изделий без радиопередатчика или приемника: национальным • Часть 15 FCC (применяется в США) нормам...
- Page 118 FCC, Части 15, 22 и 24 (применимо в США) национальным нормам • Настоящим GeoMax AG заявляет, что данный тип радиооборудования ZeniusX соответствует положениям Директивы 2014/53/ЕС и других при- менимых Директив ЕС. С полным текстом декларации ЕС о соответ- ствии можно ознакомиться на сайте...
- Page 119 • Соответствие нормам других стран, отличающимся от указанных в части 15, 22 и 24 норм FCC или Европейской директивы 2014/53/EC, должно быть обеспечено до начала эксплуатации. Важная информация о Вашем Инструменте...
- Page 120 Компоненты прибора Компоненты прибора Фронтовая часть ZeniusX Экран Клавиатура Клавиша «Питание» Светодиодные индикаторы 18642_001...
- Page 121 Вид сзади ZeniusX Подсветка камеры Камера Крепление ремня Динамик Рычажок для вскрытия аккумуляторного отсека Отсек со слотами для аккумулятора, SIM- карты и SD-карты Фиксатор ремешка 18643_001 Компоненты прибора...
- Page 122 Компоненты прибора Аккумуляторный отсек и нижняя панель Контакты аккумулятора Слот под SIM-карту Слот для SD карты Крепление ремня USB-порт и блок питания 18657_001...
-
Page 123: Технические Характеристики
Технические характеристики Условия окружаю- Температура щей среды Диапазон рабочих темпе- -30°C до +60°C ратур: Температура хранения: -40°C до +80°C Защита от влаги, пыли и песка IP67 (IEC 60529) Защищен от пыли и влаги Технические характеристики... - Page 124 Технические характеристики Влажность Уровень защиты: 5% —95% без конденсации Влияние конденсации влаги успешно устраняется перио- дической просушкой устройства. Вибрации Уровень защиты: Выдерживает сильную вибрацию во время работы, соответствие MIL‑STD-810G, метод 514.6 E-I ASAE EP455 Section 5.15.1, случайная вибрация Падения Уровень защиты: Выдерживает...
-
Page 125: Транспортировка И Хранение
Транспортировка и хранение Уход и транспорти- • Защищайте продукт от вибраций и ударов. ровка • После длительного хранения не забывайте проводить тесты. Транспортировка и хранение... -
Page 126: Работа С Инструментом
Работа с инструментом Работа с инструментом ☞ Батарея должна быть заряжена перед первым использованием инструмента. Заряд аккумуля- ☞ Используйте только то зарядное устройство, которое входит в ком- тора, плект устройства ZeniusX. пошаговая инструкция Подключите адаптер питания к ZeniusX и питанию. Или: Подключите... - Page 127 Включение ZeniusX, пошаговая инструкция 18661_001 ☞ Положите прибор ZeniusX на ровную устойчивую поверхность или держите его в руке. Подключите прибор к сети с помощью адаптера переменного тока или убедитесь, что аккумуляторы полностью заряжены. Работа с инструментом...
- Page 128 Работа с инструментом Нажмите и удерживайте нажатой клавишу питания до тех пор, пока ZeniusX не издаст однократную вибрацию и не отобразит логотип GeoMax. Когда откроется главный экран, устройство ZeniusX считается готовым к работе. Загрузка операционной системы обычно занимает 30—40 с.
- Page 129 Чтобы выключить устройство, выберите опцию Power Off. ☞ После выключения устройства ZeniusX подождите не менее 5 с, пре- жде чем включать устройство повторно. Работа с инструментом...
- Page 130 879580-1.0.1ru Перевод исходного текста (879580-1.0.1en) © 2019 GeoMax AG, Виднау, Швейцария GeoMax AG www.geomax-positioning.com...
- Page 132 879580-1.0.1multilingual Original text (879580-1.0.1en) © 2019 GeoMax AG, Widnau, Switzerland GeoMax AG www.geomax-positioning.com...
Need help?
Do you have a question about the ZeniusX Series and is the answer not in the manual?
Questions and answers