Table of Contents
Advertisement
Quick Links
Advertisement
Table of Contents

Related Manuals for GeoMax Zenius5 Series


Summary of Contents for GeoMax Zenius5 Series
- Page 1 GeoMax Zenius5 Series User Manual Version 1.0 English...
- Page 2 Read carefully through the User Manual before you switch on the product. Product Identification The model and serial number of your product are indicated on the type plate. Always refer to this information when you need to contact your agency or GeoMax authorised service centre. Trademarks •...
-
Page 3: Table Of Contents
Table of Contents In this manual Chapter Page Safety Directions General Introduction Definition of Use Limits of Use Responsibilities Hazards of Use Electromagnetic Compatibility EMC FCC Statement, Applicable in U.S. ICES-003 Statement, Applicable in Canada Description of the System Overview System Concept 2.2.1 Power Concept... -
Page 4: Safety Directions
Safety Directions General Introduction Description The following directions enable the person responsible for the product, and the person who actually uses the equipment, to anticipate and avoid operational hazards. The person responsible for the product must ensure that all users understand these directions and adhere to them. -
Page 5: Limits Of Use
Suitable for use in dry environments only and not under adverse conditions. Responsibilities Manufacturer of the GeoMax AG, CH-9443 Widnau, hereinafter referred to as GeoMax, is responsible for supplying the product, product including the user manual and original accessories, in a safe condition. - Page 6 Using the product after incorrect attempts were made to carry out repairs Precautions: Do not open the product. Only GeoMax authorised service centres are entitled to repair these products. The following advice is only valid for batteries, power adapter or docking station.
-
Page 7: Electromagnetic Compatibility Emc
Electromagnetic radiation can cause disturbances in other equipment. WARNING Although the product meets the strict regulations and standards which are in force in this respect, GeoMax cannot completely exclude the possibility that other equipment may be disturbed. The product is a class A product when operated with the internal batteries. In a domestic environment this product may cause radio interference in which case the user may be required to take adequate measures. -
Page 8: Fcc Statement, Applicable In U
It can also affect humans and animals. Precautions: Although the product meets the strict regulations and standards which are in force in this respect, GeoMax cannot completely exclude the possibility that other equipment can be disturbed or that humans or animals can be affected. -
Page 9: Ices-003 Statement, Applicable In Canada
ICES-003 Statement, Applicable in Canada This Class (B) digital apparatus complies with Canadian ICES-003. WARNING Cet appareil numérique de la classe (B) est conforme à la norme NMB-003 du Canada. Exposure to radio The wireless device is a radio transmitter and receiver. It is designed and manufactured not to exceed the frequency (RF) signals emission limit for exposure to radio frequency (RF) energy set by the OET Bulletin 65 Supplement C / Ministry of Health (Canada), Safety Code 6. -
Page 10: Description Of The System
System Concept 2.2.1 Power Concept General Use the batteries, chargers and accessories recommended by GeoMax to ensure the correct functionality of the instrument. Power options Power for the instrument can be supplied either internally or externally. Internal power supply: One battery fitting into the instrument. -
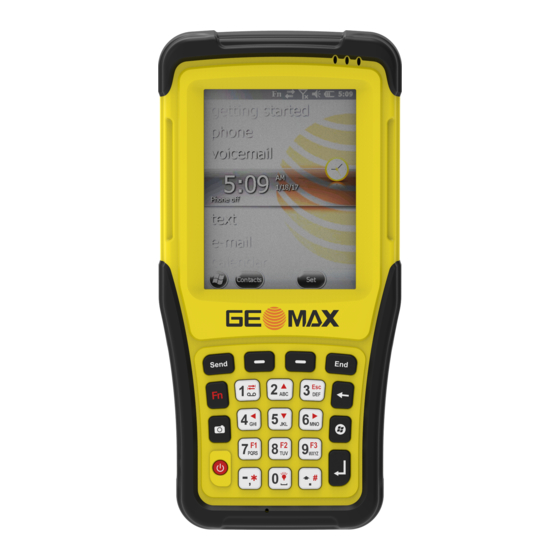
Page 11: Components
Components Front side of the Zenius5 a) Communication LED b) GPS LED c) Power LED d) Screen e) Keypad Power key g) Microphone 013752_001 Back side of the Zenius5 a) Camera b) Speaker c) Holder for hand strap d) Release lever for battery compart- ment e) Compartment with slots for battery, SIM card and SD card... -
Page 12: User Interface
User Interface Keyboard Keypad a) Left softkey b) Send key c) Function key d) Camera key e) Power key Numeric keys and alternative func- tion keys g) Right softkey h) End key Backspace key Start key k) Enter key 013753_001 Collect key Functions of the keys Function... -
Page 13: Operating Principles
Operating Principles Touch screen The user interface is operated through the capacitive touch screen. You can either use the supplied stylus or touch the screen with the finger. Operation Description To select an item Tap on the item. To start the edit mode in editable fields Tap on the editable field. - Page 14 Resetting the Zenius5 If the Zenius5 stops responding to the stylus or does not respond when you press any key, it is necessary step-by-step to start a hard reset. To start a hard reset, do the following: Step Description Press and hold the Send key and the End key. The Zenius5 resets.
-
Page 15: Led Indicators On Zenius5
LED Indicators on Zenius5 LED indicators a b c a) Communication LED b) GPS LED c) Power LED 013776_001 Status of the LED Indi- The Zenius5 device has Light Emitting Diode indicators. They indicate the basic status of the device. cators Status of LED Description... -
Page 16: Operation
• For Li-Ion batteries, a single discharging and charging cycle is sufficient. We recommend carrying out the process when the battery capacity indicated on the charger or on a GeoMax product deviates signif- icantly from the actual battery capacity available. -
Page 17: Charging The Battery
Using the product after incorrect attempts were made to carry out repairs Precautions: Do not open the product. Only GeoMax authorised service centres are entitled to repair these products. The following advice is only valid for batteries, power adapter or docking station. -
Page 18: Inserting And Removing A Sim Card And Sd Card
Inserting and Removing a SIM Card and SD Card • Keep the card dry. • Use it only within the specified temperature range. • Do not bend the card. • Protect the card from direct impacts. Failure to follow these instructions could result in data loss and/or permanent damage to the card. Always ground yourself to remove any static charge before touching the circuit board. -
Page 19: Working With A Usb Memory Stick
Working with a USB Memory Stick Working with a USB memory stick step-by-step 0014093_001 Step Description The USB port is located at the bottom panel of the Zenius5, refer to Bottom panel of the Zenius5. Connect the USB OTG cable with the Zenius5. Slide the USB stick firmly into the USB host port of the USB OTG cable. -
Page 20: Connecting And Synchronising With A Computer
Connecting and Synchronising with a Computer Microsoft ActiveSync (for PCs with Windows XP operating system) or Windows Mobile Device Center (for PCs with Windows Vista or Windows 7/Windows 8 operating system) is the synchronisation software for Windows mobile-based pocket PCs. Microsoft ActiveSync or Windows Mobile Device Center enables a PC and a Windows mobile-based pocket PC to communicate. - Page 21 Connection via Windows Step Description Mobile Device Center Connect the Zenius5 to a computer. Refer to Connecting the Zenius5 to a computer step-by- Step-by-step step. If the Zenius5 successfully connects to the computer the Windows Mobile Device Center screen appears. Select Connect without setting up your device.
-
Page 22: Operating System And Software
Operating System and Software System Main Interface Home screen The home screen is the starting place for accessing all functionalities of the Zenius5. The screen is displayed after switching on the Zenius5. a) Status bar with icons b) Default list of applets such as phone and voicemail c) Windows key d) Softkeys... - Page 23 Status icons The icons within the status bar indicate the current status of the main system functions. a b c 013736_001 a) Wi-Fi connection status b) LAN/Bluetooth mode c) Phone connection mode d) Speaker status e) Battery status Current time Battery status icons Icon Description...
-
Page 24: Interacting With The Zenius5
Interacting with the Zenius5 Working with the touch- Action Description screen Touch the screen once to open items and select options. Select and hold Select and hold an item. A pop up menu with a list of available actions opens. Tap the action you want to perform. -
Page 25: Zenius5 Camera
Zenius5 Camera Taking pictures Step Description step-by-step Press the Camera key on the keypad to start the camera. The Pictures & Videos screen opens. Press the Camera key to take a picture. The picture is shown on the screen. Tap the Menu button to change settings of the picture. -
Page 26: Software
Software Pre-installed programs The following programs are pre-installed on the Zenius5: Program Icon Description ActiveSync Synchronise information between the Zenius5 and a computer. Alarms Set alarms. Text Send, receive and organise text messages. E-mail Send, receive and organise e-mail messages. Internet explorer Access the Internet. -
Page 27: Personal Settings
Personal Settings Customise the screen Use the Screen interface to enable Clear Type, align the screen or change the appearance of text. Align Screen 1) Tap the Windows button /Settings/System/Screen. 2) Tap the Alignment Tab. 3) Tap Align Screen if the touchscreen does not respond to the stylus. 4) Follow the instructions and tap the target cross with the stylus. - Page 28 Power and backlight Power settings settings 1) Tap the Windows button /Settings/System/Power or tap the title bar and the Power icon the drop-down list. 2) Tap the Battery Tab and to check the battery level. 3) Tap the Advanced Tab to set the time before the Zenius5 turns of when idle. Backlight settings The backlight makes the screen easier to read in low light conditions but it uses extra power.
- Page 29 Password setting A password helps to keep the Zenius5 data secure. To set a password, do the following: 1) Tap the Windows button /Settings/Lock. The Password screen opens. 2) Choose the Password type and enter the password. 3) Enter the same password in the Confirm field. 4) Tap the Hint Tab to set a password hint.
-
Page 30: Communication
Communication Phone and Text Messages General To use the phone, you need to set up an account with a phone network service. The functions available to you depend on the services offered by your phone network service provider and your type of subscription. Your service provider provides you a SIM card. - Page 31 Call history The call history shows time and duration of all incoming, outgoing and missed calls and a summary of total calls. Call history provides easy access to any notes taken during a call. Access: Start the Phone program, refer to Starting the phone program. Tap Call History. Operation Description Viewing call history...
-
Page 32: Text Messages
Operation Description Reject a call Press the End key or tap Ignore on the screen to reject an incoming call. End a call Press the End key or tap End on the screen to end a call. Operations during a call Operation Description Adjusting the phone... -
Page 33: Bluetooth Connection
Step Description Tap the Tasks Tab and select Add a new modem connection. The Make New Connection screen opens. In the Select a modem: field select Cellular Line (GPRS). The name of access point is CMNET. Tap Next to confirm the setting. Optional: Type the User name, Password and Domain. -
Page 34: Wi-Fi Connection
Step Description Confirm the device SN and tap Next. Select a port and tap Finish to confirm the setting process. When removing paired devices from the list, it is advised to remove any associ- ated virtual ports first to prevent undesired behaviour. Wi-Fi Connection Wi-Fi connection Operation... -
Page 35: Troubleshooting
Troubleshooting Troubleshooting Problem Solution Zenius5 does not The remaining battery power may be too low to run the Zenius5. Charge the switch on when battery, refer to Charge battery step-by-step. using battery power Screen responds Make sure that the Zenius5 is not running out of battery power. If the problem still slowly persists, restart your device. -
Page 36: Care And Transport
Shipping When transporting the product by rail, air or sea, always use the complete original GeoMax packaging, container and cardboard box, or its equivalent, to protect against shock and vibration. -
Page 37: Technical Data
Technical Data Control unit Touch Screen: 3.7’’ VGA (480 x 640 pixels); Blanview Screen Keyboard: 22 keys, including two software-specific keys Audio: Built-in receiver, loud-speaker and microphone Digital camera: 5-megapixel camera with autofocus and LED flash System Processor: Texas Instrument Sitara™ AM335x 1GHz Operating System: Windows Embedded Handheld 6.5 Professional ROM Memory:... -
Page 38: Conformity To National Regulations
FCC Part 15, 22 and 24 (applicable in US) • Hereby, GeoMax AG, declares that the product Zenius5 is in compliance with the essential require- regulations ments and other relevant provisions of Directive 1999/5/EC. The declaration of conformity is available from GeoMax AG. -
Page 39: Software Licence Agreement
GeoMax. Such software is protected by copyright and other laws and its use is defined and regulated by the GeoMax Software Licence Agreement, which covers aspects such as, but not limited to, Scope of the Licence, Warranty, Intellectual Property Rights, Limitation of Liability, Exclusion of other Assurances, Governing Law and Place of Jurisdiction. - Page 40 GeoMax Zenius5 Series 853603-1.0.0en Original text © 2017 GeoMax AG, Widnau, Switzerland GeoMax AG www.geomax-positioning.com...
Need help?
Do you have a question about the Zenius5 Series and is the answer not in the manual?
Questions and answers