Table of Contents
Advertisement
Quick Links
350BR BROADBAND ROUTER
Product information
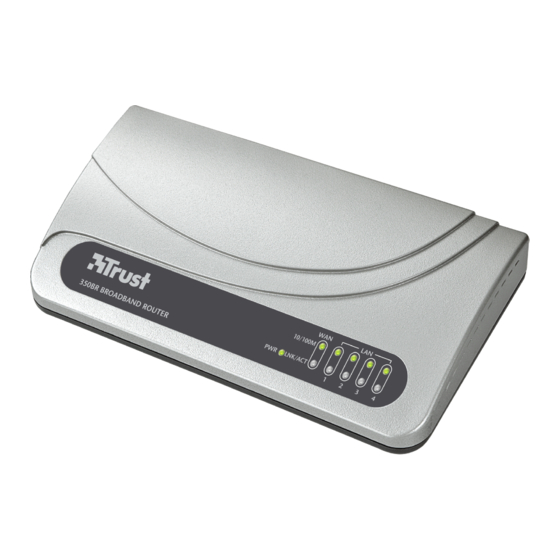
G
A: Power LED
F: LED for LAN port 4
B: LED for WAN port
G: Connection for the mains
C: LED for LAN port 1
power supply
H: LAN port 4
D: LED for LAN port 2
I: LAN port 3
E: LED for LAN port 3
J: LAN port 2
Contents
Steps 1-7
Connecting
Steps 8-26
Internet settings
Appendix A
Checking the network settings
Appendix C
Resetting the router
B C D E
F
A
H
I
J
K
L
M
K: LAN port 1
L: WAN port
M: Reset switch
Caution: This manual contains
important security and safety
information. Read the entire manual
before connecting the product.
1
UK
Advertisement
Table of Contents

Related Manuals for Trust 350BR


Summary of Contents for Trust 350BR
- Page 1 350BR BROADBAND ROUTER Product information B C D E A: Power LED F: LED for LAN port 4 K: LAN port 1 B: LED for WAN port G: Connection for the mains L: WAN port C: LED for LAN port 1...
-
Page 2: Installation
350BR BROADBAND ROUTER Installation Insert the power plug into the power connection (G). Insert the adapter into the plug socket. The power LED (A) will be lit. If the Power LED is not lit, check: - The power supply. - The connections. - Page 3 350BR BROADBAND ROUTER Connect the UTP network cable provided to one of the LAN ports on the router. Connect the other end of the UTP network cable to the network connection on the PC. 1. Turn the PC off. 2. Connect the cable to the PC.
- Page 4 350BR BROADBAND ROUTER Configuring the Internet connection (Basic settings) Start an Internet browser on the computer and open the following page: http://192.168.2.1. “OK” Appendix A “Error”...
-
Page 5: Enter The Password
350BR BROADBAND ROUTER Enter the user name. (Default user name: admin) 2. Enter the password. (Default password: 1234) 3. Click “OK”. (User name and password for the router.) Click “Quick Setup” (Wizard) 1. Time Zone Router Setup wizard: 1. Set the time zone (GMT +01.00). -
Page 6: Broadband Type
350BR BROADBAND ROUTER 2. Broadband Type 1. Select the type of Internet connection. 2. Click “Next”. If you do not know the type of Internet connection, ask your Internet Service Provider. Tip: xDSL Internet with PPPoE xDSL Internet with router modem (Dynamic/Static IP) 14, 15 xDSL Internet with PPTP modem (e.g. -
Page 7: Fixed-Ip Xdsl
350BR BROADBAND ROUTER A. The Internet Service Provider does not use a host name or MAC address. 3. IP Address Info Click “OK”. Cable Modem B. The Internet Service Provider requires a host name or MAC address (e.g. “@home). (Contact your Internet Service Provider for more information.) - Page 8 350BR BROADBAND ROUTER 3. IP Address Info 1. Enter your user name (e.g. Name@Provider). PPPoE 2. Enter the PPPoE password. 3. Click “OK”. (See the instruction manual provided with the modem or contact your Internet Service Provider for information about the settings.)
- Page 9 350BR BROADBAND ROUTER A. The Internet Service Provider uses PPTP with a 3. IP Address Info Dynamic IP address. Enter the host name given to you by your PPTP Internet Service Provider (e.g. “Name@Provider”). Enter the MAC address or click “Clone Mac Address”...
- Page 10 350BR BROADBAND ROUTER A. The Internet Service Provider uses PPTP with a Dynamic IP address. 3. IP Address Info Type the host name given to you by your L2TP Internet Service Provider (e.g. “Name@Provider”). Enter the MAC address or click “Clone Mac Address”...
-
Page 11: Password Setup
350BR BROADBAND ROUTER 1. Click "System”. 2. Click “Password Settings”. Altering the administrator password Password Setup This password is required to alter the modem settings at a later date. Altering the password prevents other people from altering your settings. 1. Enter the old password (“1234”). - Page 12 350BR BROADBAND ROUTER 1. Enter the user name. (Default User name: “admin”). 2. Enter the password. (The new password) 3. Click “OK”. (User name and password for the router.) Checking the Internet settings Click "Status”. Click “Internet Connection”.
-
Page 13: Internet Connection
Internet Connection ”Connect” ”Disconnect”: check the settings 1. Open your Internet browser. 2. Type www.trust.com in the address bar. No web page: check the settings www.trust.com Ready for use (See the advanced instruction manual (available in English) included on the CD-ROM for the other settings.) - Page 14 - Give the systems access rights to the network. Enable Windows network sharing and encryption. You have forgotten the password for the router. - Reset the device (see appendix B). Go to www.trust.com/14126 for up-to-date FAQs, drivers and instruction manuals.
-
Page 15: Windows Xp
350BR BROADBAND ROUTER Appendix A: Checking the network settings Windows XP Windows XP Your network settings for automatically assigning the TCP/IP address: Click “Start”. Select “Settings”. Select “Network Connections”. Right-click the network adapter which is connected to the modem. Select “Properties”’. - Page 16 350BR BROADBAND ROUTER Windows 2000 Windows 2000 Your network settings for assigning the TCP/IP address: Right-click the “My Network Places” icon. Select “Properties”’. Right-click the network adapter which is connected to the modem. Select “Properties”’. Click “TCP/IP”. Click “Properties”. Set the two options to “Automatic”.
- Page 17 350BR BROADBAND ROUTER...
- Page 18 350BR BROADBAND ROUTER Windows 98 and Windows ME Windows 98 / Me Your network settings for automatically assigning the TCP/IP address: Right-click the “Network Neighbourhood” icon. Select “Properties”’. Click “TCP/IP”. Click “Properties”. Click the “IP Address” tab. Select “Obtain an IP address automatically".
-
Page 19: Internet Explorer
350BR BROADBAND ROUTER Internet Explorer Open Internet Explorer and carry out the following: Click “Extra - Internet Options”. - Page 20 350BR BROADBAND ROUTER Click the “Connections” tab. Select "Never dial a connection". Click the “LAN Settings” button. Unselect all the proxy settings. Click “OK” to close all the windows and save the settings. Return to step 11.
-
Page 21: Appendix B: Resetting The Default Settings
• This device has a two-year product warranty which is valid from the date of purchase. Go to www.trust.com/warranty for more information. • It is forbidden to reproduce any part of this instruction manual without the permission of Trust International B.V.
Need help?
Do you have a question about the 350BR and is the answer not in the manual?
Questions and answers