Table of Contents
Advertisement
Available languages
Available languages
Advertisement
Table of Contents

Related Manuals for AIGOSTAR 10KZO


Summary of Contents for AIGOSTAR 10KZO
- Page 1 INSTRUCTION MANUAL LED TABLE LAMP...
- Page 2 CONTENT 02-06 07-11 12-16 17-21 22-26 27-31 32-36 37-41...
-
Page 3: Control Panel
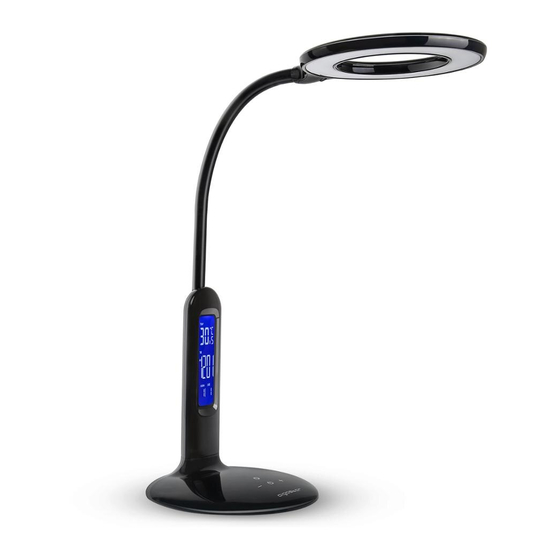
SPECIFICATION Model no.: TECHNICAL PRODUCTS SPECIFICATION 8433325188139 8433325188122 VOLTAGE POWER COLOR TEMPERATURE MODEL 8433325188139 DC24V Adjustable 1.PC Cover 8433325188122 2.Lampshade HOW TO USE 3.Connecting Rod Dimmer(DOWN) Dimmer(UP) 4.LCD Screen 5.Lamp Body 6.DC Socket 7.Base 8.Control Panel Brightness Dimmer DOWN/ Calendar Brightness Dimmer UP/ Calendar Function Key. -
Page 4: Time Mode
The CT button: Dimmer 5 grades [1 / 2 / 3 / 4 / 5 Press the to switch to ALARM setting mode, the levels] to change the color temperature, cycling in relevant data on the LCD screen will keep flashing. Each order and it is also the function key of the calendar. - Page 5 Modelo nº: 8433325188139 8433325188122 1.Cubierta 2.Cabezal Do not remove the Do not place lamp Do not use the lamp Do not use the lamp 3.Brazo cover or modify the near hot object or in if the power cord or near flammable 4.Pantalla LCD lamp in any way.
-
Page 6: Modo De Empleo
Botón de selección de función: 5 niveles de ajuste [1 MODO DE EMPLEO / 2 / 3 / 4 / 5] para regular la temperatura del color, Luminosidad (ATENUAR) Luminosidad (AUMENTAR) en orden. Este botón le permitirá también acceder al calendario. -
Page 7: Solución De Problemas
Pulse el botón para entrar en el modo de ajuste de la ALARMA, El tiempo comenzará a parpadear en la pantalla. Cada vez que pulse el botón , navegará entre las opciones de [hora - minuta – repetición de alarma - sonido - salir], en este orden. Pulse los botones “+”... -
Page 8: Panel Kontrolny
Model no.: JAK UŻYWAĆ 8433325188139 8433325188122 Opornik(DÓŁ) LOpornik(GÓRA) 1.Okładka na PC 2.Klosz 3.Korbowód Jasność Przyciemnij przycisk funkcji Jasność Przyciemnij przycisk funkcji 4.Ekran LCD dół/ Kalendarz. góra / Kalendarz Przycisk funkcyjny. 5.Korpus lampy 6.Gniazdo DC 7.Podstawa 8.Panel sterowania 9.Zasilanie PANEL KONTROLNY Krótkie dotknięcie ściemniaczem (dół): Krótkie dotknięcie Dimmer góra: ściemniacz 4 stopnie, brzęczyk będzie... - Page 9 Przycisk CT: ściemniacz 5 stopni [1/2/3/4/5 Wściśnij aby przejść do trybu ustawień ALARM, odpowiednie dane na ekranie LCD będą nadal migać. poziomów], aby zmienić temperaturę kolorów, Za każdym razem, gdy naciskasz przycisk ,aktualny cyklicznie w kolejności i jest to również klawisz stan ustawienia będzie następujący: [godzina - minuta funkcyjny kalendarza.
-
Page 10: Istruzioni Per L'installazione
Modello no. 8433325188139 8433325188122 1.PC Cover Nie zdejmuj pokrywy Nie umieszczaj lampy Nie używaj lampy, Nie używaj lampy w 2.Paralume ani nie modyfikuj w pobliżu gorących jeśli przewód pobliżu łatwopalnych 3.Biella meccanica lampy w żaden przedmiotów lub w zasilający lub przedmiotów lub sposób. - Page 11 Pulsante CT: Dimmer 5 gradi [1 / 2 / 3 / 4 / 5 livelli] per COME UTILIZZARE IL PRODOTTO modificare la temperature di colore, impostare un ordine ciclico e pulsante principale per la funzione calendario. Dimmer(MENO) Dimmer(PIU’) Il pulsante emetterà un suono ad ogni click Modalità...
-
Page 12: Problemi E Soluzioni
Premere il pulsante per passare alla modalità di impostazione ALARM, I dati rilevati sullo schermo LCD continueranno a lampeggiare. Ogni qualvolta si premerà il pulsante , lo stato di impostazione corrente tornerà come ad inizio [ore - minuti – suono d’allarme (secondit) - musica - esci]. - Page 13 Modell nº: WIE MAN ES BENUZT 8433325188139 8433325188122 Dimmer(Unten) Dimmer(Oben) 1.PC-Hülle 2.Lampenschirm 3.Verbindungsstange 4.LCD-Bildschirm 5.Lampengehäuse Helligkeits-Dimmer Unten/ Kalender- Helligkeits-Dimmer Oben/ Kalender- 6.DC-Buchse Funktionstaste. Funktionstaste. 7.Basis 8.Bedienfeld 9.Stromversorgung Bedienfeld Kurzes drücken des Dimmers (Unten): Kurzes drücken des Dimmers (UP): Dimmer 4 Stufen, der Summer Dimmer 4 Stufen, der Summer CT Funktionstaste alarmiert bei jeder kurzen Berührung.
- Page 14 Drücken Sie die Taste, um in den ALARM-Einstellmodus Die CT-Taste: Dimmer 5 Stufen[1 / 2 / 3 / 4 / 5 Stufen], zu wechseln, die entsprechenden Daten auf dem LCD- um die Farbtemperatur zu ändern, in der Reihenfolge, Bildschirm blinken weiter. Jedes Mal, wenn Sie die Taste und es ist auch die Funktionstaste des Kalenders.
- Page 15 Model no.: 8433325188139 8433325188122 1.PC Omhulsel 2.Lampekap Nehmen Sie die Stellen Sie die Lampe Verwenden Sie Verwenden Sie die 3.Verbindingsbuis Abdeckung nicht nicht in der Nähe von die Lampe nicht, Lampe nicht in der ab und verändern heißen Gegenständen wenn das Netzkabel Nähe von brennbaren 4.LCD Scherm Sie die Lampe...
-
Page 16: Hoe Te Gebruiken
De CT-knop: 5 dim gradaties [1/2/3/4/5 niveaus] om de kleurtemperatuur te wijzigen, in volgorde door te lopen HOE TE GEBRUIKEN en het is ook de functietoets van de kalender. En de zoemer waarschuwt bij iedere aanraking Dimmer(MINDER) Dimmer(MEER) Kalender instellingsmodus: Bij het opstarten worden op het LCD-scherm de tijd, de maand, de datum, de dagen en de temperatuur, de twaalf uurs instelling, weergegeven. - Page 17 Druk op om naar de ALARM-instellingsmodus te gaan, de relevante gegevens op het LCD-scherm blijven knipperen. Elke keer dat u op drukt, is de huidige instellingstoestand in orde [uur - minuten - beltoon (tweede) - muziek - stoppen], het doorlopen van meerdere knoppen. Druk op de "+"...
-
Page 18: Installation Instruction
Modèle nº: 8433325188139 8433325188122 FONCTIONNALITES Variateur de l’intensité (-) Variateur de l’intensité (+) 1.Couvercle 2.Tête de lampe 3.Bras articulé 4.Ecran LCD 5.Corps de lampe Variateur de l’intensité DIMINUER/ Variateur de l’intensité AUGMENTER/ 6.Prise électrique Fonction Calendrier Fonction Calendrier 7.Socle 8.Panneau de contrôle 9.Câble d’alimentation Panneau de Contrôle Appui court sur le bouton (-) : Réglage... -
Page 19: Fonction Temps
Bouton Modes : Réglage de 5 niveaux de température Appuyez sur le bouton pour choisir le mode de de couleur [1 / 2 / 3 / 4 / 5] dans cet ordre, ce bouton réglage de l’ALARME ; l’affichage de l’heure clignotera permet aussi d’entrer dans la fonction calendrier. -
Page 20: Instruções De Instalação
Modelo no.: 8433325188139 8433325188122 1.Capa PC 2.Abajur N’enlevez jamais Ne placez jamais la N’utilisez pas la Veuillez tenir la lampe le couvercle et lampe près d’une lampe si le câble à l’écart des objets 3.Biela ne tentez pas de source de chaleur d‘alimentation est inflammables. - Page 21 O botão CT: Regulador 5 graus [níveis 1/2/3/4/5] COMO USAR para alterar a temperatura da cor, ciclo em ordem e é também a tecla de função do calendário. E o alarme Regulador(BAIXO) Regulador (CIMA) vai soar em cada toque Modo de configuração do calendário: Inicialização, a tela LCD mostrará...
- Page 22 Pressione o botão para alternar para o modo de configuração ALARME, os dados relevantes na tela LCD continuarão a piscar. Cada vez que pressiona o o estado atual da configuração será na ordem [hora - minuto - tempo do toque (segundo) - música - sair], vários botões,pelo loop.
Need help?
Do you have a question about the 10KZO and is the answer not in the manual?
Questions and answers
Como pongo minutero
To set the minute on the AIGOSTAR 10KZO:
1. Enter the TIME setting mode.
2. Use the button to switch through the options (hour - minute - year - month - date).
3. When the minute setting blinks, press “+” or “-” to adjust the value.
4. The setting will be saved automatically if no action is taken for 1 minute.
This answer is automatically generated