Advertisement
Available languages
Available languages
Quick Links
Indoor/Outdoor
Thermometer
Art.no 36-6723
Model E0139ST2C
36-6723-1
E0139ST2C
Please read the entire instruction manual before using the product
and then save it for future reference. We reserve the right for any
errors in text or images and any necessary changes made to
technical data. In the event of technical problems or other queries,
please contact our Customer Services.
Safety
•
The thermometer must not be dismantled or modified in any way.
•
The thermometer is only intended for indoor use. Do not expose
it to moisture.
•
The thermometer is not intended to be used as a reference
thermometer and Clas Ohlson will not be held liable for any
damage which may result from inaccurate readings.
•
The batteries should be removed from the thermometer if it is
not to be used for an extended period, otherwise they might leak
and damage the thermometer. Never leave a discharged battery
in the battery compartment.
•
The max and min readings will be deleted whenever the batteries
are removed.
•
The thermometer must never be subjected to shocks or impacts.
NOTE:
Do not mix old and new batteries or batteries of different types.
Do not mix alkaline, regular or rechargeable batteries.
Care and maintenance
Clean the product using a lightly moistened cloth. Use only mild
cleaning agents, never solvents or corrosive chemicals.
Responsible disposal
This symbol indicates that this product should not
be disposed of with general household waste.
This applies throughout the entire EU. In order to
prevent any harm to the environment or health
hazards caused by incorrect waste disposal,
the product must be handed in for recycling so that
the material can be disposed of in a responsible
manner. When recycling your product, take it to
your local collection facility or contact the place
of purchase. They will ensure that the product is
disposed of in an environmentally sound manner.
GREAT BRITAIN • CUSTOMER SERVICE tel. 020 8247 9300 e-mail customerservice@clasohlson.co.uk internet www.clasohlson.co.uk
postal 10 – 13 Market Place, Kingston Upon Thames, Surrey, KT1 1JZ
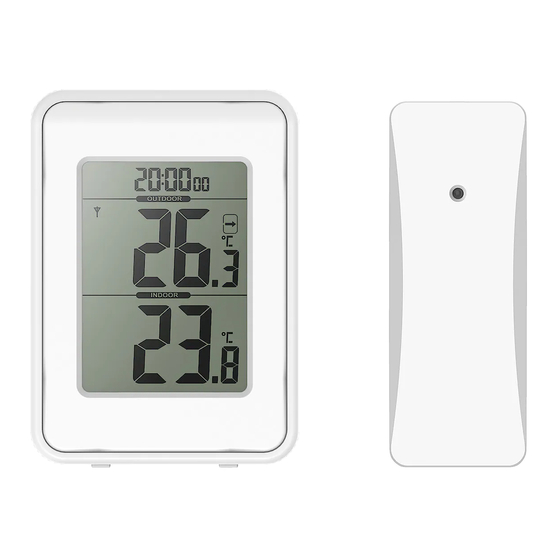
Buttons and functions
3
2
1
7
8
1.
Max/min indoor temperature indicator
2.
Max/min outdoor temperature indicator
3.
12-hour display mode indicator
4.
Time
5.
Outdoor temperature
6.
Indoor temperature
7.
[ MODE ] Time setting mode
8.
[ UP ] Increases values when setting the time
9.
[ DOWN ] Decreases the values when setting the time
10. [ MAX/MIN ] Select min/max temperature display mode
11. Hanging slot
12. Battery cover
13. Table stand
Installation
1.
Remove the battery cover (12) to access the battery compartment.
2.
Insert 2 × AAA/LR03 batteries (sold separately) observing
the polarity markings in the battery compartment.
3.
Refit the battery cover.
4.
Choose where the thermometer is to be placed:
4
-
Standing on a flat surface using the table stand (13).
-
Hanging on a wall using the hanging slot (11).
5.
Make sure that the end of the sensor lead is outside so that the it
5
can register the outdoor temperature.
Operating instructions
Temperature display
6
1.
Press [ MAX/MIN ] (10) to display the maximum or minimum
temperature. The display will return to displaying the current
temperature after a few seconds.
2.
Hold [ MAX/MIN ] pressed down for a few seconds to clear
the max/min temperature memory.
Setting the clock
9
1.
Hold down [ MODE ] (7)for 2 seconds until the hours begin to flash.
10
2.
Press [ UP ] (8) or [ DOWN ] (9) to select the correct hour.
3.
Press [ MODE ] so that the minutes begin flashing.
4.
Press [ UP ] (8) or [ DOWN ] (9) to select the correct minutes.
11
5.
Press [ MODE ] to complete setting the time.
6.
Press [ UP ] to select either a 12 or 24 hour clock display.
Specifications
Temperature (indoor)
12
Temperature (outdoor)
Batteries
Size
13
Sensor lead
Weight
0 to +50 ºC (32 to 122 ºF)
−30 to +50 ºC (−22 to 122 ºF)
2 × AAA/LR03 (sold separately)
76 × 105 × 22 mm
2.5 m
93 g
Advertisement

Subscribe to Our Youtube Channel
Related Manuals for Cotech E0139ST2C

Summary of Contents for Cotech E0139ST2C
- Page 1 Insert 2 × AAA/LR03 batteries (sold separately) observing the polarity markings in the battery compartment. Refit the battery cover. Choose where the thermometer is to be placed: Art.no 36-6723 Model E0139ST2C Standing on a flat surface using the table stand (13). 36-6723-1 E0139ST2C Hanging on a wall using the hanging slot (11).
- Page 2 Termometer inne/ute Knappar och funktioner Installation Öppna batteriluckan (12) för att komma åt batterifacket. Sätt i 2 × AAA/LR03-batterier (säljs separat) enligt märkningen Art.nr 36-6723 Modell E0139ST2C i batterifacket. 36-6723-1 E0139ST2C Sätt tillbaka batteriluckan. Välj hur du vill placera enheten: Stående på en plan yta genom att fälla ut stödet (13).
- Page 3 Termometer, inne/ute Knapper og funksjoner Installasjon Åpne batterilokket (12) for å komme til batteriene. Plasser 2 × AAA/LR03-batterier i batteriholderen og følg Art.nr. 36-6723 Modell E0139ST2C markeringen for polene. Batterier selges separat. 36-6723-1 E0139ST2C Sett batterilokket på plass igjen. Velg hvordan du vil konfigurere enheten: Stående på...
- Page 4 Sisä-/ulkolämpömittari Painikkeet ja toiminnot Asentaminen Avaa paristolokero irrottamalla paristolokeron luukku (12). Aseta paristolokeroon kaksi AAA/LR03-paristoa (myydään Tuotenro 36-6723 Malli E0139ST2C erikseen) paristolokeron merkintöjen mukaisesti. 36-6723-1 E0139ST2C Sulje paristolokeron luukku. Valitse kuinka asetat laitteen: Pystyasentoon tasolle taittamalla tuki (13) auki. Lue käyttöohje ennen tuotteen käyttöönottoa ja säilytä se tulevaa tarvetta varten.
- Page 5 Thermometer Innen/Außen Tasten und Funktionen Installation Die Batterieabdeckung (12) öffnen, um an das Batteriefach zu Art.Nr. 36-6723 Modell E0139ST2C gelangen. Zwei AAA/LR03-Batterien (separat erhältlich) entsprechend 36-6723-1 E0139ST2C der Markierung in das Batteriefach setzen. Die Batterieabdeckung wieder anbringen. Vor Inbetriebnahme die Bedienungsanleitung vollständig durchlesen Standort wählen: und für künftigen Gebrauch aufbewahren. Irrtümer, Abweichungen Freistehend auf einer ebenen Fläche, dazu die Stütze (13)
Need help?
Do you have a question about the E0139ST2C and is the answer not in the manual?
Questions and answers