
Related Manuals for Lec Club LE

Summary of Contents for Lec Club LE
- Page 1 USER MANUAL Club LE Pedicure Chair 1-400-0022 • Rev F • 5/2/21 *shown with optional accessories and/or finishes © Living Earth Crafts 2020, All Rights Reserved...
- Page 2 Legal Notice The information provided in this document is intended for informational purposes only and is subject to change without notice. The information provided in this docu- ment should not be construed as a commitment by Living Earth Crafts®. Living Earth Crafts® assumes no responsibility for the ©...
-
Page 3: Table Of Contents
The tub basin is lined with soothing textured foot pebbles to give your client’s feet a relaxed, massaging sensation. The Club LE is designed for licensed therapists and technicians and is intended to be used in a professional spa, salon, or similar commercial environment. While no special training is needed to operate the product, for safety reasons it is important that the instructions contained in this manual are reviewed in detail before the first use. -
Page 4: Section 1: Safety Information
SECTION 1: SAFETY INFORMATION Safety Symbols Indicates an imminently hazardous situation which could result in serious Familiarize yourself with the following or fatal injury. Safety & Warning symbols. They are designed to prevent damage and injury to you, your clients, and your new Living Earth Crafts product. - Page 5 SECTION 1: SAFETY INFORMATION • DO NOT reach for any electrical object that has fallen into the water. Unplug immediately. • DO NOT drop or insert anything into jet opening. • DO NOT operate without the complete jet assembly installed or without water filled 1 inch above jet. •...
-
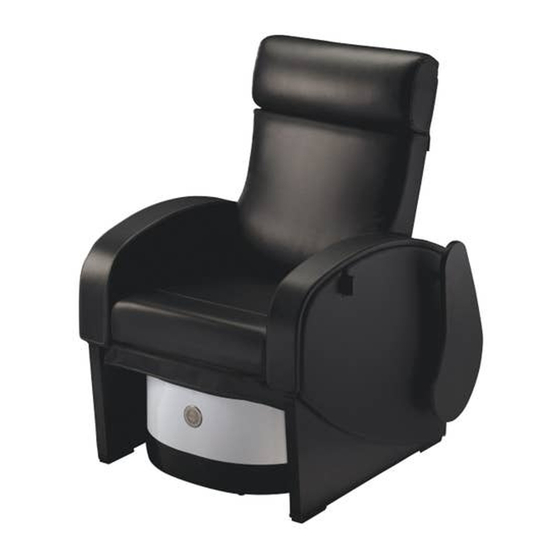
Page 6: Section 2: Product Overview
SECTION 2 : PRODUCT OVERVIEW Swingaway Manicure Tray (Optional) Swingaway Tray Storage Power (Optional) Back Control Tub Basin Footrest Adjustment Footrest Button Tub Jet Drain Release Sprayer/Fill Water Fill Valve Ventilation (Optional) Light Button Jet Button Power Drain Button *Chair shown with optional finishes... -
Page 7: Product Specifications
SECTION 2 : PRODUCT OVERVIEW Product Specifications Overall Width 31” (79 cm) Tub/Shroud Width 25.25” (64 cm) Tub Height (to footrest) 16.5” (42 cm) Length (chair only) 35” (89 cm) Length (chair w/tub) 57.5” (146 cm) Chair Height 50.25” (128 cm) Seat Height 22”... -
Page 8: Section 3: Operating Instructions
SECTION 3: OPERATING INSTRUCTIONS Retractable Tub Operation Your Club LE has a tub that conveniently retracts underneath the chair for manicure positioning. Always use extreme caution when making any position adjustments to your chair/tub. Ensure all body parts and objects are clear from all moving parts. -
Page 9: Jet & Light
SECTION 3: OPERATING INSTRUCTIONS Pipeless Jet & Chromasoothe Light Pressing the respective On/Off button once will turn on the jet or light, and pressing the button again will turn it off. Turn on the jet ONLY AFTER the tub is filled with water, and ensure you turn the jet OFF before draining the tub. -
Page 10: Footrest Operation
SECTION 3: OPERATING INSTRUCTIONS Footrest Operation Always use extreme caution when making any position adjustments to your footrest. Ensure all body parts and objects are clear from all moving parts. Do not sit on or put full body weight on the footrest. It is meant only to support a client’s feet for a pedicure, not to support body weight. -
Page 11: Swingaway Manicure Trays
SECTION 3: OPERATING INSTRUCTIONS Swingaway Manicure Trays (Optional) The Swingaway Manicure Trays are a convenient way to offer manicure services in your pedicure chair. See below on how to install and store your trays. To Set Up: To Store: Insert the tray post into the receiver and Insert the tray post into the storage push straight down to secure. -
Page 12: Relaxor
SECTION 3: OPERATING INSTRUCTIONS Relaxor® Heat & Massage (Optional) The following diagrams illustrate the ease-of-use and functionality that the Relaxor® system provides to you and your clients. RISK OF ELECTRIC SHOCK Keep hand control and all electrical components away from water. Power Lower Back Heat - High Lower Back Heat - Low... -
Page 13: Section 4: Care & Maintenance
SECTION 4: CARE & MAINTENANCE Cleaning & Ongoing Maintenance The following procedures are important guidelines that will help in keep your Club LE clean and trouble free for years. It is extremely important to clean and disinfect each and every pedicure chair after each pedicure and after the last pedicure of the day. -
Page 14: Tub Cleaning Guide
SECTION 4: CARE & MAINTENANCE Tub Cleaning Guide Always refer to your state and local codes for specific cleaning requirements. NEVER USE abrasive cleaners on any surface area. Failure to comply can cause damage and void your warranty. The removable jet assembly MUST be placed into the motor housing in the correct order and position or the jet may be damaged. - Page 15 SECTION 4: CARE & MAINTENANCE Tub Cleaning Guide Cleaning After Each Client & End of Day Drain the tub of all water. Firmly pull the jet assembly away from the tub to remove. (Fig. 1) Rotate the cover to unlock and separate the cover, magnetic impeller, and housing. (See Fig.
-
Page 16: Troubleshooting
Jet Follow cleaning instructions or replace if necessary. Check and ensure all visible bolts are tightened. Water Leakage Call a plumber to determine the source of the leak. If the leak is from the jet system, contact LEC customer service. -
Page 17: Warranty Information
SECTION 4: CARE & MAINTENANCE Warranty Information Living Earth Crafts (LEC) offers an industry best warranty on all pedicure units. • Motors and controls, actuators, foam and upholstery are warranted for two (2) years, including parts and labor unless otherwise noted. -
Page 18: Section 5: Installation
SECTION 5: INSTALLATION Technical Drawings Water, discharge, and ventilation lines will need to be connected. See technical drawings below showing connection points. A licensed plumber and electrician must make the utility connections to this pedicure chair. NOTE: INSTALLER/OWNER BEARS ALL RESPONSIBILITIES TO COMPLY WITH ALL STATE AND LOCAL CODES FOR PLUMBING AND ELECTRICAL WHEN INSTALLING THIS PRODUCT. - Page 19 SECTION 5: INSTALLATION 66.25” Recommended Spacing 38” 31.5” 25.25” 25.25” With Nail Standard Trays 18” 18” minimum minimum standard (36” minimum 10” 10” with minimum minimum nail trays) Wall Plumbing & Power Connections - Required Setup 18” 10” minimum Separate and dedicated 20 Amp minimum GFCI protected circuit is required Wall...
-
Page 20: Backflow Prevention
SECTION 3 : INSTALLATION Backflow Prevention (Discharge Line) Each Contour comes with a swing check valve pre-installed on the discharge line. This valve is NSF certified for potatable water use (see detailed specification from manufacturer on the next page). The valve is installed on the discharge line im- mediately after the discharge pump as shown in the technical diagram below. - Page 21 SECTION 3 : INSTALLATION Backflow Prevention (Discharge Line)
-
Page 24: Contact Us
Contact Us Living Earth Crafts Hours of operation: 990 Joshua Way Monday - Friday Vista, CA. 92081 8:00 a.m. to 5 p.m. PST (800) 358-8292 (760) 597-2155 Int’l Saturday - Sunday (866) 449-8872 fax Closed info@livingearthcrafts.com Visit us online at: livingearthcrafts.com Follow us on Connect with us Join us on...
Need help?
Do you have a question about the Club LE and is the answer not in the manual?
Questions and answers