Table of Contents
Advertisement
Advertisement
Table of Contents

Related Manuals for Creative XP GlassRaven 4G


Summary of Contents for Creative XP GlassRaven 4G
-
Page 3: Table Of Contents
TABLE OF CONTENTS 1. Quick Start ..................6-12 1.1 What’s in the box? ................6 1.2 How to get the GlassRaven 4G Camera Ready? ....7-8 1.3 How to set up the Camera? .............9-11 1.4 GlassRaven 4G Default Settings in Red Letters ....12 2. - Page 4 Introduction Thank you for purchasing your new CREATIVE XP® GlassRaven 4G Scouting Trail Camera which can send instant HD photos to your email address or phone number. We are an American family-owned business and you can contact us via email (support@creative-xp), our website (www.creative-xp.com)
- Page 5 AMERICAN OF ADVENTURE...
-
Page 6: Quick Start
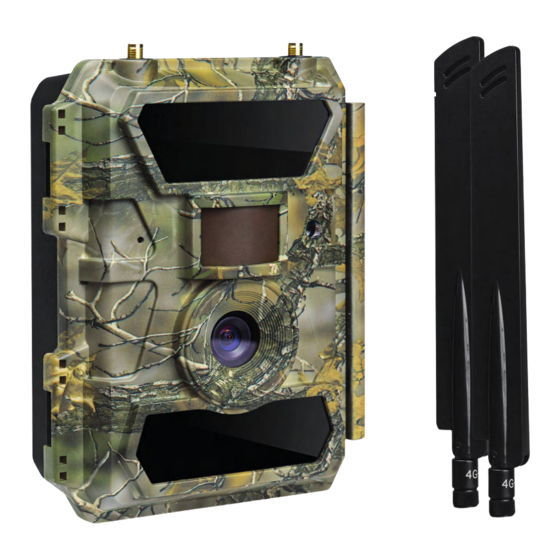
Quick Start 1.1 What’s in the box? 1* Trail Camera 1* Instructions Manual 1* Tree Strap 1* Antenna 1* USB Cable 1* Camera Tree Mount... -
Page 7: How To Get The Glassraven 4G Camera Ready
Quick Start 1.2 How to Get the GlassRaven 4G Camera Ready? 1. Fix the Antenna 2. Insert 12 AA Batteries (not included) Open the camera house and insert 12 AA batteries as the electrodes shown inthe battery case. Note: 12 AA Alkaline or Ni-MH (recommended). Under camera’s Main Menu ->... - Page 8 Quick Start 4. Mount the two 4G Antennas & Insert the SimHero, AT&T or T-Mobile Sim Card We recommend using the SimHero data card. Most of our cameras have a bonus SimHero card already inserted into the camera so you don’t have to worry about it.
-
Page 9: How To Setup The Camera
Quick Start 1.3 How to Setup the Camera? 1. Activate the SimHero Data Card Go to https://my.simhero.com and create an account with the SimHero REGISTRATION CODE - find it on the flyer provided with the SimHero data card. The SimHero comes with 40Mb, therefore you will not have to purchase a data plan until you use the 40Mb included. - Page 10 Quick Start TO RECEIVE PHOTOS UPON MOTION TRIGGERS: Press MENU -> 4G Section -> Send To (6th option down) -> EMAIL Section (NOT phone section) -> Insert your Email Address or Phone number (READ TABLE BELOW) -> Save (Press “Menu” and after “OK”) Carrier MMS Gateway Domain To receive a photo as a Text Message to...
- Page 11 Quick Start 3. How to Connect the Camera to Network? The GlassRaven 4G Trail Camera shows “Searching” on the screen when you switch the power key from “OFF” to “ON”. The SimHero data card uses the AT&T & T-Mobile cell towers. It might take up to one minute to find a cellular signal and for the signal strength indicator to...
-
Page 12: Glassraven 4G Default Settings In Red Letters
Quick Start 1.4 GlassRaven 4G Default Settings in Red letters... -
Page 13: Whole View & Details Of The Glassraven 4G
Whole View & Details of the GlassRaven 4G 2.1 Front View Antenna 27 IR LEDs Light Lens 30 IR LEDs 2.2 Bottom View SD Card Slot Battery Slot DC In SIM Card USB Port... -
Page 14: Buttons & Switches Functions
Whole View & Details of the GlassRaven 4G 2.3 Internal Back View 1. Front View LCD Color Screen Navigation Buttons OK Button MENU Button Power Switch... -
Page 15: Introduction
Introduction 3.1 Power Supply Batteries The camera runs on 12 AA size batteries (9-12V power supply to ensure maximum performance) and supports both alkaline OR high-quality NiMH rechargeable batteries. We suggest using NiMH batteries only because their performance is much better than alkaline batteries. Please choose the battery type you’re using in the Main Menu ->... -
Page 16: Sd Card Selection
1500maAH battery which increases the operating lifetime up to one year. *The CREATIVE XP Solar Panel plug needs a short adapter cable to connect to the bottom of the camera. We include this adapter cable in the camera box. -
Page 17: Usb Connection
Introduction 3.3 USB Connection When the camera is connected via USB cable, the screen shows “MSDC”. If you press “Menu” once, “MSDC” turns to “PC Cam”. The camera now can be used as a PC camera. If you press “Menu” again, camera exits PC camera mode. -
Page 18: Key Features
Introduction 3.5 Key Features 1. 0.35 seconds trigger speed 2. Wide lens model: 100 degrees FOV lens; 0.35 Seconds 110 degrees PIR angle Trigger Speed 3. Photo Max. Quality: 12MP Video: 1080p@30FPS 4. Programmable 5/8/12 Megapixel high quality 1080 Video resolution –... - Page 19 Introduction 10. Built-in 2.0” TFT color screen 1 to 5 Photos 11. With MMS/3G/SMTP/FTP function ON, the per Trigger camera can transmit photos to 1-5 preset mobile phones and 1-5 emails per trigger – please allow 30sec to 1 min to send 12.
-
Page 20: Operation List
Operation List 4.1 Photo/Video Playback Switch ON “Power Switch”, Press “OK” once to turn on the screen and enter Setup Mode, press arrow button “ ” to enter Playback; press “ ” and “ ” for selection, press “OK” to play video. 2. -
Page 21: Operation Menu
Operation List 4.5 Operation Menu 1. In Setup Mode, Press “Menu” once to enter camera setting menu; to navigate the setting interface press “ ”, “ ”, “ ”, or “ ”; press “OK” for selection; press “Menu” to exit to the previous page; 2. -
Page 22: Technical Specifications
Technical Specifications [CAM] - CAMERA MENU Settings Programmable Options Cam ID Select “ON” -> Press “OK” -> Set 4 digits/alphabets for each camera. *Such a function can help the user to identify which camera the received photos are from. Cam Mode Photo, Video, PIC+VIDEO •... - Page 23 Technical Specifications Multi-shot Programable 1~5 photos per trigger Video ON Turns ON Video Mode Video Size FHL-1080 (1920*1080), HD-720P (1280*720), WVGA (848*480) Video 05~59 Secs Length...
- Page 24 Technical Specifications [PIR] - PROXIMITY SENSING Settings Programmable Options OFF/ON a) With PIR Switch o , the camera will not be able to take photo/video per motion; b) With PIR Switch on, the camera is able to take photos/videos per motion event where Time Lapse is ON. Sensitivity High/Middle/Low The High Sensitivity mode is:...
- Page 25 Technical Specifications Timer Select “ON”, press “OK” to set the hours between the camera will work and take photos/videos. The camera will ONLY work during the time period user set. Example: If you set up the timer to 15:00 – 18:00, the camera will only work during this time interval.
- Page 26 Technical Specifications SMTP The camera comes with a default SMTP setup; you only need to enter your email address in “Send to” > EMAIL Section. If you want to set it up manually, please enter the information shown below: 1) Enter your mailbox server IP i.e.: Hotmail IP: smtp.live.com; Gmail IP: smtp.gmail.com;...
- Page 27 Technical Specifications 2. Only 1st Pic(640*480 or 1920*1440) will be sent if the only network available is 3G; 3. 1st to 5th Pics(640*480 or 1920*1440) can all be sent with the 4G network, but for original sizepics (5/8/12MP), only 2 pics can be sent with 4G network.
- Page 28 Technical Specifications [OTHER] - EXTRA SETTINGS Settings Programmable Options Language English, German, French, Italian, Russian Date/Time Manually set date/time date: month; year; hour; minute; second; Note: Please adjust camera date/time to ensure some functions work as expected. Stamp Shows the programmed camera ID, moon phase, temperature, date, and time on photo.
- Page 29 Technical Specifications Image Sensor 5 Mega Pixels Color CMOS E ective Pixels 2560x1920 Day/NightMode IR range 65ft/20m IR Setting Top: 27 LED, Bottom: 30LED Memory SD Card (8MB – 32 GB) Operating keys Lens F=3.0; FOV = 52°/100°; Auto IR-Cut-Remove (at night) PIR Angle 65°/100°...
- Page 30 Technical Specifications Wireless Module LTE Cat.4 module; 2G & 3G networks are also supported in some countries. Interface USB/SD Card/DC Port Mounting Strap; Tripod Operationg -13°F to 140°F (-25°C to 60°C) Temperature Storage -22°F to 158°F (-30°C to 70°C) Temperature Operation Humidity 5% - 90% Waterproof spec.
-
Page 31: Troubleshooting
Troubleshooting 6.1 Photos Do Not Capture Subject of Interest 1. Check the “Sensor Level” (PIR sensitivity) parameter setting. For warm environmental conditions, set the Sensor Level to “High” and for cold weather use, set the sensor to “Low”. 2. Try to set your camera up in an area where no heat resources are in the camera’s field of view. - Page 32 Troubleshooting 6.3 Night Vision Flash Doesn’t Meet Expectation 1. Please check to make sure that batteries are fully charged or remaining power is enough; 2. “Max Range” o ers better IR flash range. Given IR flash range values are based on Max Range setting, please adjust Night Mode to Max Range for better night vision flash range;...
-
Page 33: Warranty
Warranty Your CREATIVE XP product is warranted to be free of defects in materials and workmanship for one (1) year after the date of purchase. These warranties do not cover consumer caused damages such as misuse, abuse or repairs attempted by the consumer. - Page 34 CREATIVE XP product must be delivered in either its original carton or a similar package a ording an equal degree of protection. CREATIVE XP will not be responsible for any loss or damage incurred in connection with the return of this product. If defective, the product will be repaired or replaced at CREATIVE XP’s option, at no...
-
Page 35: The Complete Hunter Kit
THE COMPLETE HUNTER KIT...
Need help?
Do you have a question about the GlassRaven 4G and is the answer not in the manual?
Questions and answers
Entered bad email address into one of my cameras. How do I fix?