
Subscribe to Our Youtube Channel
Related Manuals for Sensitron MULTISCAN 8+


Summary of Contents for Sensitron MULTISCAN 8+
- Page 1 Manuale d’istruzione / Instruction Manual MULTISCAN 8+ Unità Centrale / Central Unit MT4221 rev.3 20/05/2020© 2020 SENSITRON S.R.L. - All rights reserved - www. sensitron.it...
- Page 2 PRODUCT FOR THEIR SAFETY COULD SUFFER SEVERE PERSONAL INJURY OR DEATH. The warranties made by Sensitron s.r.l. with respect to this product are voided if the product is not installed, used and serviced in accordance with the instructions in this user guide.
- Page 3 ITALIANO Attenzione IL PRESENTE MANUALE TECNICO DESCRIVE IL PRODOTTO NELLE SUE PARTI, L’INSTALLAZIONE L’OPERATIVITÀ SISTEMA. SOFTWARE CONFIGURAZIONE NON È INCLUSO, SI RIMANDA QUINDI ALLA LETTURA DEL MANUALE DEDICATO. ENGLISH Warning THIS TECHNICAL MANUAL DESCRIBES THE PRODUCT IN ITS COMPONENTS, THE INSTALLATION AND THE OPERATION OF THE SYSTEM.
-
Page 4: Table Of Contents
INDEX ITALIANO INTRODUZIONE ........................6 Schema a blocchi sistema con centrale Multiscan 8+ ..............7 Codici prodotto ..........................7 Codici accessori ..........................7 Caratteristiche tecniche ......................... 9 INSTALLAZIONE ........................10 Montaggio e collegamenti ......................10 Vista d’insieme della centrale ed identificazione delle parti............11 2.1.1 2.1.2 Layout scheda centrale ........................ - Page 5 INTRODUCTION ........................35 Block diagram ..........................36 Central unit ordering codes ......................36 Accessories ordering codes ......................37 Technical specifications ....................... 37 INSTALLATION ........................39 Assembly and connections ......................39 2.1.1 Unit diagram and part identification .................... 40 2.1.2 Central unit board layout ......................41 2.1.3 Battery disconnection detector ....................
-
Page 6: Introduzione
STG/OUT16S ed STG/16REL. La centrale viene fornita in custodia in ABS e può contenere 2 batterie da 12Vdc, 7Ah (non fornite da Sensitron) per assicurare il funzionamento dell'impianto anche in caso di mancanza di rete. La MULTISCAN 8+ è certificata SIL1 ed ATEX secondo le normative EN 60079-0:2012 e EN 60079-29-1:2016. -
Page 7: Schema A Blocchi Sistema Con Centrale Multiscan 8
Manuale d’installazione ed uso Multiscan 8+ ITALIANO Schema a blocchi sistema con centrale Multiscan 8+ LOOP Rs485 16 relay option: the detectors could be connected MULTISCAN 8+ directly on the loop in daisy-chain mode (1) RILEVATORI GAS ANALOGICI 4-20 mA / 4-20 mA ANALOG GAS DETECTORS (2) MODULO 8 INGRESSI ANALOGICI ST.G/IN8-S / ANALOG 8 INPUT MODULE ST.G/IN8-S (3) CAVO 2 FILI TWISTATI PER Rs485 + 2 FILI PER ALIMENTAZIONE (12-24 Vdc) /... - Page 8 Manuale d’installazione ed uso Multiscan 8+ ITALIANO STG/OUT16- Modulo remoto a 16 uscite in formato Open Collector per MULTISCAN++ STG/8REL Scheda a 8 relè da collegare al modulo STG/OUT16-S. STG/MTSS1- Software per la programmazione tramite PC delle centrali serie CONF Multiscan++S1, Richiede Windows XP, VISTA, WIN7, 8, 8.1, 10.
-
Page 9: Caratteristiche Tecniche
Manuale d’installazione ed uso Multiscan 8+ ITALIANO Caratteristiche tecniche Tabella 4: caratteristiche tecniche centrale Multiscan 8+ Specifiche tecniche Alloggiamento: Box plastico IP 42 420x380x160 mm Ingressi: Max. 16 rilevatori Uscite: 6 relè in centrale 16 tramite la scheda STG/16REL da collegare all'interno della centrale 16 uscite O/C o relè... -
Page 10: Installazione
Manuale d’installazione ed uso Multiscan 8+ ITALIANO INSTALLAZIONE Montaggio e collegamenti Togliere le 4 viti poste ai 4 angoli del box e rimuovere la parte frontale del box della centrale. Ora è possibile scegliere dove far entrare i cavi. Raccomandiamo di eseguire l'entrata dei cavi utilizzando un pressa-cavo idoneo. -
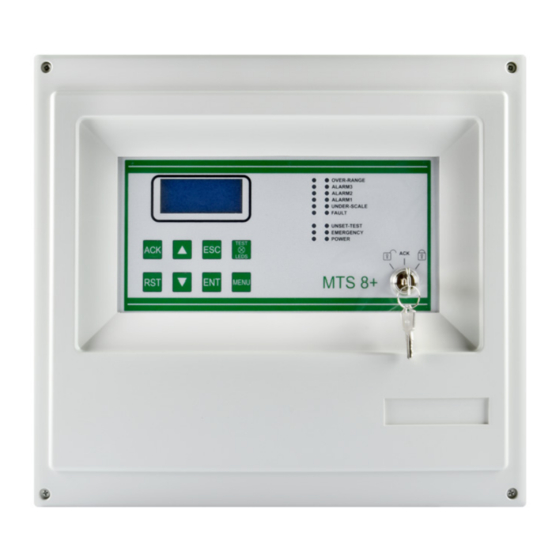
Page 11: Vista D'insieme Della Centrale Ed Identificazione Delle Parti
Manuale d’installazione ed uso Multiscan 8+ ITALIANO 2.1.1 Vista d’insieme della centrale ed identificazione delle parti 1- Alimentatore (27 Vdc 4A) 4- Uscite relè (6) 2- Batterie 2 x 12V 7Ah (non incluse) 5- 8 ingressi 4-20mA 3- Porta seriale RS232 ed USB 6- Connessione bus RS485 Figura 2.1.1: Identificazione parti... -
Page 12: Layout Scheda Centrale
Manuale d’installazione ed uso Multiscan 8+ ITALIANO 2.1.2 Layout scheda centrale Figura 2.1.2: Layout centrale 2.1.3 Funzione distacco di batteria La centrale MULTISCAN 8+ permette, tramite uno specifico allarme, di visualizzare se una delle batterie è scollegata. Per abilitare questa funzione occorre innanzitutto aver collegato le batterie come da figura 2.1 b), quindi abilitare il monitor della batteria chiudendo i pin 2-3 del jumper JP78 posizionato vicino ai connettori faston JTAB1 e JTAB2. -
Page 13: Layout Scheda 16 Relè (Opzionale)
Manuale d’installazione ed uso Multiscan 8+ ITALIANO 2.1.4 Layout scheda 16 relè (opzionale) 12Vdc POWER SUPPLY SOLO CENTR. Pl4+ / ONLY Pl4+ PANEL CONNECTORS FOR MULTISCAN 8+ CONTROL PANEL FOR Pl4+ CONTROL PANEL (PL4/ESP BOARD REQUIRED) JUMPER FOR NORMALLY ENERGIZED RELAY NORMALLY NOT ENERGIZED RELAY... - Page 14 Manuale d’installazione ed uso Multiscan 8+ ITALIANO La serie di dip switch SD2 serve ad impostare: • Baud Rate (velocità) di comunicazione e protocollo dei bus RS485 con i dispositivi in campo (rivelatori e moduli IN/OUT). • Baud Rate (velocità) di comunicazione della porta seriale RS232 verso il Personal Computer La serie di dip switch SD3 serve ad impostare invece la lingua dei testi sul display della centrale.
-
Page 15: Collegamenti Apparecchiature In Campo
Manuale d’installazione ed uso Multiscan 8+ ITALIANO Dip-switch 6 e 7: non usati Tabella 8: Dip-switch 8: Reset configurazione Posizione Velocità comunicazione bus All’accensione della centrale la configurazione viene cancellata Normale funzionamento Tabella 9: settaggio della lingua con SD3 LINGUA SW 1 Inglese Italiano... -
Page 16: Collegamento Rilevatori
Manuale d’installazione ed uso Multiscan 8+ ITALIANO -) L’alimentazione dei rilevatori (e dei moduli IN ed OUT sul bus) deve invece essere realizzata con un cavo a due conduttori di sezione adeguata in base al numero di dispositivi collegati, alla distanza degli stessi dall’alimentatore ed alla corrente assorbita da ciascuno dei dispositivi (a tal proposito consultare il manuale tecnico allegato al rilevatore gas). - Page 17 Manuale d’installazione ed uso Multiscan 8+ ITALIANO Rilevatori con uscita 4-20 mA collegati direttamente alla centrale 8 7 6 5 4 3 2 1 - - + + SCH B A JP58 JP77 JP64 CONNETTORE RS485 ALIMENTAZIONE CONNETTORE 8 INGRESSI INGRESSI ANALOGICI ANALOGICI Fig.
- Page 18 Manuale d’installazione ed uso Multiscan 8+ ITALIANO esempio di cavo raccomandato è il BELDEN 9841 o similare (cavo per trasmissione dati in EIA RS485). Collegare i rilevatori (ed i moduli IN ed OUT) solo in modalità “cascata”. Si raccomanda di evitare collegamenti ad albero o a stella in quanto riducono l’immunità alle interferenze.
- Page 19 Manuale d’installazione ed uso Multiscan 8+ ITALIANO Fig. 2.2.1 c) Collegamento diretto rivelatori sul bus RS485...
- Page 20 Manuale d’installazione ed uso Multiscan 8+ ITALIANO Fig. 2.2.1 d) Collegamento rivelatori su modulo remoto STG/IN8-S...
-
Page 21: Moduli Ingresso Remoti Stg/In8-S
Manuale d’installazione ed uso Multiscan 8+ ITALIANO Moduli ingresso remoti STG/IN8-S I moduli remoti STG/IN8-S vengono montati in campo e collegati ai bus RS485 della centrale. Permettono il collegamento di 8 rilevatori gas analogici 4-20 mA. Ciascun modulo deve essere indirizzato tramite appositi commutatori rotativi. L’indirizzo deve essere univoco e compreso tra 1 e 255 (1-247 per protocollo Modbus). -
Page 22: Scheda Espansione Relè Stg/8Rel
Manuale d’installazione ed uso Multiscan 8+ ITALIANO Fig. 2.4) Modulo ST.G/OUT16-S 2.4.1 Scheda espansione relè STG/8REL La scheda espansione 8 relè STG/8REL converte in contatti di scambio liberi da tensione le uscite O/C del modulo di uscita STG/OUT16-S. A ciascun modulo di uscita possono essere collegate fino a due schede relè. -
Page 23: Indirizzamento Moduli Stg/In8-S Ed Stg/Out16-S
Manuale d’installazione ed uso Multiscan 8+ ITALIANO Fig. 2.4.1) Scheda relè e collegamento a modulo uscita 2.4.2 Indirizzamento moduli STG/IN8-S ed STG/OUT16-S L’indirizzamento dei moduli si esegue tramite i due commutatori rotativi in esadecimale RSW 1 e 2. I commutatori rotativi permettono una configurazione esadecimale (base 16). Ogni commutatore ha 16 posizioni (0-F) ed il puntatore viene posizionato sul numero scelto tramite un cacciavite, a formare un valore decimale da 1 a 255 (vedi tabella 1). - Page 24 Manuale d’installazione ed uso Multiscan 8+ ITALIANO 248 (*) 249 (*) 250 (*) 251 (*) 252 (*) 253 (*) 254 (*) 255 (**) (*) Indirizzi non disponibili con protocollo Modbus (**)Indirizzo non disponibile con protocollo Galileo...
-
Page 25: Programmazione Da Pc
Manuale d’installazione ed uso Multiscan 8+ ITALIANO Programmazione da PC La centrale Multiscan 8+ è programmabile unicamente tramite Personal Computer con un apposito software. Il software è stato studiato per una semplice e veloce programmazione. Il collegamento con il PC avviene tramite la porta seriale RS232 oppure tramite USB disponibili sulla scheda principale della centrale. - Page 26 Gestione a distanza della centrale tramite software di terzi, utilizzando il protocollo ModBus. • Gestione a distanza della centrale tramite un apposito software di monitoraggio di Sensitron (disponibilità futura). Per caratteristiche tecniche e modalità d’uso del modulo TCP/IP, consultare la documentazione del prodotto.
-
Page 27: Accensione Ed Operativita' Sistema
Manuale d’installazione ed uso Multiscan 8+ ITALIANO ACCENSIONE ED OPERATIVITA’ SISTEMA Il capitolo descrive le procedure per operare, avviare ed eseguire la manutenzione su un sistema con centrale Multiscan 8+ La centrale Multiscan 8+ è programmabile unicamente tramite Personal Computer con l’apposito software. -
Page 28: Stati Sistema
Manuale d’installazione ed uso Multiscan 8+ ITALIANO Fig. 3.1 b) Visualizzazione display in stato normale Stati sistema La centrale comunica con l’operatore tramite il display LCD ed i Led sul frontale. Nei diversi stati del sistema, informazioni diverse vengono visualizzate. Alcune regole generali sono sottoelencate: Sul frontale è... - Page 29 Manuale d’installazione ed uso Multiscan 8+ ITALIANO NORMALE È lo stato di normale funzionamento della centrale, in assenza di allarmi e guasti. la videata in questo stato sarà la visualizzazione dei canali (rilevatori gas) con la concentrazione di gas misurata in tempo reale: Fig.
- Page 30 Manuale d’installazione ed uso Multiscan 8+ ITALIANO Fig. 3.2.1.c) Dettagli evento di Allarme 1 Dalla videata principale, premendo il tasto MENU e selezionando EVENTI ATTIVI sarà possibile visionare i canali in Allarme/Guasto e non ancora resettati. GUASTO Lo stato di Guasto sarà attivato nelle seguenti condizioni: 1.
-
Page 31: Menu
Manuale d’installazione ed uso Multiscan 8+ ITALIANO modalità TEST l’utente deve eseguire un’apposita procedura, descritta più avanti nel manuale. La concentrazione di gas misurata da un sensore in TEST sarà visualizzata sul display della centrale ma non genererà uno stato di Allarme nel caso superi una soglia impostata. Nel medesimo modo, un’uscita relè) in TEST non sarà... -
Page 32: Eventi Attivi E Gestione Di Un Evento
Manuale d’installazione ed uso Multiscan 8+ ITALIANO Eventi attivi e gestione di un evento Selezionando EVENTI ATTIVI e premendo ENT, una lista mostra gli eventi attivi attuali. Se sono contemporaneamente presenti Allarmi e Guasti/Emergenza, questi saranno mostrati su due videate. Videata Allarmi Videata Guasti Fig. -
Page 33: Tagliando Di Garanzia Per La Riparazione
ITALIANO TAGLIANDO DI GARANZIA PER LA RIPARAZIONE La garanzia sui prodotti Sensitron è valida un anno dalla data di fabbricazione riportata sul prodotto. Si intende valida comunque per un anno dalla data di installazione, purché la stessa avvenga entro i dodici mesi successivi la data di fabbricazione. Fanno fede il timbro e la data posti dall’installatore sul presente modulo, che l’utilizzatore dovrà... -
Page 34: Istruzioni Per Lo Smaltimento
Sensitron Sensitron ha una politica di continuo sviluppo e miglioramento dei suoi prodotti. Pertanto, le specifiche del dispositivo descritte in questo documento possono essere modificate senza preavviso. In caso di modifica del prodotto, Sensitron declina ogni responsabilità. -
Page 35: Introduction
Instruction Manual Multiscan 8+ ENGLISH INTRODUCTION The highly innovative and versatile MULTISCAN 8+ central units the ideal solution for small systems with up to 16 gas detectors. The system provides for the direct connection of 8 detectors to the central unit (4-20mA) and to additional 8 detectors that can be connected directly to the RS485 bus or via a remote module with 8 x STG/IN8-S inputs. -
Page 36: Block Diagram
Instruction Manual Multiscan 8+ ENGLISH Block diagram Fig. 1.1) System block outline Central unit ordering codes Table 2: Ordering codes for Multiscan 8+ control panel CODE DESCRIPTION STMTS/8+ MULTISCAN 8+ gas control panel. 8 Analog 4-20mA inputs and 6 relay outputs on-board the panel. 1 x RS485 type open bus line to connect additional 8 detectors through remote 8-input module or addressable gas detectors daisy chained to the RS485 bus. -
Page 37: Accessories Ordering Codes
Instruction Manual Multiscan 8+ ENGLISH Accessories ordering codes Table 3: Multiscan 8+ accessories codes CODE DESCRIPTION STG/IN8S High safety 8-input remote module with improved performance for MULTISCAN++S1 control panel. STG/16REL 16-relay card to be connected to MULTISCAN 8+ and STPL4/ESP to provide additional 16 relay outputs STG/OUT16S High safety 16-output remote module (Open collector type) with... - Page 38 Instruction Manual Multiscan 8+ ENGLISH Working temp. 0/-55°C Storage temp. -20 ÷ +60 C° Working RH: 15-85% Storage RH: 5-85% (non-condensing)
-
Page 39: Installation
Instruction Manual Multiscan 8+ ENGLISH INSTALLATION Assembly and connections Remove the 4 screws at the 4 corners of the box and remove the front part of the central unit box. It is now possible to choose where to place the cables. We recommend placing the cable for entry by using a suitable cable press. -
Page 40: Unit Diagram And Part Identification
Instruction Manual Multiscan 8+ ENGLISH 2.1.1 Unit diagram and part identification 1- Power Supply (27 Vdc 4A) 4- Relay outputs (6) 2- 2 x 12V 7Ah batteries (not included) 5- 8 inputs, 4-20mA 3- RS232 serial port and USB 6- RS485 bus connection Fig. -
Page 41: Central Unit Board Layout
Instruction Manual Multiscan 8+ ENGLISH 2.1.2 Central unit board layout - BAUDRATE RS232 SETTING JP64 JP77 JP58 - BAUDRATE RS485 SETTING 8 ANALOGUE INPUT ANALOGUE INPUT RS485 CONNECTOR - RS485 PROTOCOL CONNECTOR POWER SUPPLY - CONFIGURATION RESET LANGUAGE SETTING RELAY BOARD STG/16REL CONNECTOR RELAY K1 N.C. -
Page 42: 16-Relay Board Layout (Optional)
Instruction Manual Multiscan 8+ ENGLISH 2.1.4 16-relay board layout (optional) 12Vdc POWER SUPPLY SOLO CENTR. Pl4+ / ONLY Pl4+ PANEL CONNECTORS FOR MULTISCAN 8+ CONTROL PANEL FOR Pl4+ CONTROL PANEL (PL4/ESP BOARD REQUIRED) JUMPER FOR NORMALLY ENERGIZED RELAY NORMALLY NOT ENERGIZED RELAY C NC NO C NC NO... -
Page 43: Setting Of The Communication Bus, Rs232 Pc Serial And Central Unit Language
Instruction Manual Multiscan 8+ ENGLISH 2.1.5 Setting of the communication bus, RS232 PC serial and central unit language The series of SD2 dip-switches are used to set the following: • Baud Rate (communication speed) and RS485 bus protocol with field devices (detectors and IN/OUT modules). -
Page 44: Field Device Connections
Instruction Manual Multiscan 8+ ENGLISH 38400 Bit/sec. 115200 Bit/sec. (default) Dip-switches 6 and 7: not used Table 8: Dip-switch 8: Configuration reset Position Function If set to ON, default data is restored when the central unit is switched on Normal position Table 9: SD3 Language setting LANGUAGE SW 1... -
Page 45: Detector Connection
Instruction Manual Multiscan 8+ ENGLISH (and IN and OUT modules) in a "cascading" manner. Avoid tree or star connections since they reduce interference immunity. -) Detector power supply (and IN and OUT modules on the bus) must be connected with a 2- core wire with adequate section based on the number of connected devices, their distance from the power supply and each device’s consumption (please see the technical manual enclosed with gas detectors for this purpose). - Page 46 Instruction Manual Multiscan 8+ ENGLISH Detectors with 4-20 mA output directly connected to the central unit 8 7 6 5 4 3 2 1 - - + + SCH B A J 58 J 64 J 77 RS485 CONNECTOR 8 ANALOGUE INPUT ANALOGUE INPUT CONNECTOR POWER SUPPLY...
- Page 47 Instruction Manual Multiscan 8+ ENGLISH (and IN and OUT modules) in a "cascading" manner. Avoid tree or star connections since they reduce interference immunity. -) The power supply to the detectors (and IN and OUT modules on the bus) must be connected with a 2-core wire with adequate section based on the number of connected devices, their distance from the power supply and each device’s consumption (please see the technical manual enclosed with gas detectors for this purpose).
- Page 48 Instruction Manual Multiscan 8+ ENGLISH Fig. 2.2.1 c) Direct connection of detectors on the RS485 bus...
- Page 49 Instruction Manual Multiscan 8+ ENGLISH Fig. 2.2.1 d) Detector connection by STG/IN8-S...
-
Page 50: Stg/In8-S Remote Input Modules
Instruction Manual Multiscan 8+ ENGLISH STG/IN8-S remote input modules STG/IN8-S remote modules are field mounted and connected to the central unit via RS485 buses. They are used to connect 8 x 4-20mA analogue gas detectors. Each module must be addressed using the rotary switches on the PCB. The address must be univocal and between 1 and 255 (1-247 for Modbus protocol). -
Page 51: Stg/8Rel Relay Expansion Board
Instruction Manual Multiscan 8+ ENGLISH Fig. 2.4) STG/OUT16-S module 2.4.1 STG/8REL relay expansion board The STG/8REL 8-relay expansion board converts the O/C outputs of the STG/OUT16-S output module into voltage-free exchange contacts. Up to two relay boards can be connected to each output module. A relay board is directly connected to the output module (J1 connector) and a second relay board is connected to the former. -
Page 52: Stg/In8-S And Stg/Out16-S Module Addressing
Instruction Manual Multiscan 8+ ENGLISH Fig. 2.4.1) Relay board and connection to the output module 2.4.2 STG/IN8-S and STG/OUT16-S module addressing STG/IN8-S and STG/OUT16-S modules are addressed using the two rotary switches in RSW 1 and 2 hexadecimals. Rotary switches permit hexadecimal settings (base 16). Each switch as 16 positions (0-F) and the pointer is positioned on the number chosen using a screwdriver to create a decimal value between 1 and 255 (see table 1). -
Page 53: Programming From A Pc
Instruction Manual Multiscan 8+ ENGLISH 248 (*) 249 (*) 250 (*) 251 (*) 252 (*) 253 (*) 254 (*) 255 (**) Programming from a PC The Multiscan 8+ central unit is fully programmable from a personal computer by means of special software. The software has been designed for simple and fast programming. Connection to the PC takes place via the RS232 serial port or USB, available on the main board of the central unit. -
Page 54: Tcp/Ip Optional Module
Remote management of the central unit, via third party software, by using the ModBus protocol • Remote management of the central unit, via a monitoring software made by Sensitron (available in the future) For technical features and use of TCP/IP module, please consult the product documentation. -
Page 55: Installation
Instruction Manual Multiscan 8+ ENGLISH INSTALLATION The chapter explains the procedures for the operation, powering on and maintenance of the Multiscan 8+ central unit The Multiscan 8+ central unit can only be programmed by means of a personal computer with the appropriate software. OVER-RANGE ALARM3 display... -
Page 56: System Status
Instruction Manual Multiscan 8+ ENGLISH Fig. 3.1 b) Display in normal status System status The central unit communicates with the operator by means of the LCD display and LEDs on the front panel. Different information is displayed during different states of the system. A few general rules apply at any level as follows: On the front is a key switch with three positions, which determine system operation Closed padlock: it is not possible to operate the central unit... - Page 57 Instruction Manual Multiscan 8+ ENGLISH NORMAL It is the normal system operating status without alarms and faults. The screen in this status displays the channels (gas detectors) with gas concentration measured in real time. Fig. 3.2.1 a) Screen in Normal status. ALARM The Alarm status is activated when one or more gas detectors measure a gas concentration higher than the alarm threshold set during the configuration of the central...
- Page 58 Instruction Manual Multiscan 8+ ENGLISH From the main screen, by pressing the MENU button and selecting ACTIVE EVENTS, it is possible to view the channels in Alarm/Fault status that have not yet been reset. FAULT The Fault status will be activated in the following situations: 5.
-
Page 59: Menu
Instruction Manual Multiscan 8+ ENGLISH UNSET This status is used to exclude individual channels or system parts without physically disconnecting sensors. Warning: a gas detector in OFF status does not generate an alarm. EMERGENCY This is a particular malfunction status that can occur for the following two reasons: •... - Page 60 Instruction Manual Multiscan 8+ ENGLISH When a new event occurs, the screen will automatically switch to the ACTIVE EVENTS list and the buzzer of the central unit will sound. Until ACK is pressed for the new event, it will not be possible to go back to the main screen. The screens in Figure 3.5.1 show events for which ACK has not yet been pressed.
-
Page 61: Warranty Coupon For Repairing
ENGLISH WARRANTY COUPON FOR REPAIRING Warranty on Sensitron products is valid one year from the manufacturing date placed on the product and it is extended of one year from the date of the installation on condition that the installation is performed within the first year of life of the product. As proof will... -
Page 62: Instructions For Disposal
In case of modification of the product, Sensitron disclaims all liability. Data may change, as well as legislation and you are strongly advised to obtain copies of the most recently issued regulations, standards and guidelines.
Need help?
Do you have a question about the MULTISCAN 8+ and is the answer not in the manual?
Questions and answers