Advertisement
Quick Links
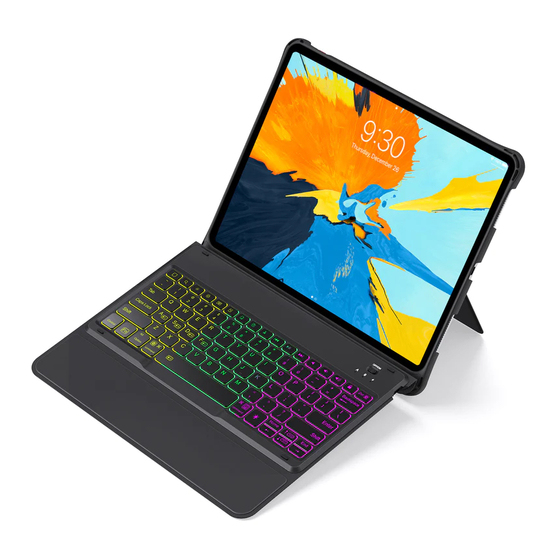
4
To connect the keyboard with cover/ Verbinden von Tastatur und Schutzhülle/ キーボードとカ
バーを接続する/ Pour connecter le clavier à lʼétui/ Montare la tastiera nella custodia/ Montar el
teclado en la funda
1. Find the connection axis on the keyboard and put it into the slot at the back the cover. Make sure that the two convex points
on the axis point up.
Finden Sie die Verbindungsachse an der Tastatur und lassen diese in die dafür vorgesehene Aussparung an der Rückseite der
Schutzhülle einrasten. Stellen Sie hierbei sicher, das die beiden herausstehenden Enden der Achse nach oben zeigen.
キーボードの接続軸の2つの凸点が上にして、 カバー背面のスロッ トに合わせます。
Trouvez l'axe du clavier, puis insérez les deux bouts dans le slot de l'étui en laissant les deux parties saillantes vers l'extérieur.
Infilare lʼasse della tastiera nella fessura sul retro del case iPad. Assicurarsi che i punti convessi siano rivolti verso lʼalto.
Insertar el eje del teclado en la ranura presente en la funda iPad. Comprobar que los puntos convexos estén hacia arriba.
2. Press the connection axis and make sure the connection is stable.
Drücken Sie an den Punkten, die Sie auf dem folgenden Bild sehen, auf die Verbindungsachse und fixieren Sie so die
Verbindung.
接続軸をスロッ トにしっかりと押し込んで、 接続が安定していることを確認してください。
Pressez sur l'axe pour fixer les deux parties.
Premere lʼasse e assicurarsi che sia ben saldo nella custodia.
Empujar el eje y comprobar que esté firme en la funda.
1
Advertisement

Related Manuals for Inateck KB02006


Summary of Contents for Inateck KB02006
- Page 1 To connect the keyboard with cover/ Verbinden von Tastatur und Schutzhülle/ キーボードとカ バーを接続する/ Pour connecter le clavier à lʼétui/ Montare la tastiera nella custodia/ Montar el teclado en la funda 1. Find the connection axis on the keyboard and put it into the slot at the back the cover. Make sure that the two convex points on the axis point up. Finden Sie die Verbindungsachse an der Tastatur und lassen diese in die dafür vorgesehene Aussparung an der Rückseite der Schutzhülle einrasten. Stellen Sie hierbei sicher, das die beiden herausstehenden Enden der Achse nach oben zeigen. キーボードの接続軸の2つの凸点が上にして、 カバー背面のスロッ トに合わせます。 Trouvez l'axe du clavier, puis insérez les deux bouts dans le slot de l'étui en laissant les deux parties saillantes vers l'extérieur. Infilare lʼasse della tastiera nella fessura sul retro del case iPad. Assicurarsi che i punti convessi siano rivolti verso lʼalto. Insertar el eje del teclado en la ranura presente en la funda iPad. Comprobar que los puntos convexos estén hacia arriba. 2. Press the connection axis and make sure the connection is stable. Drücken Sie an den Punkten, die Sie auf dem folgenden Bild sehen, auf die Verbindungsachse und fixieren Sie so die Verbindung. 接続軸をスロッ トにしっかりと押し込んで、 接続が安定していることを確認してください。 Pressez sur l'axe pour fixer les deux parties. Premere lʼasse e assicurarsi che sia ben saldo nella custodia. Empujar el eje y comprobar que esté firme en la funda.
- Page 2 背面中央部の底板を開けて3つのスロッ トがあります。 そして、 背面の金属部件をひっく り返して、 スロッ トに当ててスタンドになります Comme l'indique sur l'image, fixez l'étui, puis retirez de manière douce le clavier à l'orientation verticale. 。 違うスロッ トに当てることで立ち角度を調整できます。 Appoggiare la custodia su di un piano e portare la tastiera in posizione perpendicolare. Estrarre la tastiera con cautela. Ouvrez la partie sur le dos de lʼétui. Il y a trois slots, vous pouvez ainsi trouver le meilleur positionnement pour votre tablette lors Apoyar la funda en un plano y poner el teclado en posición vertical. Extraer el teclado con cuidado. dʼusages. Sollevare la placca che si trova al centro della parte inferiore della custodia. Sotto si trovano 3 fessure. È possibile regolare lʼangolazione del supporto fissandolo a una di queste fessure secondo lʼaltezza desiderata. Levantar el soporte que se encuentra en el centro de la parte inferior de la funda. Abajo se encuentra 3 ranuras. Es posible ajustar el ángulo del soporte sujetándolo a una de estas ranura según la altura deseada. Attention/ Achtung/ ご注意/ ATTENTION/ Attenzione/ Advertencia 1. The connection axis is made of premium PC material, soft and flexible, which can withstand repeatedly connection and separation between the keyboard and the cover. Die Verbindungsachse ist aus erstklassigem PC-Kunststoff hergestellt, welcher weich und flexible gestaltet ist, um wiederhol- ten Verbindungs- und Trennvorgängen von Tastatur und Hülle standzuhalten. 接続軸は、 柔軟性に優れたPC素材を使用して、 キーボードとカバーの間の接続と分離を繰り返し操作することができます。 Lʼaxe est fabriqué en matériau PC de qualité supérieure, doux et flexible pour permettre des connexions et séparations répétées et fréquentes. Lʼasse di montaggio è realizzato con materiale PC di alta qualità, morbido e flessibile, in grado di resistere a numerosi montaggi e smontaggi.. El eje de montaje está hecho en material PC de alta calidad, suave y flexible, y puede resistir a numerosos montajes y desmontaje. 2. Please email support@inateck.com if you need any assistance. Bitte schreiben Sie eine E-Mail an support@inateck.com, wenn Sie Unterstützung benötigen. ご相談、 お困りごとなど、 お気軽に下記の窓口までお問い合わせください。 Veuillez svp contacter support@inateck.com si vous avez besoin dʼaide. In caso di necessità, scrivere una e-mail a support@inateck.com. En caso de necesidad, escribir a support@inateck.com.
Need help?
Do you have a question about the KB02006 and is the answer not in the manual?
Questions and answers