Advertisement
Available languages
Available languages
Quick Links
5216 Portside Dr., Medina OH, 44256 USA • PH: 1 330.722.5033 • FAX: 1 330.722.5037
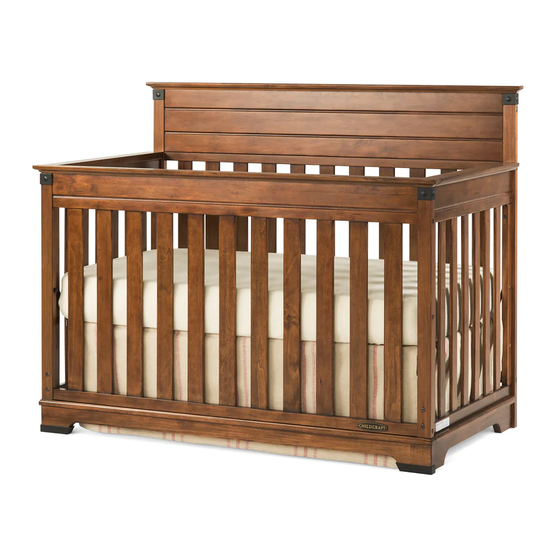
Redmond 4-in-1 Convertible Crib
THIS IS THE ASSEMBLY INSTRUCTIONS FOR CRIBS SOLD IN CANADA
INSTRUCTIONS D'ASSEMBLAGE POUR LES LITS DE BÉBÉ VENDUS AU CANADA
FOR CUSTOMER SERVICE CALL
1-877-716-2757
(outside of U.S. 330-722-5033). DO NOT CALL
RETAILER OR RESELLER FOR SERVICE
AS THEY ARE NOT AUTHORIZED TO
RESOLVE ANY SERVICE ISSUES.
FOR WARRANTY AND FEDERAL SAFETY STANDARD
COMPLIANCE CERTIFICATES,
PLEASE VISIT OUR WEBSITE AT
www.foundations.com
ASSEMBLY ASSISTANCE
IMPORTANT: retain for future reference read
carefully.
Foundations strives for the highest quality in our
products but occasionally a missing part or problem
can occur during assembly.
If any parts are missing or broken or you need
assistance with assembly, DO NOT return the
product to your dealer. Go to our website at
www.foundations.com or call Foundations
for assistance at 1-877-716-2757 (U.S. Only) or
1-330-722-5033 (Monday through Friday, 9:00
a.m.– 4:00 p.m. Eastern Time). Please have the
model number and manufacture date available
when you call or write us at:
Foundations, 5216 Portside Dr. Medina OH. 44256
ASSEMBLY INSTRUCTIONS
• Adult assembly required.
• Read all instructions BEFORE assembly and USE
of product.
• Unpack carton, remove packing materials,
including poly bag. Identify and check all parts.
SUGGESTED TOOLS
#2 Medium Straight Screwdriver
Foundations
www.foundations.com
Models Covered: F32801
KEEP INSTRUCTIONS FOR FUTURE USE
TM
SINCE 1954
Worldwide, Inc.
®
Assembled as Toddler Bed
Record the information for your product here:
Model number:
Manufacture date:
PO number:
1
.
Assembled as Crib
AB20062_G4
AB20062_G3
Advertisement

Related Manuals for Child Craft F32801


Summary of Contents for Child Craft F32801
- Page 1 5216 Portside Dr., Medina OH, 44256 USA • PH: 1 330.722.5033 • FAX: 1 330.722.5037 www.foundations.com Redmond 4-in-1 Convertible Crib Models Covered: F32801 KEEP INSTRUCTIONS FOR FUTURE USE THIS IS THE ASSEMBLY INSTRUCTIONS FOR CRIBS SOLD IN CANADA INSTRUCTIONS D’ASSEMBLAGE POUR LES LITS DE BÉBÉ VENDUS AU CANADA...
-
Page 2: Parts List
PARTS LIST Part Number Quantity Part Description A. Stationary Side Assembly 22301109 B. Long Foot Assembly 22301118 C. Short Foot Assembly 22301138 D. Short Head Assembly 22301129 E. Stationary Post Left 22301115 F. Stationary Post Right 22301117 G. Top Back Rail Assembly 22301139 H. - Page 3 STEP 1 Construct Short Foot and Head assembly: Short Head Assembly: Insert Allen Head Bolts (S) and (T) and Connector Nuts (U) into holes in Foot Post Left (I) and Stationary Post Left (E) as shown to fill in unused Holes.
- Page 4 STEP 3 Stationary Side Assembly to Short Foot Assembly: Insert Dowel Pin (AA) into center hole of the top rail of Top Back Rail Assembly (G). Place Joint Connector Nuts (V) into holes in the back of Top Back Rail Assembly (G) and bottom of top and bottom rail of Stationary Side Assembly (A).
- Page 5 STEP 5 Add Mattress Spring to crib. There are 2 positions for the Spring (O) shown as (1) and (2). The position must be the same as for all the brackets attached to the crib. Note: Pouches containing warnings and instructions face up on top surface of Spring.
-
Page 6: Finishing Touches
Finishing Touches Place a purchased full sized mattress on the spring. After completing the crib assembly, and after making yourself aware of WARNINGS, CAUTIONS, CLEANING,STORAGE,USE and MAINTENANCE of crib on pages 8 and 9, store the assembly directions in the pouch which was pre-attached to the spring. - Page 7 WARNING WARNINGS (For Toddler Bed) WARNING WARNING INFANTS HAVE DIED IN TODDLER BEDS FROM ENTRAPMENT. Openings in and between bed parts can entrap head and neck of a small child. NEVER use bed with children younger than 15 months. ALWAYS follow assembly instructions.
-
Page 8: Maintenance Cleaning And Storage
CAUTION • UPON COMPLETION OF ASSEMBLY BE SURE ALL SCREWS, BOLTS AND FASTENING DEVICES HAVE BEEN TIGHTENED SECURELY. A FREQUENT CHECK SHOULD BE MADE OF ALL SCREWS, BOLTS AND FASTENING DEVICES AND TIGHTEN IF NEEDED. Maintenance Cleaning and Storage MAINTENANCE: Upon completion of the assembly, check to make sure all screws, bolts and connectors are tightened and secure. - Page 9 Full Size Bed Configuration Full Size Bed conversion: The crib can be converted to a full size bed with the purchase of a bed rail and slat kit from Foundations®. Use Allen Bolts (Q) from existing hardware and re-use the Joint Connectors (V). Remove and save the Short Foot Assembly (C) and Short Head Assembly (D) for future use.
- Page 10 5216 Portside Dr., Medina, OH 44256 É-U • Téléphone: 1 330.722.5033 • Télécopieur: 1 330.722.5037 www.foundations.com Redmond 4-en-1 Lit de Bébé Transformable F32801 Modèles couverts : CONSERVEZ CES INSTRUCTIONS À TITRE DE RÉFÉRENCE THIS IS THE ASSEMBLY INSTRUCTIONS FOR CRIBS SOLD IN CANADA INSTRUCTIONS D’ASSEMBLAGE POUR LES LITS DE BÉBÉ...
- Page 11 LISTE DES PIÈCES Description des pièces Numéro de pièce Quantité A. Stationnaire Assemblée Side 22301109 B. Assemblée à long pied 22301118 C. Assemblée pied court 22301138 D. Assemblée courte tête 22301129 E. Stationnaire poteau gauche 22301115 F. Stationnaire Poster Droite 22301117 .
- Page 12 ÉTAPE 1 Construire ensemble pied court et la tête: Court Assemblée chef: Insérez Allen boulons à tête (S) et (T) et noix de connecteur (U) dans les trous du pied poteau gauche (I) et Papeterie poteau gauche (E) comme indiqué pour remplir les trous non utilisés.
- Page 13 ÉTAPE 3 Stationnaire Assemblée Side à l’Assemblée pied court: Insérez Goujon (AA) dans le trou central de la tra- verse supérieure de la page Haut Assemblée ferro- viaires (G). Placez commune Noix connecteur (V) dans les trous à l’arrière de la page Haut Assemblée ferroviaires (G) et le bas du haut et rail inférieur de l’Assemblée côté...
- Page 14 ÉTAPE 5 Ajouter Matelas Spring au lit de bébé. Il ya deux positions pour le printemps (O) représen- tés en (1) et (2). La position doit être la même que pour tous les supports fixés au berceau. Remarque: Les pochettes contenant les avertissements et les instructions face visible sur la surface supérieure du printemps.
- Page 15 Touches Finales Placez un matelas pleine grandeur acheté sur le ressort. Après avoir terminé l’assemblage de crèche, et après faire vous-même conscient de avertissements, Nettoyage, rangement, utilisation et entretien de crèche aux pages 17,18 et 19, de stocker l’ensemble directions dans la poche qui a été pré-attaché au printemps.
- Page 16 WARNING AVERTISSEMENTS (pour lit d’enfant) WARNING AVERTISSEMENT: DES ENFANTS SONT MORTS SUFFOQUÉS DANS DES LITS D’ENFANTS. Les ouvertures et les espaces entre les parties du lit pour- raient permettre à un jeune enfant de se coincer la tête ou le cou. Ne placez JAMAIS un enfant de moins de 15 mois dans ce lit.
-
Page 17: Entretien
Option Barrière et installation Pour plus de sécurité, un garde-corps peut être acheté pour cette crèche. Contactez Fondations ou votre revendeur. Suivez les instructions fournies avec la Barrière acheté. Note: 4 de la tête des boulons Allen (p) et (2) d’allongement de la Garde rails (L) seront néces- saires pour joindre la Garde Rail. - Page 18 Entretien, nettoyage et entreposage ENTREPOSAGE : Faites preuve de prudence lors de l’entreposage du lit, car les changements extrêmes de température ou d’humidité peuvent abîmer ce meuble. Lors de l’utilisation d’un vaporisateur, faites preuve de prudence et dirigez toujours le jet de vapeur loin du lit et de tout autre meuble en bois.
- Page 19 MISE EN GARDE WARNING • Ne pas utiliser le lit à moins ďêtre en mesure de suivre précisément les instructions qui ľaccompagnent. • Ne pas utiliser le lit si l’enfant est capable ďen sortir ou mesure plus de 90 cm. •...
Need help?
Do you have a question about the F32801 and is the answer not in the manual?
Questions and answers