Advertisement
Quick Links
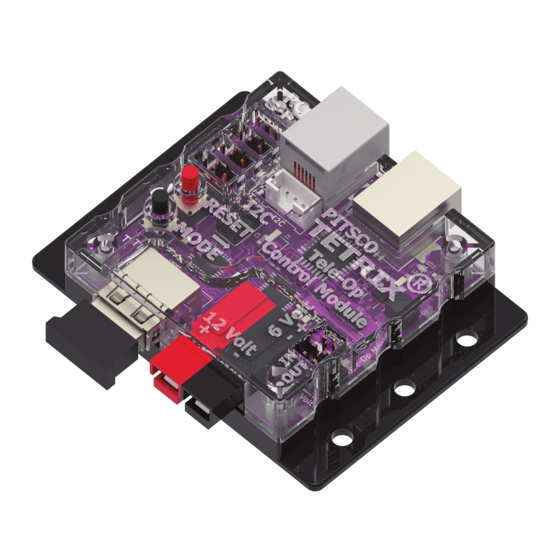
Tele-Op Module Activity 2 – TaskBot Control
Overview
In this activity, you will understand how the Tele-Op module enables you to control
a robot using the buttons, triggers, joysticks, and sensors associated with the PS4
DUALSHOCK 4 gaming controller. You will first need to build the TaskBot using
instructions from the PRIZM® Programming Guide. The TaskBot should include
the PRIZM controller, the Line Finder and Ultrasonic Sensors, and the servo/flag
attachment that is used for the final activity in the PRIZM Programming Guide.
Parts Needed
• Built TETRIX® MAX TaskBot from PRIZM
Programming Guide
• Tele-Op module
• PS4 DUALSHOCK 4 gaming controller
• Powerpole extension cable
• Daisy-chain data cable
• 2 motor encoder cables
• USB cable
• Socket head cap screws
• Kep nuts
Hardware Connections
1.
Connect one end of the Powerpole extension cable to the other battery
connection port on PRIZM. Connect the other end of the Powerpole
extension cable to the battery connection port on the Tele-Op module.
2.
Connect one end of the daisy-chain data cable to the I2C expansion
port on PRIZM. Connect the other end of the daisy-chain data cable to
the I2C port on the Tele-Op module.
3.
Choose a location on the TaskBot to attach the Tele-Op module.
Make sure that the location is close enough to PRIZM that the power
connection cable and the daisy-chain data cable will reach between the
Tele-Op module and PRIZM. Attach the Tele-Op module using leftover
socket head cap screws and kep nuts from your TETRIX MAX set.
4.
This activity uses the motor encoders built into the TETRIX MAX
TorqueNADO® Motors. Connect one end of a motor encoder cable to a
TorqueNADO motor. Connect the other end of the cable to the encoder
port on PRIZM that corresponds to the motor port for that motor
(Motor 1 to Encoder Port 1, Motor 2 to Encoder Port 2).
5.
Make sure that the Ultrasonic Sensor on the TaskBot is connected to
Port D2 on PRIZM.
6.
Make sure that the Line Finder Sensor is connected to Port D3 on
PRIZM.
7.
Make sure that the servo that raises and lowers the flag on the TaskBot
is connected to Servo Port 1 on PRIZM.
TETRIX Tele-Op Control Module Activity 2
1
Advertisement

Related Manuals for TETRIX Tele-Op Module

Summary of Contents for TETRIX Tele-Op Module
- Page 1 Tele-Op Module Activity 2 – TaskBot Control Overview In this activity, you will understand how the Tele-Op module enables you to control a robot using the buttons, triggers, joysticks, and sensors associated with the PS4 DUALSHOCK 4 gaming controller. You will first need to build the TaskBot using instructions from the PRIZM®...
-
Page 2: Bluetooth Connections
The controller is now in discovery mode. Press the black button on the Tele-Op module. The green LED on the Tele-Op module should remain on and stop flashing. Also, the light bar on the game controller should be a solid green color to indicate the controller is paired and ready to be used to control the Tele-Op module. - Page 3 This USB port should not be used when uploading sketches. Make sure the PRIZM and Tele-Op module are turned on and that your Make sure you use the USB port PS4 controller is paired with your Tele-Op module. There should be a on PRIZM.
- Page 4 Using the Ultrasonic Sensor to detect distance, PRIZM will turn on the PS4 rumble motors if an object comes within 50 centimeters. Box or obstacle Closer than 50 centimeters TETRIX Tele-Op Control Module Activity 2...
-
Page 5: Moving Forward
The void setup() section has two new commands related to the Tele-Op module. The ps4.setDeadZone commands set the size of the dead zones for the left and right joysticks on the PS4 controller. By setting a dead zone, you identify the size of an area for the joystick’s x- and y-axis that is considered neutral. - Page 6 English, but in coding, a double negative makes a positive just like it does in math. So in other words, this while loop says, “while at least one of the Group 2 buttons is pressed, call the directionButtonControl() function. ” TETRIX Tele-Op Control Module Activity 2...
- Page 7 These if statements use the same ps4.Button(BUTTON) command to check the status of the Cross, Square, Triangle, and Circle buttons. When one of these buttons is pressed, the servo that controls the flag is set to a corresponding position. TETRIX Tele-Op Control Module Activity 2...
- Page 8 After the highSpeed variable is set, the medSpeed and lowSpeed variables can be set. The medSpeed variable is set to 35% of the highSpeed value, and the lowSpeed variable is set to 15% of the highSpeed value. TETRIX Tele-Op Control Module Activity 2...
- Page 9 This command updates the status of the controller’s buttons, joysticks, and gyroscope sensor values, and it is the gyroscope sensor values that determine the pitch and roll. TETRIX Tele-Op Control Module Activity 2...
- Page 10 Notice that in the last two table entries, the TaskBot moves the opposite direction of the controller tilt, but because of the backward motion, the TaskBot ends up facing the direction of the tilt. TETRIX Tele-Op Control Module Activity 2...
- Page 11 Finally, the function uses eight if statements to determine which buttons from the directional pad are pressed and to adjust the motors accordingly. The ps4.buttons_2 command is used to get the uniquely assigned value based on what button or buttons are pressed on the direction pad. TETRIX Tele-Op Control Module Activity 2...
- Page 12 When the TaskBot is back on the line, the user should be able to press a button on the PS4 controller to have the TaskBot start autonomously following the line again. TETRIX Tele-Op Control Module Activity 2...
Need help?
Do you have a question about the Tele-Op Module and is the answer not in the manual?
Questions and answers