Table of Contents
Advertisement
Available languages
Available languages
Quick Links
1
Before Getting Started ............................................................................... 2
1.1
FusionHDTV Specification .......................................................................................................... 2
1.2
FusionHDTV System Requirements ........................................................................................... 4
1.3
Package contents ....................................................................................................................... 5
2
Software Installation ................................................................................... 6
2.1
Installing FusionHDTV Applications ............................................................................................ 6
2.2
Driver installation ....................................................................................................................... 11
3
Hardware Installation ............................................................................... 13
3.1
About the Board ........................................................................................................................ 13
3.2
Before Installation PCI card ...................................................................................................... 14
3.3
PCI Board Installation ............................................................................................................... 14
3.4
Remote Installation ................................................................................................................... 15
4
Using FusionHDTV ................................................................................... 16
4.1
Starting and Quitting ................................................................................................................. 16
4.2
Display setup ............................................................................................................................ 16
4.3
Using FusionRemote ................................................................................................................ 20
4.4
FusionHDTV Shortcut Key ....................................................................................................... 21
5
Technical Support .................................................................................... 22
FusionHDTV 7 Cool
Advertisement
Chapters
Table of Contents

Subscribe to Our Youtube Channel
Related Manuals for Dvico FusionHDTV 7 Cool

Summary of Contents for Dvico FusionHDTV 7 Cool
-
Page 1: Table Of Contents
FusionHDTV 7 Cool Before Getting Started ... 2 FusionHDTV Specification ... 2 FusionHDTV System Requirements ... 4 Package contents ... 5 Software Installation ... 6 Installing FusionHDTV Applications ... 6 Driver installation ... 11 Hardware Installation ... 13 About the Board ... 13 Before Installation PCI card ... -
Page 2: Before Getting Started
FusionHDTV Specification A Highly cost effective reception card You can enjoy HDTV at quite a low price due to Dvico’s innovative HDTV software decoding engine. Unrivaled crystal-clear picture quality FusionHDTV provides up to 5 times higher resolution when compared to analog TV, and provides crisp and crystal-clear picture quality to a PC screen. - Page 3 Cut-on-the-fly feature – Cut the transport stream files You can cut out the wanted scenes from the captured file and reconstruct the Digital clip. Supports sub-channel Sub channel is listed up in sub channel play list and can be selected with channel up/down button or mouse selection in sub channel play list.
-
Page 4: Fusionhdtv System Requirements
FusionHDTV System Requirements System requirements for FusionHDTV are as follows <Input/Output> Antenna S-Video IN, Composite IN <DxVA VGAs> Pentium3 800MHz or faster with 128M memory Celeron 900Mhz or faster with 128M memory GeForce4 MX420,440,Fx5200,5600 Series or late all models. Pentium M 1.4GHz or faster for notebook PC All ATI Radeon series VGAs Windows 2000/XP/MCE 2005/Vista 32bit/Vista 64bit Ultra-DMA66 enabled main board and HDD for recording... -
Page 5: Package Contents
① FusionHDTV transceiver ② External connection cable (Include the IR remote receiver) * Do not connect the line-in cable because FusionHDTV 7 Cool is supporting the external sound internally. All specifications and information are subject to changes without further notices... -
Page 6: Software Installation
Installing FusionHDTV Applications Insert FusionHDTV Installation CD into the CD-ROM drive. The setup window will automatically pop up. if you downloaded the recent version on DVICO’s website, please run install.exe or setup.exe. 2.1.1 Uninstall Drivers 1) When you select Uninstall Driver in the menu on the FusionHDTV INSTALLER program, Select your FusionHDTV board type. - Page 7 2.1.2 Installing FusionHDTV Software Important: Installation on Windows 2000 Professional or Windows XP Before you install FusionHDTV software, be sure that you logged on as an account with Administrator privileges. Select “Install FusionHDTV”. At the FusionHDTV Installation dialog opens, click on the “Next>” button. 3) The “Choose Destination Location”...
- Page 8 5) The “Setup status” window will appear. 7) PC specification selection windows will appear. Please select the appropriate system. You can change the mode after installation with configuration menu of the application program. You do not need to reinstall the program with different options. 8) Select your FusionHDTV card(FusionHDTV7 Cool), and Press ‘Install Driver’...
- Page 9 “Yes” when the digital signature window appears. <Notes> In certain cases, Windows will ask for the .sys files. You can locate the sys files in the C:\Program Files\DVICO\FusionHDTV\driver\Cool or C:\Windows\System32\Drivers folder. All specifications and information are subject to changes without further notices...
- Page 10 2.1.3 Installing Microsoft DirectX 9 Important! Installing on Windows 2000 Professional or Windows XP You can check the version of DirectX by typing “dxdiag” on the command line which appears with menu selection “start->run” If you have DirectX 9 or later already, you do not need to install DirectX 9 again.
-
Page 11: Driver Installation
In certain cases, Windows will ask for the .sys files. You can locate the sys files in the C:\Program Files\DVICO\FusionHDTV\driver\COOL or C:\Windows\System32\Drivers folder. 1) When the “Add New Hardware Wizard window” appears, select “Install the software automatically (Recommended)” and then click “next”. - Page 12 2.2.2 Checking the driver Right click the “My Computer” icon and select “properties” from the popup menu. Select Hardware-> Device Manger. You must see following devices properly installed under the “Sound video and game controllers”. select Uninstall Driver in the menu on the FusionHDTV INSTALLER If you want to remove the driver, program, Select your FusionHDTV board type.
-
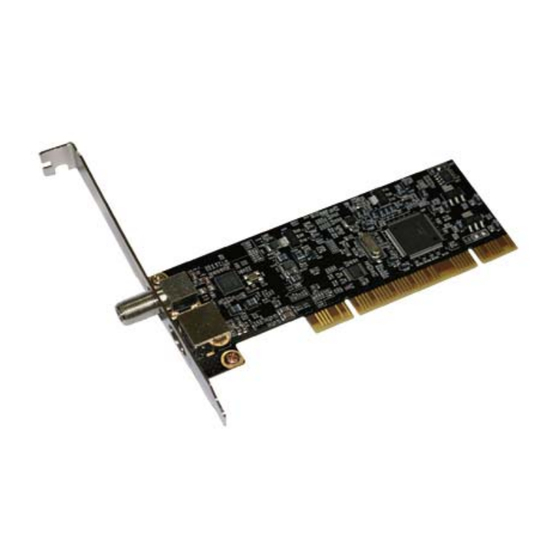
Page 13: Hardware Installation
To use the S-video input, do not connect the composite video (yellow) cable. Do not connect the line-in cable because FusionHDTV 7 Cool is supporting the external sound internally. All specifications and information are subject to changes without further notices... -
Page 14: Before Installation Pci Card
Insert the board by holding the top part of the board and push it until it completely locks into the slot. Fasten the screw on the bracket using a screw driver. Do not connect the line-in cable because FusionHDTV 7 Cool is supporting the external sound internally. To use the S-video input, do not connect the composite video (yellow) cable. -
Page 15: Remote Installation
FusionRemote icon at the low right bottom of the screen. If you want to see the FusionRemote icon in the tray, please start the program by Start->Program- >DViCO->FusionRemote. Please select the port that IR receiver module is attached and press the any button on the remote transceiver. -
Page 16: Using Fusionhdtv
Http://www.FusionHDTV.co.kr Starting and Quitting Click Start, point to Program->DVICO->FusionHDTV, or double click on the FusionHDTV icon in the program folder to execute FusionHDTV. When you first execute the program, it will ask for a channel scan. Please say “Yes” for the channel scan. - Page 17 "Audio > Second Language" option when it is available in digital broadcasting. Show WallPaper(ALT-W) Time-Shifting On/Off : Change Time-Shifting mode. MultiView : You can see all sub channel video on the single video screen. PIP : Change PIP on/off , toggle PIP program and select PIP TV tuner. If you have a single Tuner, you can see sPIP instead of PIP.
- Page 18 4.2.2 Controller This indicates Control Buttons. 1) Exit button 2) Maximize button 3) Minimize 4) Channel UP/DOWN button 5) Show Input source. 6) Channel/Input button: This mode shows the channel number. If you click on the small channel sub number(2), it will show the channel list and sub channel name. 7) Video/Audio status 8) Show program name.
- Page 19 24) Teletext button: is not used. 25) PIP button : is used to show the PIP screen. This button is available with dual digital or multi card. PIP controller : Dual digital model or multi-card If you click the PIP button, you can see PIP controller. 26) Select PIP channel.
-
Page 20: Using Fusionremote
Using FusionRemote This indicates Remote Buttons. 4.3.1 Using For FusionHDTV [ FusionHDTV IR Remote ] Profile APP start FusionHDTV Start WinAMP Start Configuration Instant Replay Volume Up/Down File Open Mute DTV/ATV or LiveTV Change Input Source Go Previous channel Aspect Ratio SnapShot MCE DVD MENU Not only does it provide perfect control of all HDTV functions you will also be able to control Windows MCE... -
Page 21: Fusionhdtv Shortcut Key
FusionHDTV Shortcut Key Shortcut Key A+Numeric D+Numeric ALT+F4 ALT+E ALT+I ALT+K ALT+P(P) ALT+Q ALT+S ALT+T (T) ALT+W (W) ALT+X Page Up Page Down Backspace Shift+ Backspace ALT+Enter CTRL+Space CTRL+B (B) CTRL+C (C) CTRL+D CTRL+E (E) CTRL+F (F) CTRL+H CTRL+I (I) CTRL+L (L) CTRL+M (M) CTRL+O (O) -
Page 22: Technical Support
My Q/A at Please visit our WEB (http://www.fusionhdtv.co.kr/Eng) and check the enriched FAQs and much more. And please sign-up and let Dvico support you better. If you sign up, you will get: 1) Automatic emailing of FusionHDTV latest update news, tips & techiques. - Page 23 FusionHDTV 7 Cool 시작하기 전에 ... 2 퓨전HDTV 특징 ... 2 퓨전HDTV 사용환경 ... 4 내용물 ... 5 소프트웨어 설치하기 ... 6 퓨전HDTV 응용 프로그램 설치하기 ... 6 드라이버 설치하기 ...13 하드웨어 설치하기 ... 15 보드의 각부 명칭 ...15 설치하기 전에 ...15 보드...
-
Page 24: 시작하기 전에
시작하기 전에 퓨전HDTV 특징 놀라운 가격대 성능비의 HDTV/아날로그 TV 수신카드 디비코의 혁신적인 HDTV 디코딩 엔진과 최소의 HW 구성으로 저렴한 가격으로 HDTV를 즐기실 수 있 습니다. 초고해상도 고선명 화질 디비코만의 독창적인 알고리즘을 적용한 HDTV엔진으로 PC 모니터 화면에서 최상의 화질을 보여주며 일반 TV보다 5배 이상의 초고해상도 고선명 화질을 유지합니다. LCD 모니터를... - Page 25 디비코가 운영하는 전자 TV편성표 (EPG) 안내를 퓨전HDTV 내에서 보실 수 있으며, 한 번 클릭으로 예 약 녹화가 가능합니다. 필요 없는 부분을 잘라내는 컷 편집 기능 재생 중인 녹화 파일에서 필요 없는 부분을 잘라내고 원하는 부분만을 따로 클립으로 만들 수 있습니다. 가상...
-
Page 26: 퓨전Hdtv 사용환경
퓨전HDTV 사용환경 퓨전HDTV는 다음과 같은 환경에서 사용할 수 있습니다. <입출력> 공중파 안테나, 케이블방송 튜너 입력 단자(겸용) S-VHS 입력, 비디오 입력, 아날로그 스테레오 오디오 입력단자 (FusionHDTV7 Cool 모델은 별도의 내부케이블이나 Line-in 을 사용하지 않습니다.) <DxVA VGA> 펜티엄3 800MHz 이상 메모리 128M 이상 지포스4 MX420,440, Fx5200,5600을... -
Page 27: 내용물
내용물 퓨전HDTV 제품에는 다음과 같은 내용물이 들어 있어야 합니다. 제품에 따라 내용물은 차이가 있을 수 있습니다. ① 퓨전HDTV 카드 ② 설치 CD ③ 사용설명서 [ 퓨전HDTV 리모콘 ] ① 퓨전HDTV 리모콘 ② 변환 케이블(외부입력 A/V 와 Line-in, 리모콘 수신부 포함) FusionHDTV7 Cool에서는... -
Page 28: 소프트웨어 설치하기
소프트웨어 설치하기 퓨전HDTV 설치 프로그램은 항상 최신 버전을 사용하시기 바랍니다. 최신 버전은 FusionHDTV 홈페이지 (Http://www.FusionHDTV.co.kr)의 다운로드 페이지에서 받으실 수 있습니다. 퓨전HDTV 응용 프로그램 설치하기 퓨전HDTV 응용 프로그램의 설치에 대해 설명합니다. 설치CD를 CD-ROM 드라이브에 넣으면 자동으로 설치화면이 나타납니다. 최신 버전을 FusionHDTV 홈페이지에서 받으셨다면 그 파일을 실행시키면 자동 으로... - Page 29 2.1.2 퓨전HDTV 소프트웨어 설치 Warning 윈도2000 프로페셔널 / 윈도XP에서 설치하는 경우 Administrator 권한이 있는 사용자ID를 사용하여 설치하셔야 합니다. 사용자 권한에 관한 자세한 사항은 윈도우 매뉴얼을 참조하시기 바랍니다. 또한, 사용자 ID가 한글인 경우 Administrator 권한이 정확히 반 영되지 않아 퓨전HDTV 설치에 문제가 될 수 있습니다. Administrator 권한을 가지는 영문 ID를 이용하 여...
- Page 30 5) 설치가 진행되는 그림이 나타납니다. 6) PC 사양을 선택하는 창이 나타납니다. 설치하려는 PC의 사양에 맞는 것으로 선택하고 “다음” 버 튼을 누릅니다. 여기서 설정하는 것은 퓨전HDTV를 사용하는 도중에 환경설정에서 비디오 디코 더를 바꿔주면 변경할 수 있습니다. (Nvidia GeForce 2 는 4번 항목을 선택해 주십시요.) Vista OS 에서는...
- Page 31 음” 버튼을 누릅니다. 8) 최신 드라이버를 설치할 것인지 묻는 창이 나타나면 설치할 퓨전HDTV카드를 선택하고 다음을 누르면 최신 드라이버를 설치해줍니다. FusionHDTV7 Cool 를 선택하면 됩니다. 9) 드라이버 설치 창이 나옵니다. Next 를 누르면 자동으로 설치됩니다.
- Page 32 10) 디지털 서명을 찾는 메시지가 나오면 설치를 계속하기 위해 “계속(Continue Anyway)” 버튼을 누 릅니다. 로고 테스트는 드라이버 인증과 관련이 있으며 계속 을 누르고 진행을 해도 동작상에 문제는 없습니다. 11) 드라이버 설치가 완료되었다는 메시지가 나옵니다. 12) 시스템에 서로 다른 2개 이상의 카드나 USB보드가 연결된 경우에는 “예”를 선택하고 다시 드라 이버를...
- Page 33 <참고 사항> 일부 시스템에서는 sys 파일을 찾는 메시지가 나옵니다. Sys 파일은 퓨전HDTV 프로그램을 설치한 폴더 아래의 driver 폴더(예: C:\Program Files\Dvico\FusionHDTV\driver) 또는, 설치CD의 Driver 폴더, C:\Windows\System32\Drivers 폴더를 선택해주시면 됩니다. VISTA OS 에서는 하드디스크 쓰기 권한 문제로 저장 디렉토리에 대한 제약이 있습니다. 프...
- Page 34 2.1.3 Microsoft DirectX 9 설치하기 Warning 윈도2000 프로페셔널 / 윈도XP에서 설치하는 경우 Administrator 권한이 있는 사용자ID를 사용하여 설치하셔야 합니다. 사용자 권한에 관한 자세한 사항은 윈도우 매뉴얼을 참조하시기 바랍니다. 또한, 사용자 ID가 한글인 경우 Administrator 권한이 정확히 반 영되지 않아 설치에 문제가 될 수 있습니다. Administrator 권한을 가지는 영문 ID를 이용하여 설치하여 주시기...
-
Page 35: 드라이버 설치하기
드라이버 설치하기 2.2.1 드라이버 설치 퓨전HDTV 하드웨어를 PC에 삽입하고 컴퓨터를 켜면 아래처럼 ‘새 하드웨어 검색 마법사 시작’ 창이 나타나고, “다음” 버튼을 누릅니다. ‘FusionHDTV7 Cool, Unified AVStream’ 드라이버라고 나오면, ‘소프트웨어 자동으로 설치(권장)’을 선택하고 “다음” 버튼을 누릅니다. ‘FusionHDTV7 Cool, Unified AVStream ‘드라이버 설치를 위해 “계속” 버튼을 누릅니다. 파일이... - Page 36 2.2.2 드라이버 설치 확인 드라이버가 하나라도 정상적으로 설치되지 않으면 퓨전HDTV의 사용이 불가능하므로, 정상적으로 설치 되지 않은 드라이버가 있으면 제거하고 다시 설치하시기 바랍니다. 아래와 같은 그림은 시작의 ‘내 컴퓨터’를 오른쪽 마우스 클릭하여 ‘등록정보’를 선택하고, 하드웨어 탭에 서 장치 관리자를 선택하면 됩니다. [FusionHDTV7 Cool] 최신...
-
Page 37: 하드웨어 설치하기
하드웨어 설치하기 보드의 각부 명칭 [FusionHDTV7 Cool] 안테나 : 공중파 안테나나 케이블(유선)과 연결합니다. 영상 신호 입력 : 외부 영상 기기의 AV 변환 케이블과 연결합니다. S-video 사용시 Composite 비디오 단자(노랑색)는 연결하지 마십시오. 설치하기 전에 Warning 설치 전 주의 사항 보드상의 소자들은 정전기 등에 의해 손상 받을 우려가 있으니 보드를 설치하기 전에 신체를 접지된... - Page 38 TV 안테나선 연결 퓨전HDTV 보드의 안테나선 연결부에 안테나선을 연결합니다. 외부입력 연결 FusionHDTV7 Cool 에서는 아날로그 방송이나 외부 입력시 내부케이블이나 Line-in 케이블은 전혀 사용 하지 않습니다. 제공된 동글 케이블을 이용해서 외부 기기와 연결하시면 됩니다. 외부 입력을 연결해서 재생과 녹화를 할 수 있습니다. Line-in 케이블은 FusionHDTV7 Cool 에서는 연결 하실...
-
Page 39: 리모콘 설치하기
리모콘 수신부와 퓨전HDTV 소프트웨어가 정상적 으로 설치되고, 컴퓨터를 재부팅하시고 환경설정 을 선택합니다. 자동 실행의 체크를 푸시면 재 시 작 후 리모콘이 동작하지 않습니다. 다시 시작하시려면 시작-프로그램-DVICO-Fusion 리모콘을 클릭하시면 됩니다. 리모콘의 수신부가 연결된 통신포트를 선택 후 테스트를 선택하신 후 리모콘 버튼이 동작을 하... -
Page 40: 퓨전Hdtv 사용하기
퓨전HDTV 사용하기 퓨전HDTV 소프트웨어의 사용법에 대한 설명입니다. 최신 소프트웨어나 매뉴얼이 업데이트되었는지 http://www.Fusionhdtv.co.kr/에서 확인하시기 바랍니다. 퓨전HDTV를 사용하는데 문제가 발생하면 http://www.fusionhdtv.co.kr/로 접속하여 문의란에서 FAQ를 참 고하십시오. FAQ에서 문제가 해결되지 않으면 퓨전HDTV 게시판에 질문을 올려주십시오. 고객지원팀에 서 신속하고 정확한 답변을 해드리겠습니다. 프로그램에 대한 자세한 사용법은 프로그램 설치 후 HELP 를 참고해 주십시요. 하드웨어... - Page 41 화면창을 오른쪽 마우스 클릭하면 아래와 같은 팝업창이 나타납니다. 화면크기 : 정해진 화면크기로 바꿀 수 있습니다. 화면비율 : 화면창의 크기 비율을 고정할 수 있습니다. 항상위 : 퓨전HDTV를 항상 다른 프로그램보다 위에 위치하도록 해줍니다. 외국어 : 음성 다중 방송중일 때 체크가 되어 있으면 다중언어로 청취할 수 있습니다. 바탕화면...
- Page 42 4.1.2 제어판 제어판이 제공하는 기능들은 다음과 같습니다. 33) 종료 버튼 : 퓨전HDTV 프로그램을 종료합니다. 34) 전체 버튼 : 화면 창을 전체화면으로 바꿔줍니다. 35) 최소화 버튼 : 프로그램을 아이콘 형태로 최소화 시켜줍니다. 36) 채널전환 버튼 : 아래/위 버튼을 이용해서 환경설정에 등록되어 있는 채널로 전환할 수 있습니 다.
- Page 43 53) Slow FF : 0.8X /0.5X /0.2X /1X 으로 재생합니다. 54) 시간이동 슬라이더 : 현재 재생중인 화면의 위치를 보여주며 마우스로 잡아 끌면 흰 선 내에서 는 어디로든지 화면 이동이 가능합니다. 55) 시간이동 막대 : 현재 이동 가능한 부분을 나타내며 녹색선 내에서는 어디로든지 화면 이동이 가능합니다.
-
Page 44: 리모콘 사용하기
리모콘 사용하기 리모콘 각 버튼의 기능은 아래의 그림과 같습니다. 프로파일 시작 버튼 FusionHDTV 시작 버튼 WinAMP 시작 버튼 설정(SETUP) 버튼 순간 재생(REPLAY) 버튼 음량 조절(VOL) 버튼 파일열기(OPEN) 버튼 음소거(MUTE) 버튼 DTV/ATV(LIVE) 버튼 입력 변경(INPUT) 버튼 이전 채널(BACK) 버튼 화면 비율 조절 버튼 화면... -
Page 45: 퓨전 Hdtv 단축키
퓨전 HDTV 단축키 기본 기능 단 축 키 도움말 아날로그 채널 A+숫자 디지털 채널 D+숫자 종료 ALT+F4 취침예약 ALT+K 녹화리스트 ALT+L 동시화면 ALT+P(P) 예약리스트 ALT+R Time-Shift ALT+T (T) 바탕화면 보기 ALT+W (W) Page Up Page Down 순간재생 Backspace 순간이동 Shift+Backspace 전체화면... - Page 46 − 경기도 성남시 분당구 구미동 192-2 온세통신 4층 463-810 TEL : 031) 728-1394 Fax : 031) 717-8980 http://www.dvico.co.kr 이 보증서는 우리나라에서만 사용되며 다시 발행하지 않으므로 사용 설명서와 함께 잘 보관해 주십시오. 제 품 보 증 서 SERIAL NO : 보드에 표기되어 있음...
Need help?
Do you have a question about the FusionHDTV 7 Cool and is the answer not in the manual?
Questions and answers