Table of Contents
Advertisement
Quick Links
M1.2.LD3P.NLFREN - 05122017
Sécheur de peinture infrarouge
P.02 Gelieve te lezen en voor later gebruik bewaren
NL
P.06 Veuillez lire et conserver pour consultation ultérieure
FR
P.10 Please read and keep for future reference
EN
HANDLEIDING - MODE D'EMPLOI - MANUAL
LD3P (829000302)
Infrarood lakdroger
Infrared paint dryer
Advertisement
Table of Contents

Related Manuals for MW TOOLS LD3P


Summary of Contents for MW TOOLS LD3P
- Page 1 M1.2.LD3P.NLFREN - 05122017 HANDLEIDING - MODE D’EMPLOI - MANUAL LD3P (829000302) Infrarood lakdroger Sécheur de peinture infrarouge Infrared paint dryer P.02 Gelieve te lezen en voor later gebruik bewaren P.06 Veuillez lire et conserver pour consultation ultérieure P.10 Please read and keep for future reference...
-
Page 2: Installation
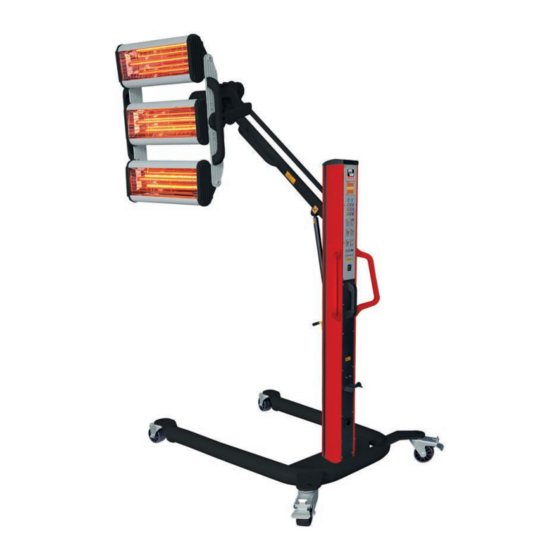
M1.2.LD3P.NLFREN - 05122017 1 Veiligheidsvoorschriften 3. Installation • Dit toestel is geschikt voor het drogen en uitharden van verf. Houd een veilige afstand tussen de zender en het paneel. Een onjuist onderhoud kan schade aan de verfopperklakte veroorzaken. • De installatie en het onderhoud moeten door gekwalificeerd personeel uitgevoerd worden. - Page 3 M1.2.LD3P.NLFREN - 05122017 De lakdroger bestaat uit 3 delen (de basis, de kolom en een cassette). 1. Installatie van de basis. a. Neem de basis uit de verpakking. b. Monteer de 4 wielen op de basis, en bevestig met de schroeven. De wielen met rem worden gewoonlijk aan de achterkant gemonteerd.
- Page 4 3. Select “Routine” or “Pulse”. M1.2.LD3P.NLFREN - 05122017 4. Set temperature and time according to the requirements of paint being cured. The display will show data. Pulse curing helps to achieve more lustrous results. 5. To achieve the best curing result, the lamp should be parallel with the paint surface.
-
Page 5: Troubleshooting
6. Troubleshooting M1.2.LD3P.NLFREN - 05122017 2. Lamp Tube Replacement 6 Problemen oplossen 1. Prepare cassette for replace Probleem Oorzaak Oplossing De lampen werken niet Lampen beschadigd Controleer de lampen Lampen niet correct aangesloten Controleer de aansluitingen SCR beschadigd Controleer de SCR... -
Page 6: Consignes De Sécurité
M1.2.LD3P.NLFREN - 05122017 1 Consignes de sécurité 3. Installation • Cet appareil est conçu pour le séchage et le durcissement de peinture. Maintenez une distance de sécurité entre l’émetteur et le panneau. Un entretien inadéquat peut endommager la surface de la peinture. - Page 7 M1.2.LD3P.NLFREN - 05122017 Le sécheur de peinture infrarouge se compose de 3 parties (la base, la colonne et une cassette). 1. Installation de la base. a. Déballez la base. b. Installez les 4 roues sur la base et fixez-les avec les vis. Les roues avec frein sont habituellement montées à l’arrière.
- Page 8 3. Select “Routine” or “Pulse”. M1.2.LD3P.NLFREN - 05122017 4. Set temperature and time according to the requirements of paint being cured. The display will show data. Pulse curing helps to achieve more lustrous results. 5. To achieve the best curing result, the lamp should be parallel with the paint surface.
-
Page 9: Résolution Des Pannes
6. Troubleshooting M1.2.LD3P.NLFREN - 05122017 2. Lamp Tube Replacement 6 Résolution des pannes 1. Prepare cassette for replace Panne Cause Solution Les lampes ne fonctionnent pas Lampes endommagées Vérifiez les lampes Les lampes ne sont pas bien branchées Vérifiez les branchements SCR endommagé... -
Page 10: Safety Instructions
M1.2.LD3P.NLFREN - 05122017 1 Safety instructions • This equipment is designed for paint curing application. Keep a safe distance between emitter and panel. Improper 3. Installation servicing can cause paint surface damage. • Installation and service must be performed by a qualified installer or service agent. - Page 11 M1.2.LD3P.NLFREN - 05122017 The shortwave infrared curing lamp is divided into 3 parts (a base, a column and a cassette). 1. Installation of the base. a. Open the packing of the base. b. Install the four wheels on the base respectively and tighten up the screws. Usually, the wheels with brakes should be mounted on the rear of the base.
-
Page 12: Operation
3. Select “Routine” or “Pulse”. M1.2.LD3P.NLFREN - 05122017 4. Set temperature and time according to the requirements of paint being cured. The display will show data. Pulse curing helps to achieve more lustrous results. 5. To achieve the best curing result, the lamp should be parallel with the paint surface. - Page 13 6. Troubleshooting M1.2.LD3P.NLFREN - 05122017 2. Lamp Tube Replacement 1. Prepare cassette for replace 6 Troubleshooting Problem Cause Solution Lamp tube does not work Lamp tube damaged Check lamp tube Lamp tube not plugged in Check connections SCR damaged Check SCR...
-
Page 14: Exploded View
M1.2.LD3P.NLFREN - 05122017 8 Onderdelen 8 Pièces détachées 8 Spare parts 7. Exploded View Name Name Name Name Upright post Connecting axle U-type base Cover plate (upper) Top cover Connector (right) Back wheel Circuit board Plastic band Handle Cover plate (lower) - Page 15 M1.2.LD3P.NLFREN - 05122017 9 Schakelschema 9 Schéma électrique 9 Circuit diagram Po w er Sw itc h AC 220V AC 230V Control Trans form ers Page 9...
- Page 16 M1.2.LD3P.NLFREN - 05122017 10 EG conformiteitsverklaring 10 Déclaration de conformité CE 10 EC declaration of conformity Fabrikant/Invoerder Vynckier Tools sa Fabricant/Importateur Avenue Patrick Wagnon, 7 Manufacturer/Retailer ZAEM de Haureu B-7700 Mouscron Verklaart hierbij dat het volgende product : Déclare par la présente que le produit suivant :...
Need help?
Do you have a question about the LD3P and is the answer not in the manual?
Questions and answers