Advertisement
Quick Links
Advertisement

Subscribe to Our Youtube Channel
Related Manuals for Perform Better PB EXTREME 6453

Summary of Contents for Perform Better PB EXTREME 6453
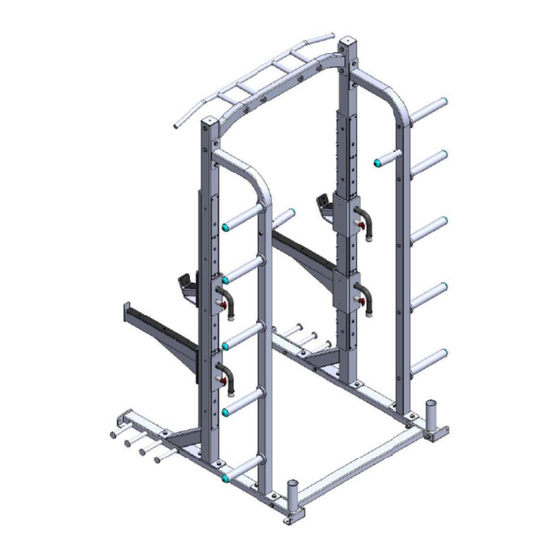
- Page 1 PB E EXTRE HALF F RAC C K DEL:6 6453 SSEM M BLY INSTR RUCT TIONS ...
- Page 2 Copyright 2014. By Perform Better. All rights reserved, including those to reproduce this book or parts thereof in any form without first obtaining written permission from Perform Better. Every effort has been made to keep this information current; however, periodically, changes are made to the information herein, and these changes will be incorporated into new editions of this publication.
-
Page 3: Table Of Contents
TABLE OF CONTENTS • SAFETY INSTRUCTIONS / WARNINGS • EXERCISE GUIDELINES • MAINTENANCE AND SERVICE • WARRANTY COVERAGE • INSTALLATION INSTRUCTIONS • LABEL • HARDWARE page3 ... -
Page 4: Safety Instructions / Warnings
1. Do not use the Half Rack in any way other than designed or intended by the manufacturer. It is imperative that the Half Rack as well as any other PERFORM BETTER STRENGTH equipment is used properly to avoid injury. - Page 5 PERFORM BETTER piece of equipment from service until the repair is made. 24. Make sure that all users are properly trained on how to use the PERFORM BETTER equipment. 25. Make sure there is enough room for safe access and operation of the PERFORM BETTER equipment.
-
Page 6: Exercise Guidelines
Also, be certain that all the stickers (safety, instructional and/or other) are read and understood by each user. All users should be instructed on the proper use of PERFORM BETTER as well as those ● actions that should be avoided. -
Page 7: Maintenance And Service
MAINTENANCE AND SERVICE The Half Rack requires very little upkeep to keep your Half Rack performing at its best, the following guidelines are suggested. GENERAL CLEANING Wipe the Half Rack with a light all-purpose cleaner, such as diluted Simple Green at a ●... -
Page 8: Warranty Coverage
Perform Better Warranty Coverage Perform Better commercial exercise equipment is warranted to be free of all defects in material and workmanship. Perform Better warrants all structural frameworks for a period of 10 years. This limited warranty on structural frame does not include coatings. The following moving parts are warranted for 5 years;... - Page 9 Changes in warranty that are not authorized No one is authorized to change, modify or extend the terms of this limited warranty. How to get parts and service Contact Perform Better Customer Support Services Monday through Friday from 8:00 a.m. to 5:00 p.m. Eastern Standard Time.
-
Page 10: Installation Instructions
NSTAL LATION N INS TRUCT TIONS REQUIRED TO OOLS: • 16mm Box / O Open-End Wre enches ………. ……..1 • 18m mm Box / Open- -End Wrenches s ……………… …2 • 4mm Hex Ke ey Wrenches … ……………….… ………..1 • 6mm m Hex Key Wre enches ………... - Page 11 ASSEMBLY AND SETUP PARTS AND MATERIALS The following parts are included with the PERFORM BETTER HALF RACK: Item Description Qty. Item Description Qty. Lower Cross Beam Safety Spot Left Arm Base Frame Left Bar Holder Right Base Frame Right...
- Page 12 ASSEMB NOTE: TAKE E CARE WH HILE OPENI NG THE BO OXES. KEEP P TRACK OF F ALL ITEM S YOU REM MOVE FROMTHE B BOXES. TAK KE CARE N OT TO LAY ITEMS ON SURFACES S THAT MAY Y SCRATCH H THE PRODUCT.
- Page 13 Step#3–As ssembly W eight Horn n and Acce essory Bar r to Uprigh t Rear 1. Insert th he weight H Horn (9) int Assy1 1 the Upri ight Frame e Rear Righ (7), usin g one wash her (20), on Hex Hea ad Screw ( (23).
- Page 14 Step#4–As ssemble As ssy1&2 to Upright 1. Install t the Assy1 to the Upright Frame R Right(5), using t two washe ers(19), two Hex x Head Scr rew(22). At this time, ali gn the drilled h holes in the e Assy1 with the e mating h...
- Page 15 Step#6 – A Assemble B Bar Holder & Safety S Spot Arm t to Upright 1. Grab the e Bar Hold er Right (1 6) with both ha nds, one o on the hand dle and another one on the e pull pin.
-
Page 16: Label
Step7-Fina al Assembl e Check S heet 1. Make su ure ALL Fas steners are e tightened to specifica ations is this s manual. 2. See Mai intenance a and Service e page. 1. P Perform all s steps ARNING! Before us sing this pr... - Page 17 LABE 300*13m 115*60m page17 ...
-
Page 18: Hardware
HAR DWAR R E page18 ... - Page 19 ...
- Page 20 ...
Need help?
Do you have a question about the PB EXTREME 6453 and is the answer not in the manual?
Questions and answers