Table of Contents
Advertisement
Owner's Manual &
Safety Instructions
Model
HE0511
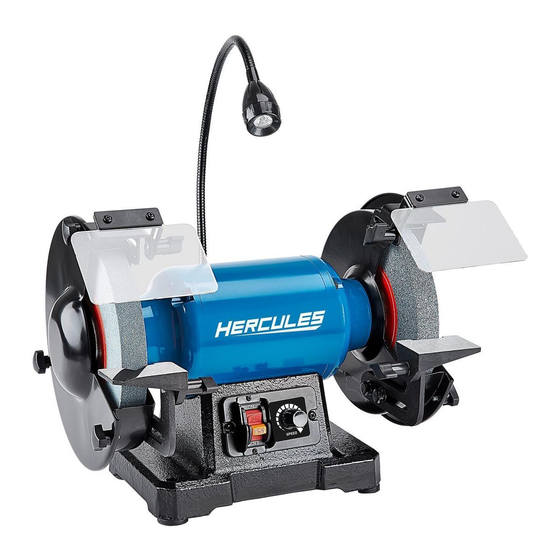
8" 5 Amp Variable Speed Bench Grinder with Worklight
WARNING: To prevent serious injury, User must read and
understand Owner's Manual. SAVE THIS MANUAL.
When unpacking, make sure that the product is intact and
undamaged. If any parts are missing or broken, please call
1-888-866-5797 as soon as possible. Reference 57285.
Advertisement
Table of Contents

Related Manuals for Hercules HE0511


Summary of Contents for Hercules HE0511
- Page 1 Owner’s Manual & Safety Instructions Model HE0511 8″ 5 Amp Variable Speed Bench Grinder with Worklight WARNING: To prevent serious injury, User must read and understand Owner’s Manual. SAVE THIS MANUAL. When unpacking, make sure that the product is intact and undamaged.
-
Page 2: Important Safety Information
IMPORTANT SAFETY INFORMATION GENERAL POWER TOOL SAFETY WARNINGS 10. WEAR PROPER APPAREL. Do not wear loose clothing, gloves, neckties, rings, bracelets, or other jewelry which may get caught in moving Read all safety warnings and all instructions. parts. Nonslip footwear is recommended. Failure to follow the warnings and instructions may Wear protective hair covering to contain long hair. - Page 3 7. This tool is intended for use on a circuit that has GROUNDING an outlet that looks like the one illustrated above in 125 VAC 3-Prong Plug and Outlet. The tool has a grounding plug that looks like the plug illustrated above in 125 VAC 3-Prong Plug and Outlet.
-
Page 4: Vibration Safety
19. Avoid unintentional starting. Specifications Prepare to begin work before turning on the tool. 20. People with pacemakers should consult their Electrical Rating 120 V AC / 60 H z / 5A physician(s) before use. Electromagnetic fields in No Load Speed 2,000 - 3,400 RPM close proximity to heart pacemaker could cause pacemaker interference or pacemaker failure. -
Page 5: Functional Description
2. Install Right Work Rest (64) to the Right Work Functional Description Rest Support using Washer (54) and a Work Rest Locking Knob (65). See below. Work Rest (64) Work Rest Support Washer (54) Locking Knob (65) 3. Install Left Work Rest Support (68) to the Left Inner Wheel Guard (39). -
Page 6: Workpiece And Work Area Set Up
2. Loosen each Eye Shield Locking Knob and move WARNING: To prevent serious injury, both Eye Shields up to access the Work Rests. gaskets must be used for all grinding wheels they are provided with. Gaskets 3. Remove the Wheel Cover Locking Knobs (36) help prevent grinding wheel damage and holding Wheel Covers (19, 34) to the Bench Grinder. -
Page 7: Maintenance And Servicing
Cleaning, Maintenance, MAINTENANCE AND SERVICING and Lubrication Procedures not specifically explained 1. BEFORE EACH USE, inspect the general in this manual must be performed condition of the tool. Check for: only by a qualified technician. • loose hardware • misalignment or binding of moving parts •... -
Page 8: Troubleshooting
Troubleshooting Problem Possible Causes Likely Solutions Tool will not start. 1. Cord not connected. 1. Check that cord is plugged in. 2. No power at outlet. 2. Check power at outlet. If outlet is unpowered, turn off tool and check circuit breaker. If breaker is tripped, make sure circuit is right capacity for tool and circuit has no other loads. - Page 9 Record Product’s Serial Number Here: Note: If product has no serial number, record month and year of purchase instead. Note: Replacement parts are not available. Item 57285 For technical questions, please call 1-888-866-5797. Page 9...
-
Page 10: Parts List And Diagram
PARTS LIST AND DIAGRAM Parts List Part Description Part Description Phillips Screw + Flat Washer Lead Wire Bushing Rubber Feet Left Inner Wheel Guard Base Cover Phillips Screw + Flat Washer Circuit Board Left End Cover Phillips Tapping Screw Wave Type Spring Washer Circuit Board Cover Deep Groove Ball Bearing Hex Bolt +Spring Washer... - Page 11 Diagram Item 57285 For technical questions, please call 1-888-866-5797. Page 11...
-
Page 12: Limited 90-Day Warranty
LIMITED 90 DAY WARRANTY Harbor Freight Tools Co. makes every effort to assure that its products meet high quality and durability standards, and warrants to the original purchaser that this product is free from defects in materials and workmanship for the period of 90 days from the date of purchase. This warranty does not apply to damage due directly or indirectly, to misuse, abuse, negligence or accidents, repairs or alterations outside our facilities, criminal activity, improper installation, normal wear and tear, or to lack of maintenance.
Need help?
Do you have a question about the HE0511 and is the answer not in the manual?
Questions and answers
I purchased the Hercules bench grinder #HEI511 and it did not come with bench rests for both sides nor any of the parts and I need them