Advertisement
Advertisement

Subscribe to Our Youtube Channel
Related Manuals for Axair MIAP V2


Summary of Contents for Axair MIAP V2
- Page 1 Mini Autopilot MANUAL MIAP V3-V5 MIAP V2-V5 MANUAL...
-
Page 2: Table Of Contents
Contents INTRODUCTION ................3 CONNECTIONS ................. 4 BUTTON AND SWITCHES ..............4 SOFTWARE ..................5 ASSIGNMENT EXAMPLES ..............6 Warnings and notes: ............... 13 Troubleshooting: ................13 MIAP V2-V5 MANUAL... -
Page 3: Introduction
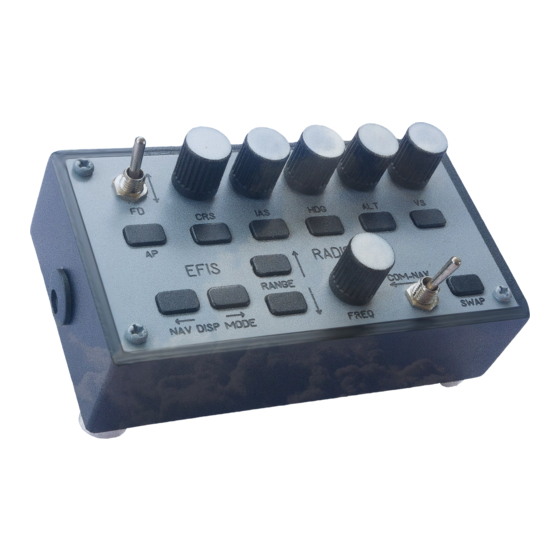
The text on the front panel shows the most commonly used Autopilot, EFIS/SIM, and Radio functions where a rotary is required to select the value in the cockpit. Not all functions might be available in the software package the user has chosen. Figure 1: MIAP Panel layout MIAP V2-V5 MANUAL... -
Page 4: Connections
The Toggle switches can be used to switch function on and off but also to switch to different functionality of the rotary and momentary buttons. Technical note: The switches are hardware connected via shift registers to minimize possible switch ghosting. MIAP V2-V5 MANUAL... -
Page 5: Software
FS2020 is or will be the most commonly used flight simulator software for the near future. If you would however need help assigning buttons and switches under other flight simulator packages visit the AXAIR website and YouTube channel to find instructional videos. -
Page 6: Assignment Examples
The MIAP unit is assigned as shown in the picture which corresponds to the numbers showing up at the FS2020 control setting panel. This picture can bse used as a reference for setting up the MIAP for all software. Figure 2: MIAP game controller hardware assignment MIAP V2-V5 MANUAL... - Page 7 Step 2: You can now create a new profile or start assigning directly which in turn will create a new profile automatically. Several profiles for different aircraft configurations can be made. MIAP V2-V5 MANUAL...
- Page 8 Click on the box with the text ‘START SCANNING’. The box will grey out and is waiting for input from the MIAP. Click on the corresponding MIAP button, in this case, press swiftly on the top of the rotary button with the HDG text. Press VALIDATE after Nr 15 has appeared. MIAP V2-V5 MANUAL...
- Page 9 Step 5: Assign all buttons and rotaries in a similar manner following the steps as before. Step 6 describes how to assign multiple button and switch selections to one single function. MIAP V2-V5 MANUAL...
- Page 10 Click on the first small dark grey rectangle. On the MIAP make sure not COM but NAV is selected. Once you click on START SCANNING again move the toggle switch to COM and thereafter press the SWAP button. Note that now the 2 corresponding hardware button numbers show up. MIAP V2-V5 MANUAL...
- Page 11 Khz we will use a combination of 3 buttons, this time button 18 built in the frequency knob. The button has a toggle function in contrary to all other rotary knob buttons which have momentary switch functionality. MIAP V2-V5 MANUAL...
- Page 12 Use Figure 2. As reference. DON’T FORGET TO SAVE YOUR PROFILE! Test the functionality or change it accordingly after you started a flight in the aircraft you assigned the MIAP for. MIAP V2-V5 MANUAL...
-
Page 13: Warnings And Notes
-In case you connect external power to the unit and the device disconnects from the PC, your adapter is not stable enough. Please contact AXAIR in this case. -If your simulator software does not detect the MIAP check if the hardware is detected under Windows 10 by clicking on the windows logo and typing joystick.
Need help?
Do you have a question about the MIAP V2 and is the answer not in the manual?
Questions and answers