Advertisement
Available languages
Available languages
Quick Links
Advertisement

Related Manuals for Baby Jogger City Sway


Summary of Contents for Baby Jogger City Sway
- Page 1 ASSEMBLY INSTRUCTIONS babyjogger.com INSTRUCCIONES PARA EL ENSAMBLAJE ©2019 NWL0001006858A 9/19 IMPORTANT: Read carefully and keep for future reference. Your child’ s safety may be affected if you do not follow these instructions.
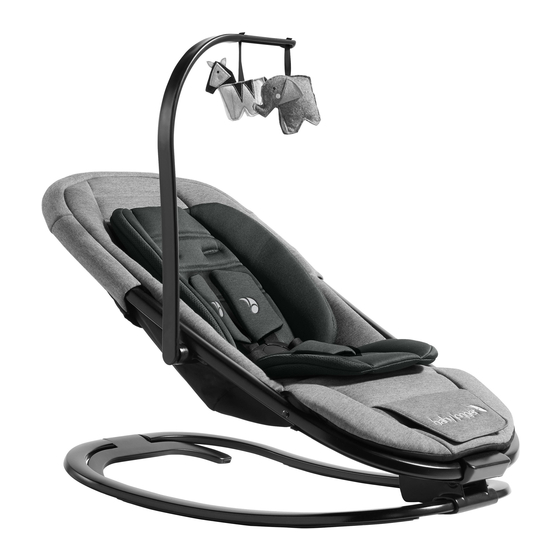
- Page 2 Features Toy Bar Vibration Unit Cover Toys (Styles may vary) Frame Infant Body Support Recline Button Harness Fold Button Crotch Strap Pad Vibration Unit Kickstand Leg Support Buttons Leg Support...
- Page 3 CLICK...
- Page 4 CLICK C-3 steps CLICK! ¡CLIC!
- Page 5 CLICK! ¡CLIC! CLICK! ¡CLIC! HIGH ALTO BAJO EMPIECE...
- Page 6 APAGUE...
- Page 11 WARNING Prevent serious injury or death: Failure • Only use the most reclined position for to follow these warnings and the infants under 4 months. instructions could result in serious injury • The upright position is only for children or death. who have developed enough upper •...
- Page 12 WARNING This Class B digital apparatus meets all Changes or modifications to this unit requirements of the Canadian not expressly approved by the party Interference-Causing Equipment responsible for compliance could void Regulations. CAN ICES-3 (B) /NMB-3 the user authority to operate the (B).
- Page 13 ASSEMBLING THE SEAT ADJUSTING HARNESS 1 Remove the product from the 13 To tighten harness pinch the box and place upright on the crotch buckle. Pull the front strap frame. below the clip to tighten strap. 2 Press the button on the back of 14 To loosen the harness, pinch the the seat to raise the seat from crotch buckle and hold the strap...
- Page 14 27 Remove infant body support 44 Snap the two snaps under the leg REPLACING INFANT BODY support. SUPPORT 45 Snap two snaps on the base of 28 Pull crotch buckle through the the seat pad. infant body support. 46 Pull the leg support fabric around 29 Slide the buckle cover over the the corners of the vibration unit.
-
Page 15: Care And Maintenance
• Do not press, iron, dry clean, tumble dry or wring the fabric. • If the seat pads need to be replaced, only use parts from a Baby Jogger Authorized Dealer. They are the only ones that are guaranteed to have been safety tested and designed to fit this seat. -
Page 16: Register Your Product Online At
Baby Jogger’ s Limited Lifetime Warranty: Baby Jogger warrants that the frame is free of manufacturer defects for the lifetime of the product. Manufacturer’ s defects include but are not limited to the breaking of welds and frame tube damage. Textile or soft side materials and all other components shall be warranted for one year from the date of purchase. - Page 17 Características Barra de juguetes Funda de la unidad de vibración Juguetes (los estilos pueden variar) Armazón Soporte para el cuerpo infantil Botón de reclinación del asiento Arnés Botón de pliegue Almohadilla para la correa de la Unidad de vibración entrepierna Pie de apoyo Botón del soporte para las piernas Soporte para las piernas...
- Page 18 ADVERTENCIA Prevenga las lesiones graves o la • DEJE de usar el producto cuando el muerte: no seguir estas advertencias y bebé comience a tratar de sentarse las instrucciones podría resultar en o pese 20 libras, lo que ocurra lesiones graves o muerte. primero.
- Page 19 PARA UN USO SEGURO DE LAS PILAS: Este dispositivo cumple con la Parte Mantenga las pilas lejos del alcance 15 de las normas FCC del Código de los niños. Federal de Regulaciones (Federal Code Of Regulation, CFR). El funcionamiento Cualquier pila puede perder ácido si está...
- Page 20 Este aparato digital Clase B cumple todos los requisitos de las Reglamentaciones Canadienses de Equipamientos que Causan Interferencias. CAN ICES-3 (B) / NMB-3 (B).
- Page 21 CÓMO ENSAMBLAR EL ASIENTO 11 Inserte el arnés conectado y las hebillas de las correas laterales 1 Retire el producto de la caja en los costados de la hebilla de la y póngalo en posición vertical entrepierna. apoyándolo en el armazón. 12 Presione el botón en la hebilla de 2 Presione el botón de la parte la entrepierna para liberarlo.
- Page 22 37 Tire de la tela para sacarla del 21 Baje el asiento hasta la posición armazón y deslícela fuera de los más baja para el modo de canales. almacenamiento. CÓMO REEMPLAZAR LA CÓMO RETIRAR EL SOPORTE ALMOHADILLA DEL ASIENTO PARA EL CUERPO INFATIL 38 Asegúrese de que las correas 22 Abra los clips del arnés.
-
Page 23: Cuidado Y Mantenimiento
CUIDADO Y MANTENIMIENTO Para preservar la longevidad de su ALMACENAMIENTO producto es importante realizar tareas • NO lo guarde al aire libre. periódicas simples de mantenimiento. • Guarde siempre el producto en un De vez en cuando, asegúrese de que las ambiente seco. - Page 24 Garantía limitada de por vida de Baby Jogger: Baby Jogger garantiza que el armazón no tiene defectos de fabricación durante toda la vida del producto. Los defectos de fabricación incluyen pero no se limitan a la rotura de soldaduras y daños a los tubos del armazón. Los materiales textiles o blandos del costado y todos los otros componentes están garantizados por un año desde la fecha de compra.
- Page 28 Baby Jogger, LLC 6655 Peachtree-Dunwoody Rd. NE • Atlanta, GA 30328...
Need help?
Do you have a question about the City Sway and is the answer not in the manual?
Questions and answers