Table of Contents
Advertisement
Available languages
Available languages
Item #A2422
Model #1005129161
USE AND CARE GUIDE
DUAL FLUSH VALVE KIT
Questions, problems, missing parts? Before returning to the store,
call Everbilt Customer Service
8 a.m. - 7 p.m., EST, Monday - Friday, 9 a.m. - 6 p.m., EST, Saturday
1-800-305-1726
HOMEDEPOT.COM
THANK YOU
flush kit
create quality
products designed to enhance your hom
e. Visit us online to see our full line of products available for your home impr ovement needs.
Thank you for choosing Everbilt!
Advertisement
Table of Contents

Subscribe to Our Youtube Channel
Summary of Contents for Everbilt 1005129161
- Page 1 8 a.m. - 7 p.m., EST, Monday - Friday, 9 a.m. - 6 p.m., EST, Saturday 1-800-305-1726 HOMEDEPOT.COM THANK YOU flush kit create quality products designed to enhance your hom e. Visit us online to see our full line of products available for your home impr ovement needs. Thank you for choosing Everbilt!
- Page 2 HOMEDEPOT.COM GRACIAS Apreciamos la confianza que ha depositado en Everbilt a través de la compra de este kit de descarga. Nos esforzamos por crear continuamente productos de calidad diseñados para mejorar su hogar. Visítenos en línea para ver nuestra línea completa de productos disponibles para sus necesidades de...
-
Page 3: Table Of Contents
Table of Contents Table of Contents ............2 Safety Information ............2 Warranty ................ 3 Pre-installation ..............4 Tools needed ..............4 Package contents ............5 Installation ..............6 Maintenance ..............12 Troubleshooting ............13 Service Parts ..............14 Safety Information For your safety and to ensure the best use of company, such as glass glue, for the... - Page 4 Tabla de contenido Tabla de contenido ..............2 Información de seguridad ............2 Garantía ................. 3 Antes de la instalaciόn ..............4 Herramientas necesarias ............4 Contenido del paquete .............. 5 Instalación ................6 Mantenimiento ................12 Resolución de problemas ............13 Piezas de repuesto ..............14 Información de seguridad Por su seguridad y para garantizar el mejor uso de empresa, como cola de vidrio, para Ia...
-
Page 5: Warranty
Warranty LIMITED THREE-YEARS EXPRESS WARRANTY Subject to the “Exclusions” set forth below, the manufacturer promises to the consumer to repair, or replace any part of this plumbing product which proves to be defective in workmanship or materials under normal use for three years from the date of purchase. All costs of removal, transportation and reinstallation to obtain warranty service shall be paid by the consumer. - Page 6 Garantía GARANTÍA EXPRESA LIMITADA DE TRES AÑOS Sujeto a las "Exclusiones" establecidas a continuación, el fabricante promete al consumidor reparar, o reemplazar cualquier parte de este producto de plomería que demuestre ser defectuoso en mano de obra o materiales bajo uso normal durante tres años a partir de la fecha de compra. Los costos de traslado, transporte y la reinstalación para obtener el servicio de garantía correrá...
-
Page 7: Pre-Installation
Pre-installation TOOLS REQUIRED Towel Pencil Sponge Ruler Wrench Diagonal pliers HARDWARE INCLUDED NOTE: Hardware not shown to actual size. Part Description Quantity Bolt Rubber gasket Flat gasket Gasket... - Page 8 Antes de la instalación HERRAMIENTAS NECESARIAS Toalla Lapiz Esponja Metro Llave Inglesa Alicates diagonales Herraje incluido Nota: Las piezas no se muestran en su tamaño real Pieza Descripción Cantidad Tornillo Arandela plástica Arandela plana Junta Tuerca...
-
Page 9: Package Contents
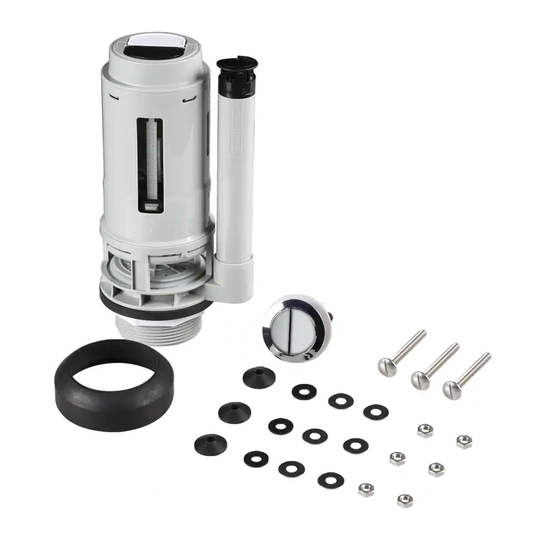
Pre-installation PACKAGE CONTENTS Part Description Quantity Flush valve Push button Bolt Gasket HOMEDEPOT.COM Please contact 1-800-305-1726 for further assistance. -
Page 10: Antes De La Instalaciόn
Antes de la instalación CONTENIDO DEL PAQUETE Pieza Descripción Cantidad Válvula de descarga Botón de descarga Tornillos de fijación Junta Por favor, comuníquese al 1-800-305-1726 para recibir asistencia adicional. - Page 11 Installation Marking water levels A. Remove the water tank lid and mark the water level with a pencil. B. Turn off water supply switch and press the half-flush button. When flush finishes, mark the residual water level of the half flush. C.
-
Page 12: Instalación
Instalación MARCAR LOS NIVELES DE AGUA A. Retire la tapa del tanque de agua y marque el nivel del agua con un lápiz. B. Cierre la llave de suministro de agua y presione el botón de media descarga. Cuando termine la descarga, marque el nivel de agua residual en el tanque con el lápiz. C. - Page 13 Installation (continued) Removing the water tank A. Use a screwdriver or open-end wrench to loosen the connection bolts between the water tank and bowl, and remove the connection bolts. B. Remove the water tank and pl ace it in the prepared flat position. C.
- Page 14 Instalación (Continuación) Retirar el tanque de agua. A. Use un destornillador o una llave inglesa para aflojar los pernos de conexión entre el tanque de agua y taza de WC, y retire los pernos de conexión. B. Retire el tanque de agua y colóquelo en la posición plana preparada. C.
- Page 15 Installation (continued) Installing the flush valve A. Put the base (A2) into the installation hole of the tank and adjust overflow pipe (A4) position. Make sure that the position of the overflow pipe is consistent with the direction observed in 2B (please make sure that the overflow pipe and the base do not touch the inner wall of the water tank and other water parts when adjusting).
- Page 16 Instalación (Continuación) Instalar la válvula de descarga A. Coloque la base (A2) en el orificio de instalación del tanque y ajuste la posición del tubo de desagüe (A4). Asegúrese de que la posición de la tubería de desagüe sea coherente con la dirección observada en 2B (por favor asegúrese de que la tubería de desagüe y la base no toquen la pared interna del tanque de agua y otras piezas de agua al ajustar).
- Page 17 Installation (continued) Adjust the flush volume of the flush valve A. Half flush volume adjustment: Adjust the half float up and down while pressing the clip. Decrease half flush volume by moving half float upward and increase half flush volume by moving half float downward.
- Page 18 Instalación (Continuación) Ajustar el volumen de descarga A. Ajuste del volumen de media descarga: ajuste la mitad del flotador hacia arriba y hacia abajo mientras presiona el clip. Disminuya el volumen de descarga moviendo la mitad del flotador hacia arriba y aumente el volumen de descarga media moviendo la mitad del flotador hacia abajo.
- Page 19 Installation (continued) Installing the push button A. Remove the mounting nut (B4). B. Put the push button (B) into the mounting hole on the water tank lid and pre-tighten the mounting nut (B4). C. Adjust the position of the buttons to ensure that the half push rod falls on the valve body's half flush button, and the full push rod falls on the valve body's full flush button.
- Page 20 Instalación (Continuación) Instalar el botón de descarga A. Retire la tuerca de montaje (B4). B. Coloque el botón (B) en el orificio de montaje en la tapa del tanque de agua y ajuste previamente el montaje de la tuerca (B4). C.
- Page 21 Installation (continued) D. Adjustment of push button function: Turn on the water supply, and after the water tank is filled with water, install the water tank lid. Lightly press the full and half push buttons (F≈3N). (Note: Lightly press full or half push buttons so that flush valve will not be activated for flushing). Measure the distance L4 that button is pressed down, and confirm that the value of L4 is between 2mm and 4mm.
- Page 22 Instalación (Continuación) D. Ajuste de la función del botón: Abra el suministro de agua y después de que el tanque de agua esté lleno de agua, instale la tapa del tanque de agua. Presione ligeramente los botones pulsadores completo y medio (F≈3N). (Nota: Presione ligeramente los botones completo o medio para que la válvula de descarga no se active).
- Page 23 Maintenance Replacement of seal 1) Turn off water supply and flush the toilet. 2) Remove the lid from the toilet tank - do NOT remove the button from the lid. 3) Note position of the half and full flush paddles on the top of the flush valve (Figure 1). 4) Holding the valve body, rotate the valve until it is possible to remove the valve body from the shank (Figure 2).
-
Page 24: Mantenimiento
Mantenimiento Sustitución de la membrana 1) Cierre el suministro de agua y descargue el inodoro. 2) Retire la tapa del tanque del inodoro - NO retire la culata de la tapa. 3) Observe la posición de las paletas de descarga media y completa en la parte superior de la válvula de descarga (Figura 1). - Page 25 Troubleshooting Basic Troubleshooting Methods If the flush valve is leaking, check the causes using the following probable causes and solutions: A. The refill tube is inserted too deep. Adjust the nozzle of refill tube to be higher than the WL. B.
-
Page 26: Resolución De Problemas
Resolución de problemas Métodos básicos de solución de problemas Si la válvula de descarga tiene fugas, verifique las causas utilizando las siguientes causas y soluciones probables: A. El tubo de recarga está insertado demasiado profundo. Ajuste la boquilla del tubo de recarga para que sea más alta que la WL. - Page 27 Service Parts Part Description Quantity Push button group Flush valve Connecting bolt group Rubber gasket...
-
Page 28: Piezas De Repuesto
Piezas de repuesto Pieza Descripción Cantidad Conjunto de botones pulsadores Válvula de descarga Conjunto de tornillos de fijación Junta de goma... - Page 29 INTENTIONALLY BLANK...
- Page 30 INTENTIONALLY BLANK...
- Page 31 Questions, problems, missing parts? Before returning to the store, call Everbilt Customer Service 8 a.m. - 7 p.m., EST, Monday-Friday, 9 a.m. - 6 p.m., EST, Saturday 1-800-305-1726 HOMEDEPOT.COM Retain this manual for future use.
- Page 32 ¿Preguntas, problemas, partes faltantes? Antes de regresar a la tienda, llame al Servicio al Cliente de Everbilt De 8 a.m. a 7 p.m., hora del este, de lunes a viernes, de 9 a.m. a 6 p.m., hora del este,los sábados 1-800-305-1726 HOMEDEPOT.COM...
Need help?
Do you have a question about the 1005129161 and is the answer not in the manual?
Questions and answers
The everbuilt dual flush has white and black tops the instructions are only black print and it does not indicate if the full flush is black or white. Is the full flush white?