Table of Contents
Advertisement
Advertisement
Table of Contents

Subscribe to Our Youtube Channel
Related Manuals for Disney DB3000-C


Summary of Contents for Disney DB3000-C
- Page 1 User’ s Guide BOOMBOX DB3000-C...
-
Page 2: Quick Reference
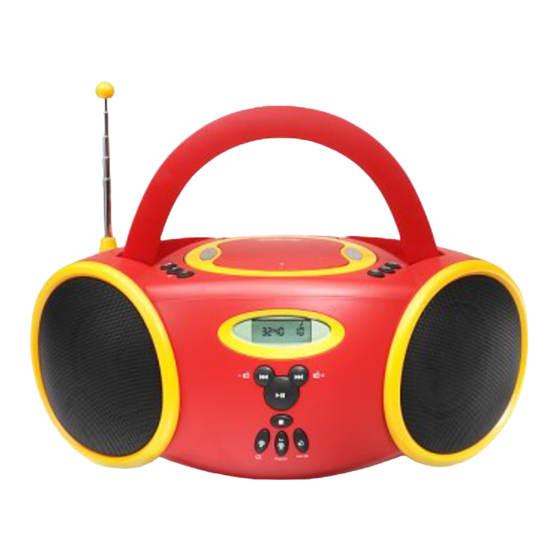
Advance track/Search CD/ Tune in a radio station Stops CD playback Increases radio preset/Selects CD repeat Sets the radio presets/Sets the CD program Disney Elements © Disney QUICK REFERENCE Select the desired EQ preset Adjusts the volume level Carrying Handle... -
Page 3: To Listen To The Radio
QUICK REFERENCE (CONTINUED) TO LISTEN TO THE RADIO: 1. Press the Power button to turn the unit on. 2. Press the Radio Band button to select radio and to select AM or FM. 3. If listening to FM, press the FM Mode button to select Stereo or Mono. 4. -
Page 4: Safety Precautions
DANGEROUS VOLTAGE: The lightning flash with arrowhead symbol, within an equilateral triangle is intended to alert the user to the presence of uninsulated dangerous voltage within the product’s enclosure that may be of sufficient magnitude to constitute a risk of electric shock to persons. ATTENTION: The exclamation point within an equilateral triangle is intended to alert the user to the presence of important operating and... -
Page 5: Surge Protectors
SAFETY PRECAUTIONS (CONTINUED) INFORMATION: This equipment has been tested and found to comply with the limits for a Class B digital device, pursuant to Part 15 of the FCC Rules. These limits are designed to provide reasonable protection against harmful interference in a residential installation. - Page 6 SAFETY PRECAUTIONS (CONTINUED) Once you have established a comfortable sound level: • Set the dial and leave it there. Taking a minute to do this now will help to prevent hearing damage or loss in the future. After all, we want you listening for a lifetime. We Want You Listening For A Lifetime Used wisely, your new sound equipment will provide a lifetime of fun and enjoyment.
-
Page 7: Important Safety Information
IMPORTANT SAFETY INFORMATION Before using the unit, be sure to read all operating instructions carefully. Please note that these are general precautions and may not pertain to your unit. For example, this unit may not have the capability to be connected to an outdoor antenna. - Page 8 IMPORTANT SAFETY INFORMATION (CONTINUED) 15. OVERLOADING Do not overload wall outlets and extension cords as this can result in a risk of fire or electric shock. 16. OBJECT AND LIQUID ENTRY Never push objects of any kind into this product through openings as they may touch dangerous voltage points or short out parts that could result in fire or electric shock.
-
Page 9: Location Of Controls
FM Rod Antenna Preset EQ Button Volume +/– Buttons Carrying Handle Display CD Open/Close Area Power Button Random Button FM Mode Button 10. Headphone Jack 11. Speaker LOCATION OF CONTROLS 12. Skip/Search/Tune ( 13. Stop ( ) Button 14. Battery Compartment (Bottom 15. -
Page 10: Power Sources
This unit is designed to operate on AC household current or DC (batteries). Use the AC polarized line cord included with the unit for operation on AC power. Insert one end of the AC line cord into the AC power jack on the rear of the unit and the other end (with the 2 blades) into a conveniently located AC outlet having 120V, 60Hz. -
Page 11: Operation
TO PLAY THE RADIO Press the Power button unit on. Press the Radio Band button to select radio and to select AM or If you press and hold the Skip/ Search/Tune ( or ( for one second, then release, the unit will automatically scan to the next broadcasting station. - Page 12 TO SET/RECALL THE RADIO PRESETS (12 AM and 20 FM) Press the Power button to turn the unit on and select a radio station as described on the previous page. Repeatedly press the Preset Up/CD Repeat button until the desired preset number appears in the display.
-
Page 13: To Insert And Play A Cd
TO INSERT AND PLAY A CD Press the Power button to turn the unit To play a disc from the beginning, press the Play/Pause ( Press the Play/Pause ( again to pause playback; the display will blink. CONTINUED ON THE NEXT PAGE OPERATION (CONTINUED) Open the CD compartment by pressing the CD Open/Close area. - Page 14 To skip forward or backward through the tracks on the disc, press the Skip/Search/Tune ( button. When the disc is through playing, it will stop rotating. Press the Stop ( ) button to stop the disc before it is finished. NOTES: •...
- Page 15 TO REPEATEDLY PLAY BACK ONE TRACK/ALL TRACKS Press the Power button to turn the unit on and insert a CD as described on page 12. TO REPEATEDLY PLAY BACK ONE TRACK: Press the Preset Up/CD Repeat button once, the blink and the unit will play the selected track over and over until the Stop ( ) button is pressed.
- Page 16 TO RANDOMLY PLAY BACK THE TRACKS Press the Power button to turn the unit on and insert a CD as described on page 12. Press the Random button once, the indicator will appear in the display and the unit will randomly play all the tracks on the CD.
- Page 17 TO PROGRAM THE MEMORY (UP TO 16 TRACKS) Press the Power button to turn the unit on and insert a CD as described on page 12. Press the Preset Set/CD Program button; “Pr:01” will appear in the display. CONTINUED ON THE NEXT PAGE OPERATION (CONTINUED) Press the Play/Pause ( / ) button to select CD and start playback, then...
- Page 18 Press the Preset Set/CD Program button again; the selected track has now been programmed and counted as program 1. Press the Play/Pause ( begin playback; the PROGRAM indicator will appear in the display and the tracks will play in the order programmed.
- Page 19 Caring for Compact Discs • Treat the compact disc carefully. Handle the compact disc only by its edges. Never allow your fingers to come in contact with the shiny, unprinted side of the compact disc. • Do not attach adhesive tape, stickers, etc. to the compact disc label.
-
Page 20: Troubleshooting Guide
Should this unit exhibit a problem, check the following before seeking service: Symptom Radio Noise or sound distorted on radio broadcasts. FM station not heard in stereo. AM or FM, no sound. Compact Disc Player CD Player will not play. CD skips while playing. - Page 21 General Power Source...AC 120V, 60Hz Batteries ...DC 12V (8 x 1.5V “C” size batteries) Alkaline recommended for longer life Speaker ...2 x 8 Ohms Radio Frequency Range (FM) ...87.9 to 107.9MHz Frequency Range (AM)...520 to 1710KHz Disc Diameter...4.72” (120mm) 3.15” (80mm) Single CD Optical Source ...Semiconductor Laser Specifications are subject to change without notice.
- Page 22 Please keep all packaging material for at least 90 days in case you need to return this product to your place of purchase or Memcorp. For parts and accessories, contact Fox International at 1-800-321-6993. Distributed by Memcorp Inc., Weston Fl Disney Elements © Disney 2003.
Need help?
Do you have a question about the DB3000-C and is the answer not in the manual?
Questions and answers